1.3.3
- 1. Castor XML - XML data binding
- 1.1. XML framework
- 1.2. XML Mapping
- 1.3. Configuring Castor XML (Un)Marshaller
- 1.4. Usage of Castor and XML parsers
- 1.5. XML configuration file
- 1.6. Castor XML - Tips & Tricks
- 1.7. Castor XML: Writing Custom FieldHandlers
- 1.8. Best practice
- 1.9. Castor XML - HOW-TO's
- 1.10. XML FAQ
- 1.10.1. General
- 1.10.1.1. How do I set the encoding?
- 1.10.1.2. I'm getting an error about 'xml' prefix already declared?
- 1.10.1.3. Why is my 'get' method called twice?
- 1.10.1.4. How can I speed up marshalling/unmarshalling performance?
- 1.10.1.5. How do I ignore elements during unmarshalling?
- 1.10.1.6. Where does Castor search for the castor.properties file?
- 1.10.1.7. Can I programmatically change the properties found in the castor.properties file?
- 1.10.2. Introspection
- 1.10.3. Mapping
- 1.10.4. Marshalling
- 1.10.5. Source code generation
- 1.10.6. Miscellaneous
- 1.10.7. Serialization
- 2. XML code generation
- 2.1. Why Castor XML code generator - Motivation
- 2.2. Introduction
- 2.3. Properties
- 2.3.1. Overview
- 2.3.2. Customization - Lookup mechanism
- 2.3.3. Detailed descriptions
- 2.3.3.1. org.exolab.castor.builder.javaVersion
- 2.3.3.2. org.exolab.castor.builder.javaVersion
- 2.3.3.3. org.exolab.castor.builder.boundproperties
- 2.3.3.4. org.exolab.castor.builder.javaclassmapping
- 2.3.3.5. org.exolab.castor.builder.superclass
- 2.3.3.6. org.exolab.castor.builder.nspackages
- 2.3.3.7. org.exolab.castor.builder.equalsmethod
- 2.3.3.8. org.exolab.castor.builder.useCycleBreaker
- 2.3.3.9. org.exolab.castor.builder.primitivetowrapper
- 2.3.3.10. org.exolab.castor.builder.automaticConflictResolution
- 2.3.3.11. org.exolab.castor.builder.extraCollectionMethods
- 2.3.3.12. org.exolab.castor.builder.jclassPrinterFactories
- 2.3.3.13. org.exolab.castor.builder.extraDocumentationMethods
- 2.4. Custom bindings
- 2.5. Invoking the XML code generator
- 2.6. XML schema support
- 2.7. Examples
- 3. Castor JDO
- 3.1. Castor JDO - An introduction
- 3.2. Castor JDO - First steps
- 3.3. Using Castor JDO
- 3.4. Castor JDO - Configuration
- 3.5. Type Support
- 3.6. Castor JDO Mapping
- 3.7. Castor JDO FAQ
- 3.7.1. Castor's relation to other specifications
- 3.7.2. XML related questions
- 3.7.3. Technical questions
- 3.7.3.1. Where can I find some examples to start with?
- 3.7.3.2. I have encountered problems using Sun JDBC-ODBC bridge with Castor...
- 3.7.3.3. My get-method for the Collection of dependent objects returns null. Why?
- 3.7.3.4. Should my JDO classes implement some special interface?
- 3.7.3.5. Can Castor automatically create/remove related objects?
- 3.7.3.6. Is Castor JDO using any connection pooling mechanism to improve the overall performance?
- 3.7.3.7. I am getting ClassNotFoundException for my JDO class, but it is in the class path. Why?
- 3.7.3.8. I am getting exception 'the class ... is not persistence capable...'. Why?
- 3.7.3.9. I call db.remove() on the dependent object and commit, but this doesn't work...
- 3.7.3.10. How should I represent string/date/boolean literals in OQL query?
- 3.7.3.11. I get 'java.lang.AbstractMethodError: getBigDecimal' for numeric fields. Why?
- 3.7.3.12. Does Castor support both one-way and two-way relationships?
- 3.7.3.13. I have an object that holds a relation to itself. Does Castor support this?
- 3.7.3.14. Why do I get an ObjectModifiedException when trying to commit a transaction?
- 3.7.3.15. I'm receiving a java.sql.SQLException: ORA-01461
- 3.7.4. Castor and performance caches
- 3.7.5. OQL
- 3.7.5.1. Is there any document available for Castor OQL?
- 3.7.5.2. The OQL document describes several phases of development. Which is the current phase?
- 3.7.5.3. Does Castor OQL support sub-queries?
- 3.7.5.4. I cannot get Castor OQL to join two objects for me. Is it supported?
- 3.7.5.5. Can I write a pass-thru OQL?
- 3.7.5.6. Does Castor OQL support struct?
- 3.7.5.7. How do I structure a query using the 'LIKE' expression?
- 3.7.5.8. Does Castor support the SQL 'IN' expression?
- 3.7.6. Features requests
- 3.7.7. Data model issues
- 3.7.8. Castor JDO design
- 3.7.9. Working with open source databases
- 3.7.10. RDBMS-specific issues
- 3.7.11. Castor & Logging
- 3.7.12. Lazy Loading related questions
- 3.7.12.1. How do I configure the JDO mapping to use the lazy loading feature for 1:1 relations?
- 3.7.12.2. Lazy loading for 1:1 relations and serialization
- 3.7.12.3. How do I configure the JDO mapping to use the lazy loading feature for 1:m and M:N relations?
- 3.7.12.4. I have modified my mapping to use lazy loading. Now I get the error 'no method to set value for field: com.xyz.ClassB in class: ClassMolder com.xyz.ClassA' or 'org.exolab.castor.jdo.DataObjectAccessException: no method to set value for field: com.xyz.ClassB in class: ClassMolder com.xyz.ClassA'. What am I doing wrong?
- 3.7.13. Tuning for LOBs
- 3.7.14. Database-specific issues
- 3.7.15. Changing database configurations
- 3.8. Castor JDO code samples
- 3.9. Castor JDO - How To's
- 3.9.1. Introduction
- 3.9.2. Documentation
- 3.9.3. Contribution
- 3.9.3.1. How to setup Castor project in eclipse
- 3.9.3.2. How to run Castor JDO's database independend unit tests
- 3.9.3.3. How to run Castor JDO's test suite
- 3.9.3.4. How to run Castor JDO's performance tests
- 3.9.3.5. Submitting a bug report
- 3.9.3.6. How to prepare a patch
- 3.9.3.7. How to Contribute a Patch via Jira
- 3.9.4. OQL
- 3.9.5. Core features
- 3.9.6. Cascading
- 3.9.7. Caches
- 3.9.8. Connection pooling
- 3.9.9. Use of Castor in J2EE applications
- 3.9.10. Database specifica
- 3.10. Castor JDO - Tips & Tricks
- 3.11. Castor JDO - Advanced features
- 3.12. Running the self-executable Castor JDO examples
- 4. Advanced JDO
- 4.1. Castor JDO - Caching
- 4.2. OQL to SQL translator
- 4.3. Transaction And Locking Modes
- 4.4. Castor Persistence Architecture
- 4.5. Castor JDO Key Generator Support
- 4.6. Castor JDO Long Transactions Support
- 4.7. Nested Attributes
- 4.8. Using Pooled Database Connections
- 4.9. Blobs in PostgreSQL
- 4.10. Castor JDO - Best practice
- 5. Castor JDO - Integration with Spring ORM
- 6. Castor JDO - Support for the JPA specification
- 6.1. JPA annotations - Motivation
- 6.2. Prerequisites and outline
- 6.3. Limitations and Basic Information
- 6.4. An outline of JPA-Annotations
- 6.5. Usage of JPA annotations - Configuration
- 6.5.1. HOW-TO persist a single class (@Entity, @Table, @Id)
- 6.5.2. HOW-TO persist a 1:1 relation (@OneToOne)
- 6.5.3. Persist one to many relation (@OnetoMany)
- 6.5.4. HOW-TO create and use a named query (@NamedQuery)
- 6.5.5. HOW-TO create and use multiple named queries (@NamedQueries)
- 6.5.6. HOW-TO create and use a named native query (@NamedNativeQuery)
- 6.5.7. HOW-TO create and use multiple named native queries (@NamedNativeQueries)
- 6.5.8. HOW-TO use persistence callbacks
- 6.5.9. HOW-TO use @Enumerated
- 6.5.10. HOW-TO use @Temporal
- 6.5.11. HOW-TO use @Lob
- 6.6. Integration with Spring ORM for Castor JDO
- 6.7. Castor JPA Extensions
- 7. DDL generator for Castor JDO
- 8. XML code generation - Extensions
Castor XML is an XML data binding framework. Unlike the two main XML APIs, DOM (Document Object Model) and SAX (Simple API for XML) which deal with the structure of an XML document, Castor enables you to deal with the data defined in an XML document through an object model which represents that data.
Castor XML can marshal almost any "bean-like" Java Object to and from XML. In most cases the marshalling framework uses a set of ClassDescriptors and FieldDescriptors to describe how an Object should be marshalled and unmarshalled from XML.
For those not familiar with the terms "marshal" and "unmarshal", it's simply the act of converting a stream (sequence of bytes) of data to and from an Object. The act of "marshalling" consists of converting an Object to a stream, and "unmarshalling" from a stream to an Object.
The XML data binding framework, as it's name implies, is
responsible for doing the conversion between Java and XML.
The framework consists of two worker classes,
org/exolab/castor/xml/Marshaller and
org.exolab.castor.xml.Unmarshaller
respectively, and a bootstrap class
org.exolab.castor.xml.XMLContext
used for configuration of the XML data binding framework and
instantiation of the two worker objects.
Lets walk through a very simple example. Assume we have a
simple
Person
class as follows:
import java.util.Date;

/** An simple person class */
public class Person implements java.io.Serializable {

   /** The name of the person */
   private String name = null;

   /** The Date of birth */
   private Date dob = null;

   /** Creates a Person with no name */
   public Person() {
      super();
   }

   /** Creates a Person with the given name */
   public Person(String name) { this.name = name; }

   /**
     * @return date of birth of the person
     */
   public Date getDateOfBirth() { return dob; }

   /**
     * @return name of the person
     */
   public String getName() { return name; }

   /**
     * Sets the date of birth of the person
     * @param name the name of the person
     */
   public void setDateOfBirth(Date dob) { this.dob = dob; }

   /**
     * Sets the name of the person
     * @param name the name of the person
     */
   public void setName(String name) { this.name = name; }
}
To (un-)marshal data to and from XML, Castor XML can be used in one of three modes:
introspection mode
mapping mode
descriptor mode (aka generation mode)
The following sections discuss each of these modes at a high level.
The introspection mode is the simplest mode to use from a user perspective, as it does not require any configuration from the user. As such, the user does not have to provide any mapping file(s), nor point Castor to any generated descriptor classes (as discussed in the 'descriptor mode' section).
In this mode, the user makes use of
static
methods on the
org.exolab.castor.xml.Marshaller and
org.exolab.castor.xml.Unmarshaller
classes, providing all required data as parameters on
these method calls.
To marshal an instance of the person class you simply
call the
org.exolab.castor.xml.Marshaller
as follows:
// Create a new Person
Person person = new Person("Ryan 'Mad Dog' Madden");
person.setDateOfBirth(new Date(1955, 8, 15));

// Create a File to marshal to
writer = new FileWriter("test.xml");

// Marshal the person object
Marshaller.marshal(person, writer);
This produces the XML shown in Example 1.1, “XML produced in introspection mode”
To unmarshal an instance of the person class from XML,
you simply call the
org.exolab.castor.xml.Unmarshaller
as follows:
// Create a Reader to the file to unmarshal from
reader = new FileReader("test.xml");

// Marshal the person object
Person person = (Person)
Unmarshaller.unmarshal(Person.class, reader);
Marshalling and unmarshalling is basically that simple.
![[Note]](images/admons/note.png) | Note |
|---|---|
Note: The above example uses the
static
methods of the marshalling framework, and as such no
Marshaller and/or Unmarshaller instances need to be
created. A common mistake in this context when using a
mapping file
is to call the
org.exolab.castor.xml.Marshaller or
org.exolab.castor.xml.Unmarshaller
as in the above example. This won't work, as the mapping
will be ignored.
|
In introspection mode , Castor XML uses Java reflection to establish the binding between the Java classes (and their properties) and the XML, following a set of (default) naming rules. Whilst it is possible to change to a different set of naming rules, there's no way to override this (default) naming for individual artifacts. In such a case, a mapping file should be used.
In mapping mode , the user provides Castor XML with a user-defined mapping (in form of a mapping file) that allows the (partial) definition of a customized mapping between Java classes (and their properties) and XML.
When you are using a mapping file, create an instance of the
org.exolab.castor.xml.XMLContext class and use the
org.exolab.castor.xml.XMLContext.addMapping(Mapping)
method to provide Castor XML with one of more mapping files.
To start using Castor XML for marshalling and/or unmarshalling based upon your custom mapping, create
instances of org.exolab.castor.xml.Marshaller and
org.exolab.castor.xml.Unmarshalleras needed using one of the following methods:
Table 1.1. Methods on XMLContext to create Un-/Marshaller objects
| Method name | Description |
|---|---|
|
Creates a Marshaller instance. | |
|
Creates a Unmarshaller instance. |
and call any of the non-static (un)marshal methods to trigger data binding in either way.
Below code shows a full example that demonstrates
unmarshalling a
Person
instance from XML using a
org.exolab.castor.xml.Unmarshaller
instance as obtained from an XMLContext previously
configured to your needs.
Example 1.2. Unmarshalling from XML using a mapping
import org.exolab.castor.xml.XMLContext; import
org.exolab.castor.mapping.Mapping; import
org.exolab.castor.xml.Unmarshaller;

// Load Mapping
Mapping mapping = new Mapping();
mapping.loadMapping("mapping.xml");


	// initialize and configure XMLContext

XMLContext context = new XMLContext();
context.addMapping(mapping);


	// Create a Reader to the file to unmarshal from

reader = new FileReader("test.xml");

// Create a new Unmarshaller
Unmarshaller unmarshaller =
context.createUnmarshaller();
unmarshaller.setClass(Person.class);

// Unmarshal the person object
Person person = (Person)
unmarshaller.unmarshal(reader);
To marshal the very same
Person
instance to XML using a
org.exolab.castor.xml.Marshaller
obtained from the
same
org.exolab.castor.xml.XMLContext,
use code as follows:
Example 1.3. Marshalling to XML using a mapping
import org.exolab.castor.xml.Marshaller;

// create a Writer to the file to marshal to
Writer writer = new FileWriter("out.xml");

// create a new Marshaller
Marshaller marshaller = context.createMarshaller();
marshaller.setWriter(writer);

// marshal the person object
marshaller.marshal(person);
Please have a look at XML Mapping for a detailed discussion of the mapping file and its structure.
For more information on how to effectively deal with loading mapping file(s) especially in multi-threaded environments, please check the best practice section.
Castor supports multiple sources and destinations from which objects can be marshalled and unmarshalled.
Table 1.2. Marshalling destinations.
| Destination | Description |
|---|---|
|
|
The character stream. |
|
|
The SAX document handler. |
|
|
The SAX content handler. |
|
|
The DOM node to marshall object into. |
|
|
The STaX cursor API. |
|
|
The STaX iterator API. |
|
|
|
Table 1.3. Unmarshalling sources.
| Source | Description |
|---|---|
|
|
A character stream. |
|
|
A SAX input source. |
|
|
A W3C DOM node which will be used for unmarshalling. |
|
|
A StAX cursor. |
|
|
A StAX iterator. |
|
|
Supports |
Castor 1.3.2 and 1.3.3 introduced support for the STaX API for both for marshalling and unmarshalling. The framework fully supports the STaX cursor and iterator API.
An example of marshalling using STaX:
Example 1.4. Marshalling to a StAX java.xml.stream.XMLStreamWriter
// marshalling using STaX
StringWriter writer = new StringWriter();
XMLOutputFactory outputFactory = XMLOutputFactory.newInstance();
XMLStreamWriter xmlStreamWriter = outputFactory.createXMLStreamWriter(writer);

marshaller.setXmlStreamWriter(xmlStreamWriter);
marshaller.marshal(object);
Also beginning from version 1.3.3, the framework has been modified to support Source and Result interfaces. Now it is possible to use SAXSource, DOMSource and StreamSource for unmarshalling and corresponding classes for marshalling.
Below an example of marshalling into Result:
Example 1.5. Marshalling to a javax.xml.transform.dom.DOMResult
// instance of object to be marshalled
Object obj = ...

// marshalling into DOM node
XMLContext xmlContext = ... // creates the xml context

// creates marshaller
Marshaller marshaller = xmlContext.createMarshaller();

// creates DOM factory
DocumentBuilderFactory factory = DocumentBuilderFactory.newInstance();
DocumentBuilder builder = factory.newDocumentBuilder();

// creates document
Document document = builder.newDocument();

// sets the DOM result for the marshaller
marshaller.setResult(new DOMResult(document));

// marshalls object
marshaller.marshall(obj);
Another example of unmarshalling from Source:
Example 1.6. Unmarshalling from a javax.xml.transform.sax.SAXSource
// unmarshalling from SAX InputSource
XMLContext xmlContext = ... // creates the xml context

// creates unmarshaller
Unmarshaller unmarshaller = xmlContext.createUnmarshaller();

// creates SAX input source
InputSource inputSource = new InputSource(new StringReader(xml));

// creates instance of SAXSource
SAXSource saxSource = new SAXSource(inputSource);

// unmarshalls object
Object result = unmarshaller.unmarshal(saxSource);
With Castor 1.1.2, the
org.exolab.castor.xml.XMLContext
class has been added to the Castor marshalling framework.
This new class provides a bootstrap mechanism for Castor
XML, and allows easy (and efficient) instantiation of
org.exolab.castor.xml.Marshaller
and
org.exolab.castor.xml.Unmarshaller
instances as needed.
As shown above, the
org.exolab.castor.xml.XMLContext
class offers various factory methods to obtain a new
org.exolab.castor.xml.Marshaller,
org.exolab.castor.xml.Unmarshaller.
When you need more than one
org.exolab.castor.xml.Unmarshaller
instance in your application, please call
org.exolab.castor.xml.XMLContext.createUnmarshaller()
as required. As all
Unmarshaller
instances are created from the very same
XMLContext
instance, overhead will be minimal. Please note, though,
that use of one
Unmarshaller
instance is not thread-safe.
Castor can marshal "almost" any arbitrary Object to and from XML. When descriptors are not available for a specfic Class, the marshalling framework uses reflection to gain information about the object.
| Note |
|---|---|
| Actually an in memory set of descriptors are created for the object and we will soon have a way for saving these descriptors as Java source, so that they may be modified and compiled with little effort. |
If a set of descriptors exist for the classes, then Castor will use those to gain information about how to handle the marshalling. See Section 1.1.6, “Class Descriptors” for more information.
There is one main restrictions to marshalling objects. These classes must have have a public default constructor (ie. a constructor with no arguments) and adequete "getter" and "setter" methods to be properly be marshalled and unmarshalled.
The example illustrated in the previous section Section 1.1.2, “Castor XML - The XML data binding framework” demonstrates how to use the framework with existing classes.
Class descriptors provide the "Castor Framework" with necessary information so that the Class can be marshalled properly. The class descriptors can be shared between the JDO and XML frameworks.
Class descriptors contain a set of ???
XML Class descriptors provide the marshalling framework with
the information it needs about a class in order to be
marshalled to and from XML. The XMLClassDescriptor
org.exolab.castor.xml.XMLClassDescriptor.
XML Class Descriptors are created in four main ways. Two of these are basically run-time, and the other two are compile time.
To use "compile-time" class descriptors, one can
either implement the
org.exolab.castor.xml.XMLClassDescriptor
interface for each class which needs to be
"described", or have the
Source Code Generator
create the proper descriptors.
The main advantage of compile-time descriptors is that they are faster than the run-time approach.
To use "run-time" class descriptors, one can either simply let Castor introspect the classes, a mapping file can be provided, or a combination of both "default introspection" and a specified mapping file may be used.
For "default introspection" to work the class being introspected must have adequete setter/getter methods for each field of the class that should be marshalled and unmarshalled. If no getter/setter methods exist, Castor can handle direct field access to public fields. It does not do both at the same time. So if the respective class has any getter/setter methods at all, then no direct field access will take place.
There is nothing to do to enable "default introspection". If a descriptor cannot be found for a class, introspection occurs automatically.
Some behavior of the introspector may be controlled by setting the appropriate properties in the castor.properties file. Such behavior consists of changing the naming conventions, and whether primitive types are treated as attributes or elements. See castor.properties file for more information.
A mapping file may also be used to "describe" the
classes which are to be marshalled. The mapping is
loaded before any marshalling/unmarshalling takes
place. See
org.exolab.castor.mapping.Mapping
The main advantage of run-time descriptors is that it takes very little effort to get something working.
Castor XML mapping is a way to simplify the binding of java classes to XML document. It allows to transform the data contained in a java object model into/from an XML document.
Although it is possible to rely on Castor's default behavior to marshal and unmarshal Java objects into an XML document, it might be necessary to have more control over this behavior. For example, if a Java object model already exists, Castor XML Mapping can be used as a bridge between the XML document and that Java object model.
Castor allows one to specify some of its marshalling/unmarshalling behavior using a mapping file. This file gives explicit information to Castor on how a given XML document and a given set of Java objects relate to each other.
A Castor mapping file is a good way to dissociate the changes in the structure of a Java object model from the changes in the corresponding XML document format.
The mapping information is specified by an XML document. This document is written from the point of view of the Java object and describes how the properties of the object have to be translated into XML. One constraint for the mapping file is that Castor should be able to infer unambiguously from it how a given XML element/attribute has to be translated into the object model during unmarshalling.
The mapping file describes for each object how each of its fields have to be mapped into XML. A field is an abstraction for a property of an object. It can correspond directly to a public class variable or indirectly to a property via some accessor methods (setters and getters).
It is possible to use the mapping and Castor default behavior in conjunction: when Castor has to handle an object or an XML data but can't find information about it in the mapping file, it will rely on its default behavior. Castor will use the Java Reflection API to introspect the Java objects to determine what to do.
Note: Castor can't handle all possible mappings. In some complex cases, it may be necessary to rely on an XSL transformation in conjunction with Castor to adapt the XML document to a more friendly format.
For Castor, a Java class has to map into an XML element. When Castor marshals an object, it will:
use the mapping information, if any, to find the name of the element to create
or
by default, create a name using the name of the class
It will then use the fields information from the mapping file to determine how a given property of the object has to be translated into one and only one of the following:
an attribute
an element
text content
nothing, as we can choose to ignore a particular field
This process will be recursive: if Castor finds a property that has a class type specified elsewhere in the mapping file, it will use this information to marshal the object.
By default, if Castor finds no information for a given class in the mapping file, it will introspect the class and apply a set of default rules to guess the fields and marshal them. The default rules are as follows:
All primitive types, including the primitive type wrappers (Boolean, Short, etc...) are marshalled as attributes.
All other objects are marshalled as elements with either text content or element content.
When Castor finds an element while unmarshalling a document, it will try to use the mapping information to determine which object to instantiate. If no mapping information is present, Castor will use the name of the element to try to guess the name of a class to instantiate (for example, for an element named 'test-element', Castor will try to instantiate a class named 'TestElement' if no information is given in the mapping file). Castor will then use the field information of the mapping file to handle the content of the element.
If the class is not described in the mapping file, Castor will instrospect the class using the Java Reflection API to determine if there is any function of the form getXxxYyy()/setXxxYyy(<type> x). This accessor will be associated with XML element/attribute named 'xxx-yyy'. In the future, we will provide a way to override this default behavior.
Castor will introspect object variables and use direct access _only_ if no get/set methods have been found in the class. In this case, Castor will look for public variables of the form:
public <type> xxxYYY;
and expect an element/attribute named 'xxx-yyy'. The only handled collections for <type> are java.lang.Vector and array. (up to version 0.8.10)
For primitive <type>, Castor will look for an attribute first and then an element. If <type> is not a primitive type, Castor will look for an element first and then an attribute.
The following sections define the syntax for each of the mapping file artefacts and their semantical meaning.
This section defines a small domain model that will be referenced by
various mapping file (fragments/samples) in the following sections. The model consists
of two two classes Order and OrderItem, where an order
holds a list of order items.
public class Order {

    private List orderItems;
    private String orderNumber;

    public List getOrderItems() {
        return orderItems;
    }
    public void setOrderItems(List orderItems) {
        this.orderItems = orderItems;
    }
    public String getOrderNumber() {
        return orderNumber;
    }
    public void setOrderNumber(String orderNumber) {
        this.orderNumber = orderNumber;
    }
}

public class OrderItem {

    private String id;
    private Integer orderQuantity;

    public String getId() {
        return id;
    }
    public void setId(String id) {
        this.id = id;
    }
    public Integer getOrderQuantity() {
        return orderQuantity;
    }
    public void setOrderQuantity(Integer orderQuantity) {
        this.orderQuantity = orderQuantity;
    }
}
As shown above in bold, the Order instance has a (private) field 'orderItems'
to hold a collection of OrderItem instances. This field is publically exposed
by corresponding getter and setter methods.
<!ELEMENT mapping ( description?, include*, field-handler*, class*, key-generator* )>
The <mapping> element is the root element of a mapping file. It contains:
an optional description
zero or more <include> which facilitates reusing mapping files
zero of more <field-handler> defining custom, configurable field handlers
zero or more <class> descriptions: one for each class we intend to give mapping information
zero or more <key-generator>: not used for XML mapping
A mapping file look like this:
<?xml version="1.0"?>

<!DOCTYPE mapping PUBLIC "-//EXOLAB/Castor Mapping DTD Version 1.0//EN"
      castor.org
                         "http://castor.org/mapping.dtd">

<mapping>
	<description>Description of the mapping</description>

	<include href="other_mapping_file.xml"/>

	<!-- mapping for class 'A' -->
	<class name="A">
	        .........
	</class>

	<!-- mapping for class 'B' -->
	<class name="B">
	        .........
	</class>

</mapping>
<!ELEMENT class ( description?, cache-type?, map-to?, field+ )>
<!ATTLIST class
          name            ID       #REQUIRED
          extends         IDREF    #IMPLIED
          depends         IDREF    #IMPLIED
          auto-complete   ( true |false ) "false"
          identity        CDATA    #IMPLIED
          access          ( read-only | shared | exclusive | db-locked )  "shared"
          key-generator   IDREF    #IMPLIED >
The <class> element contains all the information used to
map a Java class into an XML document. The content of <class>
is mainly used to describe the fields that will be mapped.
Table 1.4. Description of the attributes
| Name | Description |
|---|---|
| name | The fuly-qualified name of the Java class that we want to map to. |
| extends | The fully qualified name of a parent class. This attribute should be used only if this class extends another class for which a class mapping is provided. It should not be used if there's no class maping for the extended class. |
| depends | Used with Castor JDO only; for more information on this field, please see the JDO documentation. |
| auto-complete | If true, the class will be introspected to determine its field and the fields specified in the mapping file will be used to overide the fields found during the introspection. |
| identity | Used with Castor JDO only; for more information on this field, please see see the JDO documentation. |
| access | Used with Castor JDO only; for more information on this field, please see see the JDO documentation. |
| key-generator | Used with Castor JDO only; for more information on this field, please see see the JDO documentation. |
The auto-complete attributes is interesting as it allow a fine degree of control of the introspector: it is possible to specifiy only the fields whose Castor default behavior does not suite our needs. These feature should simplify the handling of complexe class containing many fields. Please see below for an example usage of this attribute.
Table 1.5. Description of the content
| Name | Description |
|---|---|
| description | An optional description. |
| cache-type | Used with Castor JDO only; for more information on this field, please see see the JDO documentation. |
| map-to | Used if the name of the element is not the name of the class. By default, Castor will infer the name of the element to be mapped from the name of the class: a Java class named 'XxxYyy' will be transformed in 'xxx-yyy'. If you don't want Castor to generate the name, you need to use <map-to> to specify the name you want to use. <map-to> is only used for the root element. |
| field | Zero or more <field> elements, which are used to describe the properties of the Java class being mapped. |
The following mapping fragment defines a class mapping for the OrderItem
class:
<class name="mypackage.OrderItem>

   <map-to xml="item"/>

   <field name="id" type="string">
      <bind-xml name="identity" node="attribute"/>
   </field>

   </field name="orderQuantity" type="integer">
      <bind-xml name="quantity" node="element"/>
   </field>

</class>
When marshalling an OrderItem instance, this yields the
following XML:
<?xml version="1.0" ?>
<item identity="12">
   <quantity>100</quantity>
</item>
The following mapping fragment defines a class mapping for the same
class, where for all properties but id introspection should
be used; the use of the auto-complete attribute instructs Castor XML
to use introspection for all attributes other than 'id', where
the given field mapping will be used.
<class name="mypackage.OrderItem auto-complete="true">

   <map-to xml="item"/>

   <field name="id" type="string">
      <bind-xml name="identity" node="attribute"/>
   </field>

</class>
When marshalling the very same OrderItem instance, this yields the
following XML:
<?xml version="1.0" ?>
<item identity="12">
   <order-quantity>100</order-quantity>
</item>
By removing the <map-to> element from above class mapping, ...
<class name="mypackage.OrderItem auto-complete="true">

   <field name="id" type="string">
      <bind-xml name="identity" node="attribute"/>
   </field>

</class>
... Castor will use introspection to infer the element name from the Java
class name (OrderItem), applying a default naming convention scheme.
When marshalling the very same OrderItem instance, this yields the
following XML:
<?xml version="1.0" ?>
<order-item identity="12">
   <order-quantity>100</order-quantity>
</order-item>
<!ELEMENT map-to EMPTY>
<!ATTLIST map-to
          table               NMTOKEN  #IMPLIED
          xml                 NMTOKEN  #IMPLIED
          ns-uri              NMTOKEN  #IMPLIED
          ns-prefix           NMTOKEN  #IMPLIED
          ldap-dn             NMTOKEN  #IMPLIED
          element-definition  (true|false) "false"     NEW as of 1.0M3
          ldap-oc             NMTOKEN  #IMPLIED>
<map-to> is used to specify the name of the element that should
be associated with the given class. <map-to> is only used for
the root class. If this information is not present, Castor will:
for marshalling, infer the name of the element to be mapped from the name of the class: a Java class named 'XxxYyy' will be transformed into 'xxx-yyy'.
for unmarshalling, infer the name of the class from the name of the element: for an element named 'test-element' Castor will try to use a class named 'TestElement'
Please note that it is possible to change the naming scheme used by Castor
to translate between the XML name and the Java class name in the
castor.properties file.
Table 1.6. Description of attributes
| xml | Name of the element that the class is associated to. |
| ns-uri | Namespace URI |
| ns-prefix | Desired namespace |
| element-definition | True if the descriptor as created from a schema definition that
was of type element (as opposed to a <complexType> definition). This
only is useful in the context of source code generation. |
| ldap-dn | Not used for Castor XML |
| ldap-oc | Not used for Castor XML |
The following mapping fragment defines a <map-to element for the
OrderItem class, manually setting the element name to a value
of 'item'.
<class name="myPackage.OrderItem">
   ...
   <map-to xml="item" />
   ...
</class>
The following mapping fragment instructs Castor to assign a namespace URI of
http://castor.org/sample/mapping/ to the <item> element,
and use a namespace prefix of 'castor' during un-/marshalling.
<class name="myPackage.OrderItem">
   ...
   <map-to xml="item" ns-uri="http://castor.org/sample/mapping/"
           ns-prefix="castor"/>
   ...
</class>
When marshalling an OrderItem instance, this will yield the
following XML:
<?xml version="1.0" ?>
<castor:order-item xmlns:castor="http://castor.org/sample/mapping/" identity="12">
   <castor:order-quantity>100</castor:order-quantity>
</castor:order-item>
<!ELEMENT field ( description?, sql?, bind-xml?, ldap? )>
<!ATTLIST field
    name           NMTOKEN  #REQUIRED
    type           NMTOKEN  #IMPLIED
    handler        NMTOKEN  #IMPLIED
    required       ( true | false )  "false"
    direct         ( true | false )  "false"
    lazy           ( true | false )  "false"
    transient      ( true | false )  "false"
    nillable       ( true | false )  "false"
    container      ( true | false )  "false"
    get-method     NMTOKEN  #IMPLIED
    set-method     NMTOKEN  #IMPLIED
    create-method  NMTOKEN  #IMPLIED
    collection     ( array | vector | hashtable | collection | set | map )  #IMPLIED>
<field> is used to describe a property of a Java object
we want to marshal/unmarshal. It gives:
its identity ('name')
its type (infered from 'type' and 'collection')
its access method (infered from 'direct', 'get-method', 'set-method')
From this information, Castor is able to access a given property in the Java class.
In order to determine the signature that Castor expects, there are two easy rules to apply.
1. Determine <type>.
If there is no 'collection' attribute, the <type> is just the Java type specified in <type_attribute> (the value of the 'type' attribute in the XML document). The value of <type_attribute> can be a fully qualified Java object like 'java.lang.String' or one of the allowed short name:
Table 1.7. Type shortnames
short name Primitive type? Java Class other N java.lang.Object string N java.lang.String integer Y java.lang.Integer.TYPE long Y java.lang.Long.TYPE boolean Y java.lang.Boolean.TYPE double Y java.lang.Double.TYPE float Y java.lang.Float.TYPE big-decimal N java.math.BigDecimal byte Y java.lang.Byte.TYPE date N java.util.Date short Y java.lang.Short.TYPE char Y java.lang.Character.TYPE bytes N byte[] chars N char[] strings N String[] locale N java.util.Locale Castor will try to cast the data in the XML file in the proper Java type.
If there is a collection attribute , you can use the following table:
Table 1.8. Type implementations
name <type> default implementation array <type_attribute>[] <type_attribute>[] arraylist java.util.List java.util.Arraylist vector java.util.Vector java.util.Vector hashtable java.util.Hashtable java.util.Hashtable collection java.util.Collection java.util.Arraylist set java.util.Set java.util.Hashset map java.util.Map java.util.Hashmap sortedset java.util.SortedSet java.util.TreeSet The type of the object inside the collection is <type_attribute>. The 'default implementation' is the type used if the object holding the collection is found to be null and need to be instantiated.
For hashtable and maps (since 0.9.5.3), Castor will save both key and values. When marshalling output <key> and <value> elements. These names can be controlled by using a top-level or nested class mapping for the org.exolab.castor.mapping.MapItem class.
Note: for backward compatibility with prior versions of Castor, the saveMapKeys property can be set to false in the castor.properties file.
For versions prior to 0.9.5.3, hashtable and maps, Castor will save only the value during marshalling and during unmarshalling will add a map entry using the object as both the key and value, e.g. map.put(object, object).
It is necessary to use a collection when the content model of the element expects more than one element of the specified type.
Determine the signature of the function
If 'direct' is set to true, Castor expects to find a class variable with the given signature:
public <type> <name>;If 'direct' is set to false or omitted, Castor will access the property though accessor methods. Castor determines the signature of the accessors as follow: If the 'get-method' or 'set-method' attributes are supplied, it will try to find a function with the following signature:
public <type> <get-method>();or
public void <set-method>(<type> value);
If 'get-method' and 'set-method' attributes are not provided, Castor will try to find the following function:
public <type> get<capitalized-name>();or
public void set<capitalized-name>(<type> value);
<capitalized-name> means that Castor takes the <name> attribute and put its first letter in uppercase without modifying the other letters.
The content of <field> will contain the information on how to map this given field to SQL, XML, ...
Exceptions concerning collection fields:
The default is to treat the 'get-method' as a simple getter returning the collection field, and the 'set-method' as a simple getter used to set a new instance on the collection field.
Table 1.9. Collection field access
Parameter Description 'get-method' If a 'get-method' is provided for a collection field, Castor - in adition to the default behaviour described above - will deviate from the standard case for the following special prefixes:
public Iterator iterate...();A 'get-method' starting with the prefix '
iterate' is treated as Iterator method for the given collection field.public Enumeration enum...();A 'get-method' starting with '
enum' is treated as Enumeration method for the given collection field.'set-method' If 'set-method' is provided for a collection field, Castor - in addition to the default behaviour described above - will accept an 'add' prefix and expect the following signature:
public void add...(<type> value);
This method is called for each collection element while unmarshalling.
Table 1.10. Description of the attributes
| Name | Description |
|---|---|
| name | The field 'name' is required even if no such field exists in the class. If 'direct' access is used, 'name' should be the name of a public instance member in the object to be mapped (the field must be public, not static and not transient). If no direct access and no 'get-/set-method' is specified, this name will be used to infer the name of the accessors methods. |
| type | The Java type of the field. It is used to access the field. Castor will use this information to cast the XML information (like string into integer). It is also used to define the signature of the accessor methods. If a collection is specified, this is used to specify the type of the objects held by the collection. See description above for more details. |
| required | A field can be optional or required. |
| nillable | A field can be of content 'nil'. |
| transient | If true, this field will be ignored during the marshalling. This is usefull when used together with the auto-complete="true" option. |
| direct | If true, Castor will expect a public variable in the containing class and will access it directly (for both reading and writing). |
| container | Indicates whether the field should be treated as a container, i.e. only it's fields should be persisted, but not the containing class itself. In this case, the container attribute should be set to true (supported in Castor XML only). |
| collection | If a parent expects more than one occurrence of one of its element, it is necessary to specify which collection Castor will use to handle them. The type specified is used to define the type of the content inside the collection. |
| get-method | Optional name of the 'get method' Castor should use. If this attribute is not set and the set-method attribute is not set, then Castor will try to infer the name of this method with the algorithm described above. |
| set-method | Optional name of the 'set method' Castor should use. If this attribute is not set and the get-method attribute is not set, then Castor will try to infer the name of this method with the algorithm described above. |
| create-method | Optionally defines a factory method for the instantiation of a FieldHandler |
| handler | If present, specifies one of the following:
|
In the case of XML mapping, the content of a field element should be one and only one <bind-xml> element describing how this given field will be mapped into the XML document.
Starting with release 0.9.5, for attribute
mapped fields, support has been added to map a constructor field using
the set-method attribute.
To specify that a field (mapped to an attribute) should be used as a constructor
argument during object initialization, please specify a set-method attribute on the
<field> mapping and use "%X" as the value of the
set-method attribute, where X
is a positive integer number, e.g. %1 or
%21.
For example:
<field name="foo" set-method="%1" get-method="getFoo" type="string">
   <bind-xml node="attribute"/>
</field>
Note that because the set-method is specified, the get-method also
must be specified.
Tip: the XML HOW-TO section has a HOW-TO document for mapping constructor arguments, incl. a fully working mapping.
The following mapping fragment defines a <field> element for the
member property of the org.some.package.Root class,
specifying a custom org.exolab.castor.mapping.FieldHandler
implementation.
<class name="org.some.package.Root">
   <field name="member" type="string" handler="org.some.package.CustomFieldHandlerImpl"/>
</class>
The same custom field handler as in the previous sample can be defined with a separate configurable <field-handler> definition, where additional configuration can be provided.
<field-handler name="myHandler" class="org.some.package.CustomFieldHandlerImpl">
   <param name="date-format" value="yyyyMMddHHmmss"/>
</field-handler>
and subsequently be referred to by its name as shown in the following field mapping:
<class name="org.some.package.Root">
   <field name="member" type="string" handler="myHandler"/>
</class>
Assume you have a class mapping for a class Order which defines -
amongst others - a field mapping as follows, where the field item
refers to an instance of a class Item.
<class name="some.example.Order">

   ...
   <field name="item" type="some.example.Item" >
      <bind-xml> name="item" node="element" />
   </field>
   ...
</class>

<class name="some.example.Item">
   <field name="id" type="long" />
   <field name="description" type="string" />
</class>
Marshalling an instance of Order would produce XML as follows:
<order>
    ...
    <item>
        <id>100</id>
        <description>...</description>
    </item>
</order>
If you do not want the Item instance to be marshalled,
but only its fields, change the field mapping for the item
member to be as follows:
<field name="item" type="some.example.Item" container="false" >
   <bind-xml> name="item" node="element" />
</field>
The resulting XML would look as follows:
<order>
    ...
    <id>100</id>
    <description>...</description>
</order>
<!ELEMENT bind-xml (class?, property*)>
<!ATTLIST bind-xml
          name     NMTOKEN     #IMPLIED
          type     NMTOKEN     #IMPLIED
          location CDATA       #IMPLIED
          matches  NMTOKENS    #IMPLIED
          QName-prefix NMTOKEN #IMPLIED
          reference   ( true | false ) "false"
          node        ( attribute | element | text )    #IMPLIED
          auto-naming ( deriveByClass | deriveByField ) #IMPLIED
transient ( true | false ) "false">Table 1.11. Description of the attributes
| name | The name of the element or attribute.
| |||
| auto-naming | If no name is specified, this attribute controls how castor will automatically create a name for the field. Normally, the name is created using the field name, however many times it is necessary to create the name by using the class type instead (such as heterogenenous collections). | |||
| type | XML Schema type (of the value of this field) that requires specific handling in the Castor Marshalling Framework (such as 'QName' for instance). | |||
| location (since 0.9.4.4) | Allows the user to specify the "sub-path" for which the value should be marshalled to and from. This is useful for "wrapping" values in elements or for mapping values that appear on sub-elements to the current "element" represented by the class mapping. For more information, see the Location attribute below. | |||
| QName-prefix | When the field represents a QName value, a prefix can be provided that is used when marshalling value of type QName. More information on the use of 'QName-prefix' can be found in the SourceGenerator Documentation | |||
| reference | Indicates if this field has to be treated as a reference by the
unmarshaller. In order to work properly, you must specify the node
type to 'attribute' for both the 'id' and the 'reference'. In
newer versions of Castor, 'element' node for reference is allowed.
Remember to make sure that an identity field is specified
on the <class> mapping for the object type being
referenced so that Castor knows what the object's identity is. | |||
| matches | Allows overriding the matches rules for the name of the element. It is a standard regular expression and will be used instead of the 'name' field. A '*' will match any xml name, however it will only be matched if no other field exists that matches the xml name. | |||
| node | Indicates if the name corresponds to an attribute, an element, or text content. By default, primitive types are assumed to be an attribute, otherwise the node is assumed to be an elemen | |||
| transient | Allows for making this field transient for XML. The default value is inherited from the <field> element. |
Since 0.9.5.3, the bind-xml element supports a nested class mapping, which is often useful when needing to specify more than one mapping for a particular class. A good example of this is when mapping Hashtable/HashMap/Map.
<bind-xml ...>
   <class name="org.exolab.castor.mapping.MapItem">
      <field name="key" type="java.lang.String">
        <bind-xml name="id"/>
      </field>
      <field name="value" type="com.acme.Foo"/>
   </class>
</bind-xml>
Here is an example of how Castor Mapping can be used. We want to map an XML document like the following one (called 'order.xml'). model.
<Order reference="12343-AHSHE-314159">
  <Client>
    <Name>Jean Smith</Name>
    <Address>2000, Alameda de las Pulgas, San Mateo, CA 94403</Address>
  </Client>

  <Item reference="RF-0001">
    <Description>Stuffed Penguin</Description>
    <Quantity>10</Quantity>
    <UnitPrice>8.95</UnitPrice>
  </Item>

  <Item reference="RF-0034">
    <Description>Chocolate</Description>
    <Quantity5</Quantity>
    <UnitPrice>28.50</UnitPrice>
  </Item>

  <Item reference="RF-3341">
     <Description>Cookie</Description>
     <Quantity>30</Quantity>
     <UnitPrice>0.85</UnitPrice>
  </Item>
</Order>
Into the following object model composed of 3 classes:
MyOrder: represent an order
Client: used to store information on the client
Item: used to store item in an order
The sources of these classes follow.
import java.util.Vector;
import java.util.Enumeration;

public class MyOrder {

    private String _ref;
    private ClientData _client;
    private Vector _items;
    private float _total;

    public void setReference(String ref) {
        _ref = ref;
    }

    public String getReference() {
        return _ref;
    }

    public void setClientData(ClientData client) {
        _client = client;
    }

    public ClientData getClientData() {
        return _client;
    }

    public void setItemsList(Vector items) {
        _items = items;
    }

    public Vector getItemsList() {
        return _items;
    }


    public void setTotal(float total) {
        _total = total;
    }

    public float getTotal() {
        return _total;
    }

    // Do some processing on the data
    public float getTotalPrice() {
        float total = 0.0f;

        for (Enumeration e = _items.elements() ; e.hasMoreElements() ;) {
            Item item = (Item) e.nextElement();
            total += item._quantity * item._unitPrice;
        }

        return total;
    }
}
public class ClientData {

    private String _name;
    private String _address;

    public void setName(String name) {
        _name = name;
    }

    public String getName() {
        return _name;
    }

    public void setAddress(String address) {
        _address = address;
    }

    public String getAddress() {
        return _address;
    }
}
public class Item {
    public String _reference;
    public int    _quantity;
    public float  _unitPrice;
    public String _description;
}
The XML document and the java object model can be connected by using the following mapping file:
<?xml version="1.0"?>
<!DOCTYPE mapping PUBLIC "-//EXOLAB/Castor Mapping DTD Version 1.0//EN"
                         "http://castor.org/mapping.dtd">

<mapping>
  <class name="MyOrder">
    <map-to xml="Order"/>

    <field name="Reference"
           type="java.lang.String">
      <bind-xml name="reference" node="attribute"/>
    </field>

    <field name="Total"
           type="float">
      <bind-xml name="total-price" node="attribute"/>
    </field>

    <field name="ClientData"
           type="ClientData">
      <bind-xml name="Client"/>
    </field>

    <field name="ItemsList"
           type="Item"
              collection="vector">
      <bind-xml name="Item"/>
    </field>
  </class>

  <class name="ClientData">
    <field name="Name"
           type="java.lang.String">
      <bind-xml name="Name" node="element"/>
    </field>

    <field name="Address"
           type="java.lang.String">
      <bind-xml name="Address" node="element"/>
    </field>
  </class>

  <class name="Item">
    <field name="_reference"
           type="java.lang.String"
           direct="true">
      <bind-xml name="reference" node="attribute"/>
    </field>

    <field name="_quantity"
           type="integer"
           direct="true">
      <bind-xml name="Quantity" node="element"/>
    </field>

    <field name="_unitPrice"
           type="float"
           direct="true">
      <bind-xml name="UnitPrice" node="element"/>
    </field>

    <field name="_description"
           type="string"
           direct="true">
      <bind-xml name="Description" node="element"/>
    </field>
  </class>

</mapping>
The following class is an example of how to use Castor XML Mapping to manipulate the file 'order.xml'. It unmarshals the document 'order.xml', computes the total price, sets the total price in the java object and marshals the object model back into XML with the calculated price.
import org.exolab.castor.mapping.Mapping;
import org.exolab.castor.mapping.MappingException;

import org.exolab.castor.xml.Unmarshaller;
import org.exolab.castor.xml.Marshaller;

import java.io.IOException;
import java.io.FileReader;
import java.io.OutputStreamWriter;

import org.xml.sax.InputSource;

public class main {

    public static void main(String args[]) {

        Mapping      mapping = new Mapping();

        try {
            // 1. Load the mapping information from the file
            mapping.loadMapping( "mapping.xml" );

            // 2. Unmarshal the data
            Unmarshaller unmar = new Unmarshaller(mapping);
            MyOrder order = (MyOrder)unmar.unmarshal(new InputSource(new FileReader("order.xml")));

            // 3. Do some processing on the data
            float total = order.getTotalPrice();
            System.out.println("Order total price = " + total);
            order.setTotal(total);

            // 4. marshal the data with the total price back and print the XML in the console
            Marshaller marshaller = new Marshaller(new OutputStreamWriter(System.out));
            marshaller.setMapping(mapping);
            marshaller.marshal(order);

        } catch (Exception e) {
            System.out.println(e);
            return;
        }
    }
}
Ordinarily, a mapping will only reference types that are concrete classes (i.e. not interfaces nor abstract classes). The reason is that to unmarshal a type requires instantiating it and one cannot instantiate an interface. However, in many real situations, object models depend on the use of interfaces. Many class properties are defined to have interface types to support the ability to swap implementations. This is often the case in frameworks.
The problem is that a different mapping must be used each time the same model is to be used to marshal/unmarshal an implementation that uses different concrete types. This is not convenient. The mapping should represent the model and the specific concrete type used to unmarshal a document is a configuration parameter; it should be specified in the instance document to be unmarshalled, not the mapping.
For example, assume a very simple object model of an engine that has one property that is a processor:
public interface IProcessor {
    public void process();
}

public class Engine {
    private IProcessor processor;
    public IProcessor getProcessor() {
        return processor;
    }
    public void setProcessor(IProcessor processor) {
        this.processor = processor;
    }
}
A typical mapping file for such a design may be:
<mapping>
    <class name="Engine">
        <map-to xml="engine" />

        <field name="processor" type="IProcessor" required="true">
           <bind-xml name="processor" node="element" />
        </field>

     </class>
  </mapping>
It is possible to use such a mapping and still have the marshal/unmarshal process work by specifying the concrete implementation of IProcessor in the document to be unmarshalled, using the xsi:type attribute, as follows:
  <engine>
     <processor xsi:type="java:com.abc.MyProcessor" />
  </engine>
In this manner, one is still able to maintain only a single mapping, but vary the manner in which the document is unmarshalled from one instance document to the next. This flexibility is powerful because it enables the support of polymorphism within the castor xml marshalling framework.
Suppose we wanted the following XML instead:
  <engine>
     <myProcessor/>
  </engine>
In the above output our XML name changed to match the type of the class used instead of relying on the xsi:type attribute. This can be achieved by modifying the mapping file as such:
  <mapping>
     <class name="Engine">
        <map-to xml="engine" />
        <field name="processor" type="IProcessor" required="true">
           <bind-xml auto-naming="deriveByClass" node="element" />
        </field>
     </class>

     <class name="MyProcessor">
        <map-to xml="myProcessor" />
     </class>

</mapping>Since 0.9.5
The location attribute allows the user to map fields from nested elements or specify a wrapper element for a given field. Wrapper elements are simply elements which appear in the XML instance, but do not have a direct mapping to an object or field within the object model.
For example to map an instance of the following class:
public class Foo {

    private Bar bar = null;

    public Foo();

    public getBar() {
        return bar;
    }

    public void setBar(Bar bar) {
        this.bar = bar;
    }
}
into the following XML instance:
<?xml version="1.0"?>
<foo>;
   <abc>
      <bar>...</bar>
   </abc>
</foo>
(notice that an 'abc' field doesn't exist in the Bar class) One would use the following mapping:
<?xml version="1.0"?>
   ...
   <class name="Foo">
      <field name="bar" type="Bar">
         <bind-xml name="bar" location="abc"/>
      </field>
   </class>
   ...
</mapping>
Note the "location" attribute. The value of this attribute is the name of the wrapper element. To use more than one wrapper element, the name is separated by a forward-slash as such:
<bind-xml name="bar" location="abc/xyz" />
Note that the name of the element is not part of the location itself and that the location is always relative to the class in which the field is being defined. This works for attributes also:
<bind-xml name="bar" location="abc" node="attribute" />
will produce the following:
<?xml version="1.0"?>
<foo>
   <abc bar="..."/>;
</foo>
Some helpful hints...
Castor comes with a tool that can automatically create a mapping from class files. Please see the XML FAQ for more information.
Sometimes to handle complex situations you'll need to create your own FieldHandler. Normally a FieldHandler deals with a specific class and field, however generic, reusable FieldHandlers can also be created by extending org.exolab.castor.mapping.GeneralizedFieldHandler or org.exolab.castor.mapping.AbstractFieldHandler. The FieldHandler can be specified on the <field> element.
For more information on writing a custom FieldHandler please see the following: XML FieldHandlers.
You may map any attributes to constructor arguments. For more information on how to map constructor arguments see the information available in the section on set-method above.
Please note that mapping elements to constructor arguments is not yet supported.
Tip: the XML HOW-TO section has a HOW-TO document for mapping constructor arguments.
Sometimes it's useful to prevent Castor from checking for a default constructor, such as when trying to write a mapping for an interface or type-safe enum. You can use the "undocumented" verify-constructable="false" attribute on the <class> element to prevent Castor from looking for the default constructor.
While you can always use your own custom FieldHandler for handling type-safe enumeration classes, Castor does have a built-in approach to dealing with these types of classes. If the type-safe enum class has a public static <type> valueOf(String) method Castor will call that method so that the proper instance of the enumeration is returned. Note: You'll also need to disable the default constructor check in the mapping file (see section 7.4 above to see more on this).
Before using the
Marshaller
class for marshalling Java objects to XML, the
Marshaller
can be fine-tuned according to your needs by calling a
variety of set-methods on this class. This section enlists
the available properties and provides you with information
about their meaning, possible values and the default value.
Table 1.12. Marshaller properties
| Name | Description | Values | Default | Since |
|---|---|---|---|---|
| suppressNamespaces |
true
or
false
|
false
| - |
Before using the
Unmarshaller
class for unmarshalling Java objects from XML, the
Unmarshaller
can be fine-tuned according to your needs by calling a
variety of set-methods on this class. This section enlists
the available properties and provides you with information
about their meaning, possible values and the default value.
Table 1.13. Unmarshaller properties
| Name | Description | Values | Default | Since |
|---|---|---|---|---|
| rootObject | A Class instance identifying the root class to use for unmarshalling. | - | - |
Being an XML data binding framework by definition, Castor XML relies on the availability of an XML parser at run-time. In Java, an XML parser is by default accessed though either the DOM or the SAX APIs: that implies that the XML Parser used needs to comply with either (or both) of these APIs.
With the creation of the JAXP API (and its addition to the Java language definition as of Java 5.0), Castor internally has been enabled to allow usage of the JAXP interfaces to interface to XML parsers. As such, Castor XML allows the use of a JAXP-compliant XML parser as well.
By default, Castor ships with Apache Xerces 2.6.2. You may, of course, upgrade to a newer version of Apache Xerces at your convenience, or switch to any other XML parser as long as it is JAXP compliant or implements a particular SAX interface. Please note that users of Java 5.0 and above do not need to have Xerces available at run-time, as JAXP and Xerces have both been integrated into the run-time library of Java.
For marshalling, Castor XML can equally use any JAXP complaint XML parser (or
interact with an XML parser that implements the SAX API), with the exception
of the following special case: when using 'pretty printing' during marshalling
(by setting the corresponding property in castor.properties
to true) with Java 1.4 or below,
Apache Xerces
has to be on the classpath, as Castor XML internally uses Xerces' XMLSerializer
to implement this feature.
The following table enlists the requirements relative to the Java version used in your environment.
Table 1.14. XML APIs on various Java versions
| Java 1.4 and below | Java 5.0 and above |
|---|---|
| Xerces 2.6.2 | - |
| XML APIs | - |
As of Castor 1.3.2, Castor XML can be used with a StAX-compliant parser to unmarshal from XML.
Please see Example 1.1, “XML produced in introspection mode” for StAX-specific
unmarshal methods added to
org.exolab.castor.xml.Unmarshaller.
Added a section on how to access the properties as defined in the Castor properties file from within code.
Release 1.2.1: : Added new
org.exolab.castor.xml.lenient.integer.validationproperty to allow configuration of leniency for validation for Java properties generated from<xs:integer>types during code generation.Release 1.2: : Access to the
org.exolab.castor.util.LocalConfigurationclass has been removed completely. To access the properties as used by Castor from code, please refer to the below section.Release 1.1.3: Added special processing of proxied classes. The property org.exolab.castor.xml.proxyInterfaces allows you to specify a list of interfaces that such proxied objects implement. If your object implements one of these interfaces Castor will not use the class itself but its superclass at introspection or to find class mappings and ClassDescriptors.
Release 0.9.7: Added new org.exolab.castor.persist.useProxies property to allow configuration of JDBC proxy classes. If enabled, JDBC proxy classes will be used to wrap
java.sql.Connectionandjava.sql.PreparedStatementinstances, to allow for more detailed and complete JDBC statements to be output during logging. When turned off, no logging statements will be generated at all.
Castor uses a configuration file for environmental
properties that are shared across all the Castor sub
systems. The configuration file is specified as a Java
properties file with the name castor.properties.
By definition, a default configuration file is included with the Castor XML JAR. Custom properties can be supplied using one of the following methods. Please note that the custom properties specified will override the default configuration.
Place a file named
castor.propertiesanywhere on the classpath of your application.Place a file named
castor.propertiesin the working directory of your application.Use the system property
org.castor.user.properties.locationto specify the location of your custom properties.
Please note that Castor XML - upon startup - will try the methods given above in exactly the sequence as stated above; if it managed to find a custom property file using any of the given methods, it will cancel its search.
When running the provided examples, Castor will use the configuration file located in the examples directory which specifies additional debugging information as well as pretty printing of all produced XML documents.
The following properties are currently supported in the configuration file:
Table 1.15.
| Name | Description | Values | Default | Since |
|---|---|---|---|---|
| org.exolab.castor.xml.introspector.primitive.nodetype |
Property specifying the type of XML node to use
for primitive values, either
element
or
attribute
|
element
or
attribute
|
attribute
| - |
| org.exolab.castor.parser | Property specifying the class name of the SAX XML parser to use. | - | - | - |
| org.exolab.castor.parser.validation | Specifies whether to perform XML document validation by default. |
true
and
false
|
false
| - |
| org.exolab.castor.parser.namespaces | Specifies whether to support XML namespaces by default. |
false
and
true
|
false
| - |
| org.exolab.castor.xml.nspackages | Specifies a list of XML namespace to Java package mappings. | - | - | - |
| org.exolab.castor.xml.naming |
Property specifying the 'type' of the XML naming
conventions to use. Values of this property must
be either
mixed
,
lower
, or the name of a class which extends
org.exolab.castor.xml.XMLNaming
.
|
mixed
,
lower
, or the name of a class which extends
org.exolab.castor.xml.XMLNaming
|
lower
| - |
| org.castor.xml.java.naming |
Property specifying the 'type' of the Java
naming conventions to use. Values of this
property must be either
null
or the name of a class which extends
link org.castor.xml.JavaNaming.
|
|
null
| - |
| org.exolab.castor.marshalling.validation | Specifies whether to use validation during marshalling. |
false
or
true
|
true
| - |
| org.exolab.castor.indent | Specifies whether XML documents (as generated at marshalling) should use indentation or not. |
false
or
true
|
false
| - |
| org.exolab.castor.sax.features | Specifies additional features for the XML parser. | A comma separated list of SAX (parser) features (that might or might not be supported by the specified SAX parser). | http://apache.org/xml/features/disallow-doctype-decl | - |
| org.exolab.castor.sax.features-to-disable | Specifies features to be disbaled on the underlying SAX parser. | A comma separated list of SAX (parser) features to be disabled. |
http://xml.org/sax/features/external-general-entities,
http://xml.org/sax/features/external-parameter-entities,
http://apache.org/xml/features/nonvalidating/load-external-dtd
|
1.0.4 |
| org.exolab.castor.regexp | Specifies the regular expression validator to use. | A class that implements org.exolab.castor.util.RegExpValidator. | - | - |
| org.exolab.castor.xml.strictelements | Specifies whether to apply strictness to elements when unmarshalling. When enabled, the existence of elements in the XML document, which cannot be mapped to a class, causes a {@link SAXException} to be thrown. If set to false, these 'unknown' elements are ignored. |
false
or
true
|
false
| - |
| org.exolab.castor.xml.loadPackageMappings |
Specifies whether the ClassDescriptorResolver
should (automatically) search for and consult
with package mapping files (
.castor.xml
) to retrieve class descriptor information
|
false
or
true
|
true
| 1.0.2 |
| org.exolab.castor.xml.serializer.factory | Specifying what XML serializers factory to use. | A class name | org.exolab.castor.xml.XercesXMLSerializerFactory | 1.0 |
| org.exolab.castor.xml.lenient.sequence.order | Specifies whether sequence order validation should be lenient. |
false
or
true
|
false
| 1.1 |
| org.exolab.castor.xml.lenient.id.validation | Specifies whether id/href validation should be lenient. |
false
or
true
|
false
| 1.1 |
| org.exolab.castor.xml.proxyInterfaces | Specifies whether or not to search for an proxy interface at marshalling. If property is not empty the objects to be marshalled will be searched if they implement one of the given interface names. If the interface is implemented, the superclass will be marshalled instead of the class itself. | A list of proxy interfaces | - | 1.1.3 |
| org.exolab.castor.xml.lenient.integer.validation |
Specifies whether validation for Java properties
generated from <xs:integer> should be
lenient, i.e. allow for
int
s as well.
|
false
or
true
|
false
| 1.2.1 |
| org.exolab.castor.xml.version | Specifies the XML document version number to be used during marshalling; defaults to 1.0. |
1.0
or
1.1
|
1.0
| 1.3.2 |
| Note |
|---|---|
As of Castor 1.3.3, the default values for org.exolab.castor.sax.features
and org.exolab.castor.sax.features-to-disable have changed to include/disable
selected features.
|
As of Castor 1.1, it is possible to read and set the value of properties programmatically using the
getProperty(String) and setProperty(String,String)
on the following classes:
org.exolab.castor.xml.Unmarshallerorg.exolab.castor.xml.Marshallerorg.exolab.castor.xml.XMLContext
Whilst using the setter methods on the first two classes will change the settings of the respective instances only,
using the setProperty() method on the org.exolab.castor.xml.XMLContext
class will change the configuration globally, and affect all org.exolab.castor.xml.Unmarshaller
and org.exolab.castor.xml.Marshaller instances created thereafter using the
org.exolab.castor.xml.XMLContext.createUnmarshaller() and
org.exolab.castor.xml.XMLContext.createMarshaller() methods.
When developing using Castor, we recommend that you use the various
setLogWriter methods to get detailed information and error
messages.
Using a logger with org.exolab.castor.mapping.Mapping will
provide detailed information about mapping decisions made by Castor and
will show the SQL statements being used.
Using a logger with org.exolab.castor.jdo.JDO will provide
trace messages that show when Castor is loading, storing, creating and
deleting objects. All database operations will appear in the log; if an
object is retrieved from the cache or is not modified, there will be no
trace of load/store operations.
Using a logger with org.exolab.castor.xml.Unmarshaller will
provide trace messages that show conflicts between the XML document and
loaded objects.
A simple trace logger can be obtained from
org.exolab.castor.util.Logger. This logger uses the
standard output stream, but prefixes each line with a short message
that indicates who generated it. It can also print the time and date of
each message. Since logging is used for warning messages and simple
tracing, Castor does not require a sophisticated logging mechanism.
Interested in integratating Castor's logging with Log4J? Then see this question in the JDO FAQ.
By default the marshaler writes XML documents without indentation. When
developing using Castor or when debugging an application that uses
Castor, it might be desireable to use indentation to make the XML
documents human-readable. To turn indentation on, modify the Castor
properties file, or create a new properties file in the classpath
(named castor.properties) with the following content:
org.exolab.castor.indent=true
Indentation inflates the size of the generated XML documents, and also consumes more CPU. It is recommended not to use indentation in a production environment.
It is possible to disable the validation in the marshaling framework
by modifying the Castor properties file or by creating a new
properties file in the classpath (named castor.properties)
with the following content:
org.exolab.castor.marshalling.validation=false
| Note |
|---|---|
This only works with Castor-XML. |
To save time when writing your mappings, try using the auto-complete attribute of class. When using auto-complete, Castor will introspect your class and automatically fill in any missing fields.
Example:
<class name="com.acme.Foo" auto-complete="true"/>
This is also compatible with generated descriptor files. You can use a mapping file to override some of the behavior of a compiled descriptor by using auto-complete.
| Note |
|---|---|
Be careful to make sure you use the exact field name as specified in the generated descriptor file in order to modify the behavior of the field descriptor! Otherwise, you'll probably end up with two fields being marshaled! |
Castor requires that classes have a public, no-argument constructor in order to provide the ability to marshal & unmarshal objects of that type.
create-method is an optional attribute to the <field> mapping
element that can be used to overcome this restriction in cases where you
have an existing object model that consists of, say, singleton classes
where public, no-argument constructors must not be present by definition.
Assume for example that a class "A" that you want to be able
to unmarshal uses a singleton class as one of its properties. When
attempting to unmarshal class "A", you should get an exception
because the singleton property has no public no-arg constructor.
Assuming that a reference to the singleton can be obtained via a static
getInstance() method, you can add a "create method" to class A
like this:
 public MySingleton getSingletonProperty() {
    return MySingleton.getInstance();
 }
and in the mapping file for class A, you can define
the singleton property like this:
 <field name="mySingletonProperty"
       type="com.u2d.MySingleton"
       create-method="getSingletonProperty">
    <bind-xml name="my-singleton-property" node="element" />
 </field>
This illustrates how the create-method attribute is quite a useful mechanism for dealing with exceptional situations where you might want to take advantage of marshaling even when some classes do not have no-argument public constructors.
| Note |
|---|---|
As of this writing, the specified create-method must
exist as a method in the current class (i.e. the class being described
by the current |
Castor allows control on the object being marshaled or unmarshaled by a set of two listener interfaces: MarshalListener and UnmarshalListener.
The MarshalListener interface located in org.exolab.castor.xml listens to
two different events that are intercepted by the following methods:
preMarshal: this method is called before an object gets marshaled.
postMarshal: this method is called once an object has been marshaled.
The UnmarshalListener located also in org.castor.xml listens to
four different events that are intercepted by the following methods:
initialized: this method is called once an object has been instantiated.
attributesProcessed: this method is called when the attributes have just been read and processed.
fieldAdded: this method is called when an object is added to a parent.
unmarshalled: this method is called when an object has been fully unmarshaled
Note: The UnmarshalListener had been part of org.exolab.castor.xml
but as an extention of this interface had been required a new interface in org.castor.xml
was introduced. Currently the org.exolab.castor.xml.UnmarshalListener interface
can still be used but is deprecated.
Sometimes we need to deal with a data format that Castor doesn't
support out-of-the-box, such as an unsupported Date/Time
representation, or we want to wrap and unwrap fields in Wrapper
objects to get the desired XML output without changing our object
model. To handle these cases Castor allows specifying a custom
org.exolab.castor.mapping.FieldHandler
which can do these varying conversions during calls to the fields
setter and getter methods.
| Note |
|---|---|
The FieldHandler is the basic interface used by the Castor Framework when accessing field values or setting them. By specifying a custom FieldHandler in the mapping file we can basically intercept the calls to retrieve or set a field's value and do whatever conversions are necessary. |
When a writing a FieldHandler handler we need to provide implementations of the various methods specified in the FieldHandler interface. The main two methods are the getValue and setValue methods which will basically handle all our conversion code. The other methods provide ways to create a new instance of the field's value or reset the field value.
![[Tip]](images/admons/tip.png) | Tip |
|---|---|
It's actually even easier to write custom field handlers if we use a GeneralizedFieldHandler. See more details in Section 1.7.3, “Writing a GeneralizedFieldHandler” |
Let's take a look at how to convert a date in the format YYYY-MM-DD using
a custom FieldHandler. We want to marshal the following XML input file text.xml:
<?xml version="1.0"?>
<root>2004-05-10</root>
The class we'll be marshalling from and unmarshalling to looks as follows:
import java.util.Date;

public class Root {

    private Date _date;

    public Root() {
        super();
    }

    public Date getDate() {
        return _date;
    }


    public void setDate(final Date date) {
        _date = date;
    }
So we need to write a custom FieldHandler that takes the input String and converts it into the proper java.util.Date instance:
import org.exolab.castor.mapping.FieldHandler;
import org.exolab.castor.mapping.FieldDescriptor;
import org.exolab.castor.mapping.ValidityException;

import java.text.ParseException;
import java.text.SimpleDateFormat;
import java.util.Date;

/**
 * The FieldHandler for the Date class
 *
 */
public class MyDateHandler implements FieldHandler
{

    private static final String FORMAT = "yyyy-MM-dd";

    /**
     * Creates a new MyDateHandler instance
     */
    public MyDateHandler() {
        super();
    }

    /**
     * Returns the value of the field from the object.
     *
     * @param object The object
     * @return The value of the field
     * @throws IllegalStateException The Java object has changed and
     *  is no longer supported by this handler, or the handler is not
     *  compatible with the Java object
     */
    public Object getValue(final Object object) throws IllegalStateException {
        Root root = (Root)object;
        Date value = root.getDate();
        if (value == null) return null;
        SimpleDateFormat formatter = new SimpleDateFormat(FORMAT);
        Date date = (Date)value;
        return formatter.format(date);
    }


    /**
     * Sets the value of the field on the object.
     *
     * @param object The object
     * @param value The new value
     * @throws IllegalStateException The Java object has changed and
     *  is no longer supported by this handler, or the handler is not
     *  compatible with the Java object
     * @throws IllegalArgumentException The value passed is not of
     *  a supported type
     */
    public void setValue(Object object, Object value)
       throws IllegalStateException, IllegalArgumentException {

        Root root = (Root)object;
        SimpleDateFormat formatter = new SimpleDateFormat(FORMAT);
        Date date = null;
        try {
            date = formatter.parse((String)value);
        }
        catch(ParseException px) {
            throw new IllegalArgumentException(px.getMessage());
        }
        root.setDate(date);
    }


    /**
     * Creates a new instance of the object described by this field.
     *
     * @param parent The object for which the field is created
     * @return A new instance of the field's value
     * @throws IllegalStateException This field is a simple type and
     *  cannot be instantiated
     */
    public Object newInstance(Object parent) throws IllegalStateException {
        //-- Since it's marked as a string...just return null,
        //-- it's not needed.
        return null;
    }


    /**
     * Sets the value of the field to a default value.
     *
     * Reference fields are set to null, primitive fields are set to
     * their default value, collection fields are emptied of all
     * elements.
     *
     * @param object The object
     * @throws IllegalStateException The Java object has changed and
     *  is no longer supported by this handler, or the handler is not
     *  compatible with the Java object
     */
    public void resetValue(Object object) throws IllegalStateException, IllegalArgumentException {
        ((Root)object).setDate(null);
    }
}
| Tip |
|---|---|
The newInstance method should return null for immutable types. |
| Note |
|---|---|
There is also an
|
In order to tell Castor that we want to use our Custom FieldHandler
we must specify it in the mapping file mapping.xml:
<?xml version="1.0"?>
<mapping>
  <class name="Root">
     <field name="date" type="string" handler="MyDateHandler">
        <bind-xml node="text"/>
     </field>
  </class>
</mapping>
We can now use a simple Test class to unmarshal our XML document:
import java.io.*;
import org.exolab.castor.xml.*;
import org.exolab.castor.mapping.*;

public class Test {

    public static void main(String[] args) {
	    try {

	       //--load mapping
	       Mapping mapping = new Mapping();
	       mapping.loadMapping("mapping.xml");

           System.out.println("unmarshalling root instance:");
           System.out.println();

           Reader reader = new FileReader("test.xml");
           Unmarshaller unmarshaller = new Unmarshaller(Root.class);
           unmarshaller.setMapping(mapping);
           Root root = (Root) unmarshaller.unmarshal(reader);
           reader.close();

           System.out.println("Root#getDate : " + root.getDate());
	    }
	    catch (Exception e) {
	        e.printStackTrace();
	    }
    }
}
Now simply compile the code and run!
% java Test
unmarshalling root instance:

Root#getDate : Mon May 10 00:00:00 CDT 2004
After running our test program we can see that Castor invoked our custom FieldHandler and we got our properly formatted date in our Root.class.
A org.exolab.castor.mapping.GeneralizedFieldHandler
is an extension of FieldHandler interface
where we simply write the conversion methods and Castor will automatically
handle the underlying get/set operations. This allows us to re-use the
same FieldHandler for fields from different classes that require the
same conversion.
| Note |
|---|---|
Note: Currently the GeneralizedFieldHandler cannot be used from a binding-file for use with the SourceGenerator, an enhancement patch will be checked into SVN for this feature, shortly after 0.9.6 final is released. |
The same FieldHandler we used above can be written as a GeneralizedFieldHandler as such:
import org.exolab.castor.mapping.GeneralizedFieldHandler;
import org.exolab.castor.mapping.FieldDescriptor;

import java.text.ParseException;
import java.text.SimpleDateFormat;
import java.util.Date;

/**
 * The FieldHandler for the Date class
 *
 */
public class MyDateHandler extends GeneralizedFieldHandler {

    private static final String FORMAT = "yyyy-MM-dd";

    /**
     * Creates a new MyDateHandler instance
     */
    public MyDateHandler() {
        super();
    }

    /**
     * This method is used to convert the value when the
     * getValue method is called. The getValue method will
     * obtain the actual field value from given 'parent' object.
     * This convert method is then invoked with the field's
     * value. The value returned from this method will be
     * the actual value returned by getValue method.
     *
     * @param value the object value to convert after
     *  performing a get operation
     * @return the converted value.
     */
    public Object convertUponGet(Object value) {
        if (value == null) return null;
        SimpleDateFormat formatter = new SimpleDateFormat(FORMAT);
        Date date = (Date)value;
        return formatter.format(date);
    }


    /**
     * This method is used to convert the value when the
     * setValue method is called. The setValue method will
     * call this method to obtain the converted value.
     * The converted value will then be used as the value to
     * set for the field.
     *
     * @param value the object value to convert before
     *  performing a set operation
     * @return the converted value.
     */
    public Object convertUponSet(Object value) {
        SimpleDateFormat formatter = new SimpleDateFormat(FORMAT);
        Date date = null;
        try {
            date = formatter.parse((String)value);
        }
        catch(ParseException px) {
            throw new IllegalArgumentException(px.getMessage());
        }
        return date;
    }

    /**
     * Returns the class type for the field that this
     * GeneralizedFieldHandler converts to and from. This
     * should be the type that is used in the
     * object model.
     *
     * @return the class type of of the field
     */
    public Class getFieldType() {
        return Date.class;
    }

    /**
     * Creates a new instance of the object described by
     * this field.
     *
     * @param parent The object for which the field is created
     * @return A new instance of the field's value
     * @throws IllegalStateException This field is a simple
     *  type and cannot be instantiated
     */
    public Object newInstance(Object parent) throws IllegalStateException
    {
        //-- Since it's marked as a string...just return null,
        //-- it's not needed.
        return null;
    }

}
Everything else is the same. So we can re-run our test case using this GeneralizedFieldHandler and we'll get the same result. The main difference is that we implement the convertUponGet and convertUponSet methods.
Notice that we never reference the Root
class in our GeneralizedFieldHandler. This allows us
to use the same exact FieldHandler for any field
that requires this type of conversion.
In some situations, the GeneralizedFieldHandler might not
provide sufficient flexibility. Suppose your XML document uses more than one
date format. You could solve this by creating a GeneralizedFieldHandler
subclass per date format, but that would lead to code duplication, which in
itself is not desirable.
A ConfigurableFieldHandler is a FieldHandler
that can be configured in the mapping file
with any kind and any number of parameters. You can simply configure two (or more)
instances of the same ConfigurableFieldHandler class
with different date format patterns.
Here's a mapping file that uses a ConfigurableFieldHandler
to marshal and unmarshal the
date field, similar to the preceding examples:
<?xml version="1.0"?>
<mapping>

   <field-handler name="myHandler" class="FieldHandlerImpl">
      <param name="date-format" value="yyyyMMddHHmmss"/>
   </field-handler>

   <class name="Root">
      <field name="date" type="string" handler="myHandler"/>
   </class>

</mapping>
The field-handler element defines the
ConfigurableFieldHandler.
The class must be an implementation of the
org.exolab.castor.mapping.ConfigurableFieldHandler
interface. This
instance is configured with a date format. However, each implementation can decide
which, and how many parameters to use.
The field handler instance is referenced by the field element, using the handler attribute.
Here's the ConfigurableFieldHandler implementation:
import java.text.ParseException;
import java.text.SimpleDateFormat;
import java.util.Date;

import java.text.ParseException;
import java.text.SimpleDateFormat;
import java.text.DateFormat;
import java.util.Date;
import java.util.Properties;

import org.exolab.castor.mapping.ConfigurableFieldHandler;
import org.exolab.castor.mapping.FieldHandler;
import org.exolab.castor.mapping.GeneralizedFieldHandler;
import org.exolab.castor.mapping.ValidityException;

public class FieldHandlerImpl implements FieldHandler, ConfigurableFieldHandler {

    private DateFormat formatter;

    public void setConfiguration(final Properties config) throws ValidityException {
    	String pattern = config.getProperty("date-format");
    	if (pattern == null) {
    		throw new ValidityException("Required parameter \"date-format\" is missing for FieldHandlerImpl.");
    	}
    	try {
    		formatter = new SimpleDateFormat(pattern);
    	} catch (IllegalArgumentException e) {
    		throw new ValidityException("Pattern \""+pattern+"\" is not a valid date format.");
    	}
    }

    /**
     * Returns the value of the field from the object.
     *
     * @param object The object
     * @return The value of the field
     * @throws IllegalStateException The Java object has changed and
     *  is no longer supported by this handler, or the handler is not
     *  compatible with the Java object
     */
    public Object getValue(Object object) throws IllegalStateException {
        Root root = (Root)object;
        Date value = root.getDate();
        if (value == null) return null;
        return formatter.format(value);
    }

    /**
     * Sets the value of the field on the object.
     *
     * @param object The object
     * @param value The new value
     * @throws IllegalStateException The Java object has changed and
     *  is no longer supported by this handler, or the handler is not
     *  compatible with the Java object
     * @throws IllegalArgumentException The value passed is not of
     *  a supported type
     */
    public void setValue(Object object, Object value)
        throws IllegalStateException, IllegalArgumentException {
        Root root = (Root)object;
        Date date = null;
        try {
            date = formatter.parse((String)value);
        }
        catch(ParseException px) {
            throw new IllegalArgumentException(px.getMessage());
        }
        root.setDate(date);
    }

    /**
     * Creates a new instance of the object described by this field.
     *
     * @param parent The object for which the field is created
     * @return A new instance of the field's value
     * @throws IllegalStateException This field is a simple type and
     *  cannot be instantiated
     */
    public Object newInstance(Object parent)
        throws IllegalStateException
    {
        //-- Since it's marked as a string...just return null,
        //-- it's not needed.
        return null;
    }

    /**
     * Sets the value of the field to a default value.
     *
     * Reference fields are set to null, primitive fields are set to
     * their default value, collection fields are emptied of all
     * elements.
     *
     * @param object The object
     * @throws IllegalStateException The Java object has changed and
     *  is no longer supported by this handler, or the handler is not
     *  compatible with the Java object
     */
    public void resetValue(Object object)
        throws IllegalStateException, IllegalArgumentException {
        ((Root)object).setDate(null);
    }

}
This implementation is similar to the first MyDateHandler example on this page, except that is adds a setConfiguration method as specified by the ConfigurableFieldHandler interface. All parameters that are configured in the mapping file will be passed in as a Properties object. The implementing method is responsible for processing the configuration data.
As a convenience, org.exolab.castor.mapping.AbstractFieldHandler already implements ConfigurableFieldHandler. However, the setConfiguration method is not doing anything. Any subclass of AbstractFieldHandler only has to override this method to leverage the configuration capabilities. Since AbstractFieldHandler and its subclass GeneralizedFieldHandler are useful abstract classes, you'd probably want to use them anyway. It eliminates the need to implement the ConfigurableFieldHandler interface yourself.
Imagine a scenario where you want to use above ConfigurableFieldHandler
instance for more than one field - a valid use case as it promotes reuse.
<?xml version="1.0"?>
<mapping>

   <field-handler name="myFirstHandler" class="FieldHandlerImpl">
      <param name="date-format" value="yyyyMMddHHmmss"/>
   </field-handler>

   <field-handler name="mySecondHandler" class="FieldHandlerImpl">
      <param name="date-format" value="yyyy-MM-ddHH:mm:ss"/>
   </field-handler>

   <class name="Root">
      <field name="firstDate" type="string" handler="myFirstHandler"/>
      <field name="secondDate" type="string" handler="myFirstHandler"/>
      <field name="thirdDate" type="string" handler="mySecondHandler"/>
   </class>

</mapping>
For this to work, there's one more thing you will have to do: your
ConfigurableFieldHandler implementation has to implement the
ClonableFieldHandlerMarker interface and implement
the copyFieldHandler() method. As indicated by the name,
please return a clone/copy of your FieldHandler instance ... and you
are all set.
A simplified sample implementation could look as follows, extending the
FieldHandlerImpl class from the previous section:
public class FieldHandlerImpl implements FieldHandler, ConfigurableFieldHandler, ClonableFieldHandlerMarker {

    private DateFormat format;

    ...

    public void setFormat(DateFormat format) {
        this.format = format;
    }

    @Override
    public FieldHandler copyFieldHandler() {
        FieldHandlerImpl handler = new FieldHandlerImpl();
        handler.setFormat(this.getFormat());
        return handler;
    }

}
A number of classes such as type-safe enum style classes have no constructor, but instead have some sort of static factory method used for converting a string value into an instance of the class. With a custom FieldHandler we can allow Castor to work nicely with these types of classes.
| Tip |
|---|---|
Castor XML automatically supports these types of classes if they have a specific method: public static {Type} valueOf(String)
|
| Note |
|---|---|
We're working on the same support for Castor JDO |
Even though Castor XML supports the "valueOf" method type-safe enum style classes, we'll show you how to write a custom handler for these classes anyway since it's useful for any type of class regardless of the name of the factory method.
Let's look at how to write a handler for the following type-safe enum style class, which was actually generated by Castor XML (javadoc removed for brevity):
import java.io.Serializable;
import java.util.Enumeration;
import java.util.Hashtable;

public class Color implements java.io.Serializable {

    public static final int RED_TYPE = 0;

    public static final Color RED = new Color(RED_TYPE, "red");

    public static final int GREEN_TYPE = 1;

    public static final Color GREEN = new Color(GREEN_TYPE, "green");

    public static final int BLUE_TYPE = 2;

    public static final Color BLUE = new Color(BLUE_TYPE, "blue");

    private static java.util.Hashtable _memberTable = init();

    private int type = -1;

    private java.lang.String stringValue = null;


    private Color(int type, java.lang.String value) {
        super();
        this.type = type;
        this.stringValue = value;
    } //-- test.types.Color(int, java.lang.String)


    public static java.util.Enumeration enumerate()
    {
        return _memberTable.elements();
    } //-- java.util.Enumeration enumerate()

    public int getType()
    {
        return this.type;
    } //-- int getType()

    private static java.util.Hashtable init()
    {
        Hashtable members = new Hashtable();
        members.put("red", RED);
        members.put("green", GREEN);
        members.put("blue", BLUE);
        return members;
    } //-- java.util.Hashtable init()

    public java.lang.String toString()
    {
        return this.stringValue;
    } //-- java.lang.String toString()

    public static Color valueOf(java.lang.String string)
    {
        Object obj = null;
        if (string != null) obj = _memberTable.get(string);
        if (obj == null) {
            String err = "'" + string + "' is not a valid Color";
            throw new IllegalArgumentException(err);
        }
        return (Color) obj;
    } //-- test.types.Color valueOf(java.lang.String)

}
The GeneralizedFieldHandler for the above Color class is as follows (javadoc removed for brevity):
import org.exolab.castor.mapping.GeneralizedFieldHandler;
import org.exolab.castor.mapping.FieldDescriptor;

/**
 * The FieldHandler for the Color class
**/
public class ColorHandler
    extends GeneralizedFieldHandler
{

    public ColorHandler() {
        super();
    }

    public Object convertUponGet(Object value) {
        if (value == null) return null;
        Color color = (Color)value;
        return color.toString();
    }


    public Object convertUponSet(Object value) {
        return Color.valueOf((String)value);
    }

    public Class getFieldType() {
        return Color.class;
    }

    public Object newInstance( Object parent )
        throws IllegalStateException
    {
        //-- Since it's marked as a string...just return null,
        //-- it's not needed.
        return null;
    }

}
That's all there really is to it. Now we just need to hook this up to our mapping file and run a sample test.
If we have a root class Foo as such:
public class Foo {

    private Color _color = null;
    private int _size = 0;
    private String _name = null;

    public Foo() {
        super();
    }

    public Color getColor() {
        return _color;
    }

    public String getName() {
        return _name;
    }

    public int getSize() {
        return _size;
    }

    public void setColor(Color color) {
        _color = color;
    }

    public void setName(String name) {
        _name = name;
    }

    public void setSize(int size) {
        _size = size;
    }

}
Our mapping file would be the following:
<?xml version="1.0"?>
<mapping>
  <class name="Foo">
     <field name="size" type="integer">
        <bind-xml node="element"/>
     </field>
     <field name="name" type="string"/>
     <field name="color" type="string" handler="ColorHandler"/>
  </class>
</mapping>
We can now use our custom FieldHandler to unmarshal the following xml input:
<?xml version="1.0"?>
<foo>
   <name>MyFoo</name>
   <size>345</size>
   <color>blue</color>
</foo>
A sample test class is as follows:
import java.io.*;
import org.exolab.castor.xml.*;
import org.exolab.castor.mapping.*;

public class Test {

    public static void main(String[] args) {
	    try {

	        //--load mapping
	        Mapping mapping = new Mapping();
	        mapping.loadMapping("mapping.xml");

            System.out.println("unmarshalling Foo:");
            System.out.println();

            Reader reader = new FileReader("test.xml");
            Unmarshaller unmarshaller = new Unmarshaller(Foo.class);
            unmarshaller.setMapping(mapping);
            Foo foo = (Foo) unmarshaller.unmarshal(reader);
            reader.close();

            System.out.println("Foo#size : " + foo.getSize());
            System.out.print("Foo#color: ");
            if (foo.getColor() == null) {
                System.out.println("null");
            }
            else {
                System.out.println(foo.getColor().toString());
            }

            PrintWriter pw = new PrintWriter(System.out);
            Marshaller marshaller = new Marshaller(pw);
            marshaller.setMapping(mapping);
            marshaller.marshal(foo);
            pw.flush();
	    }
	    catch (Exception e) {
	        e.printStackTrace();
	    }
    }
}
| Note |
|---|---|
With Castor 0.9.6 and later, the GeneralizedFieldHandler automatically supports iterating over the items of a collection and passing them one-by-one to the convertUponGet.
For backward compatibility or to handle the collection iteration yourself,
simply add the following to the constructor of your
setCollectionIteration(false);
|
If you're going to be using custom field handlers for collection fields with
a GeneralizedFieldHandler using versions of Castor
prior to 0.9.6, then you'll need to handle the collection iteration yourself in the
convertUponGet method.
If you're not using a GeneralizedFieldHandler, then
you'll need to handle the collection iteration yourself in the
FieldHandler#getValue() method.
| Tip |
|---|---|
Since Castor incrementally adds items to collection fields, there
usually is no need to handle collections directly in the
convertUponSet method (or the setValue() for those
not using |
There are many users of Castor XML who (want to) use Castor XML in in high-volume applications. To fine-tune Castor for such an environment, it is necessary to understand many of the product features in detail and to be able to balance their use according to the application needs. Even though many of these features are documented in various places, people frequently asked for a 'best practices' document, a document that brings together these technical topics in one place and that presents them as a set of easy-to-use recipes.
Please be aware that this document is under construction. But still we believe that this document -- even when in its conception phase -- provides valuable information to users of Castor XML.
It is not generally recommended to generate code into the default package, especially since code in the default package cannot be referenced from code in any other package.
Additionally, we recommend that generated code go into a different
package then the code that makes use of the generated code. For
example, if your application uses Castor to process an XML
configuration file that is used by code in the package
org.example.userdialog then we do not recommend that the
generated code also go into that package. However, it would be
reasonable to generate source to process this XML configuration file
into the package org.example.userdialog.xmlconfig.
Creating instances of org.exolab.castor.xml.Marshaller and
org.exolab.castor.xml.Unmarshaller for the purpose of XML
data binding is easy to achieve at the API usage level. However,
details of API use have an impact on application performance; each
instance creation involves setup operations.
This is generally not an issue for one-off invocations; however, in a multi-threaded, high volume use scenario this can be become a serious issue. Internally, Castor uses a collection of Descriptor classes to keep information about the Java entities to be marshaled and unmarshaled. With each instance creation of (Un)Marshaller, this collection will be built from scratch (again and again).
To avoid this initial configuration 'penalty', Castor allows you to
cache these Descriptor classes through its
org.exolab.castor.xml.ClassDescriptorResolver component.
This cache allows reuse of these Descriptor instances between
(Un)Marshaller invocations.
With the introduction of the new org.exolab.castor.xml.XMLContext
class, the use of a
ClassDescriptorResolver has been greatly simplified in that such
an instance is managed by the XMLContext per default. As such, there's no need
to pass a ClassDescriptorResolver instance to
Marshaller/
Unmarshaller instances anymore, as this is done automatically
when such instances are created through
org.exolab.castor.xml.XMLContext.createMarshaller()org.exolab.castor.xml.XMLContext.createUnmarshaller()
For example, to create a Marshaller instance that is pre-configured
with an instance of ClassDescriptorResolver, use the following code
fragment:
Mapping mapping = new Mapping();
mapping.loadMapping(new InputSource(...));

XMLContext context = new XMLContext();
context.addMapping(mapping);

Marshaller marshaller = context.createMarshaller();
In the case where no mapping file is used, it is still possible
to instruct the org.exolab.castor.xml.XMLContext to
pre-load class descriptors for a given
package via the methods enlisted below.
As above, create an instance of org.exolab.castor.xml.XMLContext
and configure it according to your needs as shown below:
XMLContext context = new XMLContext();
context.addPackage("your.package.name");

Marshaller marshaller = context.createMarshaller();
The org.exolab.castor.xml.XMLContext class
provides for various methods to load class descriptors for individual classes
and/or packages.
Table 1.16. Methods on XMLContext to create Un-/Marshaller objects
| Method | Description | .castor.cdr |
|---|---|---|
addClass(Class) on org.exolab.castor.xml.XMLContext | Loads the class descriptor for one class. | n/a |
addClass(Class[]) on org.exolab.castor.xml.XMLContext | Loads the class descriptors for a collection of classes. | n/a |
addPackage(String) on org.exolab.castor.xml.XMLContext | Loads the class descriptor for all classes in the defined package. | Required |
addPackages(String[]) on org.exolab.castor.xml.XMLContext | Loads the class descriptor for all classes in the defined packages. | Required |
| Note |
|---|---|
For some of the methods, pre-loading class descriptords will only work if you provide
the |
When you do not use the XMLContext class, you will have
to manually manage your
org.exolab.castor.xml.XMLClassDescriptorResolver. To do
so, first create an instance of
org.exolab.castor.xml.XMLClassDescriptorResolver
using the following code fragment:
XMLClassDescriptorResolver classDescriptorResolver =
   (XMLClassDescriptorResolver) ClassDescriptorResolverFactory.createClassDescriptorResolver(BindingType.XML);
MappingUnmarshaller mappingUnmarshaller = new MappingUnmarshaller();
MappingLoader mappingLoader =
   mappingUnmarshaller.getMappingLoader(mapping, BindingType.XML);
classDescriptorResolver.setMappingLoader(mappingLoader);
and then reuse this instance as shown below:
   Unmarshaller unmarshaller = new Unmarshaller();
   unmarshaller.setResolver(classDescriptorResolver);
   unmarshaller.unmarshal(...);
When you are not using a mapping file, but you have generated Java
classes and their corresponding descriptor classes using the Castor
XML code generator, you might want to instruct the
org.exolab.castor.xml.XMLClassDescriptorResolver to
pre-load class descriptors (as enumerated explicitly
or for a given package) using various add* methods.
As above, create an instance of
org.exolab.castor.xml.XMLClassDescriptorResolver">XMLClassDescriptorResolver
using the following code fragment:
   XMLClassDescriptorResolver classDescriptorResolver = (XMlClassDescriptorResolver)
      ClassDescriptorResolverFactory.createClassDescriptorResolver(BindingType.XML);
   classDescriptorResolver.setClassLoader(...);
   classDescriptorResolver.addClass("your.package.name.A");
   classDescriptorResolver.addClass("your.package.name.B");
   classDescriptorResolver.addClass("your.package.name.C");
and then reuse this instance as shown above. Alternatively, add complete packages to the resolver configuration as follows:
   XMLClassDescriptorResolver classDescriptorResolver = (XMlClassDescriptorResolver)
      ClassDescriptorResolverFactory.createClassDescriptorResolver(BindingType.XML);
   classDescriptorResolver.setClassLoader(...);
   classDescriptorResolver.addPackage("your.package.name");
The org.exolab.castor.xml.XMLClassDescriptorResolver
interface provides various other methods to load class descriptors for individual
classes and/or packages.
Table 1.17. blah
| Method | Description | Requires .castor.cdr |
|---|---|---|
addClass(String) | Loads the class descriptor for one class. | No |
addClass(String[]) | Loads the class descriptors for a collection of classes. | No |
addPackage(String) | Loads the class descriptors for all classes in the package defined. | Yes |
addPackages(String[]) | Loads the class descriptors for all classes in the package defined. | Yes |
| Note |
|---|---|
For some of the methods, pre-loading class descriptords will only work if you provide
the |
This is a collection of HOW-TOs. The Castor project is actively seeking additional HOW-TO contributors to expand this collection. For information on how to do that, please see 'How to write a How-to'.
How to Author a How-To (Author wanted!)
How to Author an FAQ (Author wanted!)
How to Author a Code Snippet (Author wanted!)
How to Author Core Documentation (Author wanted!)
How to Contribute a Patch via Jira (Author wanted!)
This section provides answers to frequently answered questions, i.e. questions that have been asked repeatedly on one of the mailing lists. Please check with these F.A.Q.s frequently, as addressing questions that have been answered in the past already again and again places an unnecessary burden on the committers/contributors.
This section is structured along the lines of the following areas ...
Create a new instance of the
Marshaller
class and use the
setEncoding
method. You'll also need to make sure the encoding for
the Writer is set properly as well:
 ...
 String encoding = "ISO-8859-1";
 FileOutputStream fos = new FileOutputStream("result.xml");
 OutputStreamWriter osw = new OuputStreamWriter(fos, encoding);
 Marshaller marshaller = new Marshaller(osw);
 marshaller.setEncoding(encoding);
 ...
| Note |
|---|---|
For Castor 0.9.5.2 only |
The issue occurs with newer versions of Xerces than the version 1.4 that ships with Castor. The older version works OK. For some reason, when the newer version of Xerces encounters an "xml" prefixed attribute, such as "xml:lang", it tries to automatically start a prefix mapping for "xml". Which, in my opinion, is technically incorrect. They shouldn't be doing that. According to the w3c, the "xml" prefix should never be declared.
The reason it started appearing in the new Castor (0.9.5.2), is because of a switch to SAX 2 by default during unmarshaling.
Solution: A built in work-around has been checked into the Castor SVN and will automatically exist in any post 0.9.5.2 releases. For those who are using 0.9.5.2 and can't upgrade, I found a simple workaround (tested with Xerces 2.5). At first I thought about disabling namespace processing in Xerces, but then realized that it's already disabled by default by Castor ... so I have no idea why they call #startPrefixMapping when namespace processing has been disabled. But in any event... explicitly enabling namespace processing seems to fix the problem:
in the
castor.properties
file, change the following line:
org.exolab.castor.parser.namespaces=false
to:
org.exolab.castor.parser.namespaces=true
| Note |
|---|---|
This work-around has only been tested with Xerces 2.5 and above. |
The get method will be called a second time during the validation process. To prevent this from happening, simply disable validation on the Marshaller or Unmarshaller.
Cache the descriptors!
 import org.exolab.castor.xml.ClassDescriptorResolver;
 import org.exolab.castor.xml.Unmarshaller;
 import org.exolab.castor.xml.util.ClassDescriptorResolverImpl;
 ...
 ClassDescriptorResolver cdr = new ClassDescriptorResovlerImpl();
 ...
 Unmarshaller unm = new Unmarshaller(...);
 unm.setResolver(cdr);
By reusing the same
ClassDescriptorResolverany time you create an Unmarshaller instance, you will be reusing the existing class descriptors previously loaded.Disable validation
unm.setValidation(false);
Reuse objects
To cut down on object creation, you can reuse an existing object model, but be careful because this is an experimental feature. Create an Unmarshaller with your existing root object and set object reuse to true...
 Unmarshaller unm = new
 Unmarshaller(myObjectRoot);
unm.setReuseObjects(true);
If you have enabled pretty-printing (indenting), then disable it. The Xerces Serializer is much slower with indenting enabled.
Try changing parsers to something other than Xerces.
There are probably other approaches you can use as well, but those seem to be the most popular ones. Let us know if you have a solution that you think we should add here.
Use the
Unmarshaller#setIgnoreExtraElements()method:Unmarshaller unm = new Unmarshaller(...); unm.setIgnoreExtraElements(true);If any elements appear in the XML instance that Castor cannot find mappings for, they will be skipped.
You can also set the
org.exolab.castor.xml.strictelementsproperty in thecastor.propertiesfile:org.exolab.castor.xml.strictelements=true
Castor loads the castor.properties in the following order:
From classpath (usually from the jar file)
From {java.home}/lib (if present)
From the local working directory
Each properties file overrides the previous. So you don't have to come up with a properties file with all the properties and values, just the ones you want to change. This also means you don't have to touch the properties file found in the jar file.
| Note |
|---|---|
Note: You can also use
|
Make sure you are not using one of the static methods on the Marshaller/Unmarshaller. Any configuration changes that you make to the Marshaller or Unmarshaller are not available from the static methods.
Yes! We provide one such tool, see
org.exolab.castor.tools.MappingTool
. There are some
3rd party
tools as well.
For a specific field you can use a QName for the value of the bind-xml name attribute as such:
<bind-xml name="foo:bar" xmlns:foo="http://www.acme.com/foo"/>
Note: The namespace prefix is only used for qualification during the loading of the mapping, it is not used during Marshaling. To map namespace prefixes during marshaling you currently need to set these via the Marshaler directly.
For a class mapping, use the <map-to> element. For more information see the XML Mapping documentation .
For all versions of Castor:
To enable pretty-printing (indenting, line-breaks) just modify the castor.properties file and uncomment the following:
 # True if all documents should be indented on output by default
 #
 #org.exolab.castor.indent=true
Note: This will slow down the marshalling process
If you are using Castor's default introspection to automatically map the objects into XML, then there is no guarantee on the order. It simply depends on the order in which the fields are returned to Castor using the Java reflection API.
Note: If you use a mapping file Castor will generate the XML in the order in which the mapping file is specified.
Not directly, however you can convert your DTD to an XML
Schema fairly easily. We provide a tool (
org.exolab.castor.xml.dtd.Converter
) to do this. You can also use any number of 3rd-party
tools such as XML Spy or XML Authority.
Also: I used the source code generator, but all my xml element names are getting marshaled as lowercase with hyphens, what's up with that?
Solution: Are the generated class descriptors compiled? Make sure they get compiled along with the source code for the object model.
Example: Castor generates the following:
import types.Foo;
instead of:
import com.acme.types.Foo;
This usually happens when the namespaces for the imported schemas have not been mapped to appropriate java packages in the castorbuilder.properties file.
Solution:
Make sure the
castorbuilder.propertiesis in your classpath when you run the SourceGenerator.Uncomment and edit the
org.exolab.castor.builder.nspackagesproperty. Make sure to copy the value of the imported namespace exactly as it's referred to in the schema (i.e. trailing slashes and case-sensitivity matter!).
For those using 0.9.5.1, you'll need to upgrade due to a bug that is fixed in later releases.
For Castor 0.9.4 and above:
Castor JDO requires a reference to the actual collection
to be returned from the get-method. By default the
source generator does not provide such a method. To
enable such methods to be created, simple add the
following line to your
castorbuilder.properties
file:
org.exolab.castor.builder.extraCollectionMethods=true
Note: The default
castorbuilder.properties
file has this line commented out. Simply uncomment it.
Your mapping file will also need to be updated to include the proper set/get method names.
Yes! We provide such a tool. Please see
org.exolab.castor.xml.schema.util.XMLInstance2Schema
. It's not 100% perfect, but it does a reasonable job.
To enable XML validation at the parser level, please add
properties to your
castor.properties
file as follows:
 org.exolab.castor.parser.namespaces=true
 org.exolab.castor.sax.features=http://xml.org/sax/features/validation,\
 http://apache.org/xml/features/validation/schema,\
 http://apache.org/xml/features/validation/schema-full-checking
Please note that the example given relies on the use of
Apache Xerces, hence the
apache.org
properties; similar options should exist for other
parsers.
When using a custom FieldHandlerFactory as in the following example
 Mapping mapping = ... ;
 FieldHandlerFactoyt factory = ...;
 Marshaller m = new Marshaller(writer);
 ClassDescriptorResolverImpl cdr = new ClassDescriptorResolverImpl();
 cdr.getIntrospector().addFieldHandlerFactory(factory);
 m.setResolver(cdr);
 marshaller.setMapping(mapping);
please make sure that you set the mapping file
after
you set the ClassDescriptorResolver. You will note the
following in the Javadoc for
org.exolab.castor.xml.Marshaller.html#setResolver(org.exolab.castor.xml.ClassDescriptorResolver)
:
| Note |
|---|---|
Note: This method will nullify any Mapping currently being used by this Marshaller |
1.10.7.1. Is it true that the use of Castor XML mandates Apache Xerces as XML parser?
Yes and no. It actually depends. When requiring pretty printing during marshalling, Castor internally relies on Apache's Xerces to implement this feature. As such, when not using this feature, Xerces is not a requirement, and any JAXP-compliant XML parser can be used (for unmarshalling).
In other words, with the latter use case, you do not have to download (and use) Xerces separetely.
No. Starting with release 1.1, we have added support for using the Xerces instance as shipped with the JRE/JDK for serialization. As such, for Java 5.0 users, this removes the requirement to download Xerces separately when wanting to use 'pretty printing' with Castor XML during marshalling.
To enable this feature, please change the following
properties in your
local
castor.properties
file (thus redefining the default value) as shown below:
 # Defines the XML parser to be used by Castor.
 # The parser must implement org.xml.sax.Parser.
 org.exolab.castor.parser=org.xml.sax.helpers.XMLReaderAdapter

 # Defines the (default) XML serializer factory to use by Castor, which must
 # implement org.exolab.castor.xml.SerializerFactory; default is
 # org.exolab.castor.xml.XercesXMLSerializerFactory
 org.exolab.castor.xml.serializer.factory=org.exolab.castor.xml.XercesJDK5XMLSerializerFactory

 # Defines the default XML parser to be used by Castor.
 org.exolab.castor.parser=com.sun.org.apache.xerces.internal.parsers.SAXParser
Starting with release 1.3.3, the Castor
source generator supports a new naming scheme for Java field names, which
will be enabled by default. As such, Java field names as generated will follow more closely the standard
Java property naming conventions. Should there be a need to keep using the old naming schema,
please amend the following property in your custom castorbuilder.properties file:
#
# Property specifying whether for Java field names the old naming conventions
# should be used.
#
# Possible values:
# - true
# - false (default)
#
# <pre>
# org.exolab.castor.builder.field-naming.old = false
# </pre>
#
org.exolab.castor.builder.field-naming.old=true
Since release 1.0.2, the Castor source generator supports the optional the generation of Java 5.0 compliant code.
With release 1.3, the XML code generator will generate Java 5.0 compliant code by default.
With support for Java 5.0 enabled, the generated code will support the following Java 5.0-specific artifacts:
Use of parameterized collections, e.g.
ArrayList<String>.Use of
@Overrideannotations with the generated methods that require it.Use of
@SuppressWarningswith "unused" method parameters on the generated methods that needed it.Added "enum" to the list of reserved keywords.
To disable this feature (on by default), please amend the following property
in your custom castorbuilder.properties file:
# Specifies whether the sources generated should be source compatible with
# Java 1.4 or Java 5.0. Legal values are "1.4" and "5.0".  When "5.0" is
# selected, generated source will use Java 5 features such as generics and
# annotations.
# Defaults to "5.0".
#
org.exolab.castor.builder.javaVersion=5.0
Castor's Source Code Generator creates a set of Java classes which represent an object model for an XML Schema (W3C XML Schema 1.0 Second Edition, Recommendation), as well as the necessary Class Descriptors used by the marshaling framework to obtain information about the generated classes.
| Note |
|---|---|
The generated source files will need to be compiled. A later release may add an Ant taskdef to handle this automatically. |
The XML code generator can be invoked in many ways, including by command line, via an Ant task and via Maven. Please follow the below links for detailed instructions on each invocation mode.
The input file for the source code generator is an XML schema[1]footnote>. The currently supported version is the W3C XML Schema 1.0, Second Edition [2]. For more information about XML schema support, check Section 2.6, “XML schema support”.
Please find below a list of properties that can be configured through the builder configuration properties, as defined in either the default or a custom XML code generator configuration file. These properties allow you to control various advanced options of the XML source generator.
Table 2.1. <column> - Definitions
| Option | Description | Values | Default | Since version |
|---|---|---|---|---|
| org.exolab.castor.builder.javaVersion | Compliance with Java version | 1.4/5.0 | 1.4 | 1.0.2 |
| org.exolab.castor.builder.forceJava4Enums | Forces the code generator to create 'old' Java 1.4 enumeration classes even in Java 5 mode. | true/false | false | 1.1.3 |
| org.exolab.castor.builder.boundproperties | Generation of bound properties | true/false | false | 0.8.9 |
| org.exolab.castor.builder.javaclassmapping | Class generation mode | element/type | element | 0.9.1 |
| org.exolab.castor.builder.superclass | Global super class (for all classes generated) | Any valid class name | - | 0.8.9 |
| org.exolab.castor.builder.nspackages | XML namespace to package name mapping | A series of mappings | - | 0.8.9 |
| org.exolab.castor.builder.equalsmethod | Generation of equals/hashCode() method | true/false | false | 0.9.1 |
| org.exolab.castor.builder.useCycleBreaker | Use of cycle breaker code in generated equals/hashCode() method | true/false | true | 1.3.2 |
| org.exolab.castor.builder.primitivetowrapper | Generation of Object wrappers instead of primitives | true/false | false | 0.9.4 |
| org.exolab.castor.builder.automaticConflictResolution | Specifies whether automatic class name conflict resolution should be used or not | true/false | false | 1.1.1 |
| org.exolab.castor.builder.extraCollectionMethods | Specifies whether extra (additional) methods should be created for collection-style fields. Set this to true if you want your code to be more compatible with Castor JDO or other persistence frameworks. | true/false | false | 0.9.1 |
| org.exolab.castor.builder.jclassPrinterFactories | Enlists the available modes for (J)Class printing during XML code generation. | org.exolab.castor.builder.printing.WriterJClassPrinterFactory/
org.exolab.castor.builder.printing.TemplateJClassPrinterFactory | n/a | 1.2.1 |
| org.exolab.castor.builder.extraDocumentationMethods | specifying whether extra members/methods for extracting XML schema documentation should be made available. | true/false | false | 1.2 |
By default, the Castor XML code generator will look for such a property file in the following places:
If no custom property file is specified, the Castor XML code generator will use the default builder configuration properties at
org/exolab/castor/builder/castorbuilder.propertiesas shipped as part of the XML code generator JAR.If a file named
castorbuilder.propertiesis available on the CLASSPATH, the Castor XML code generator will use each of the defined property values to override the default value as defined in the default builder configuration properties. This file is commonly referred to as a custom builder configuration file.
As of Castor 1.0.2, the Castor source generator now supports the generation of Java 5.0 compliant code. The generated code - with the new feature enabled - will make use of the following Java 5.0-specific artifacts:
Use of parameterized collections, e.g. ArrayList<String>.
Use of @Override annotations with the generated methods that require it.
Use of @SupressWarnings with "unused" method parameters on the generated methods that needed it.
Added "enum" to the list of reserved keywords.
To enable this feature (off by default), please uncomment the
following property in your custom castorbuilder.properties
file:
# This property specifies whether the sources generated
# should comply with java 1.4 or 5.0; defaults to 1.4
org.exolab.castor.builder.javaVersion=5.0
In previous versions, castor only supported (un)marshalling of "simple" java5 enums, meaning enums where all facet values are valid java identifiers. In these cases, every enum constant name can be mapped directly to the xml value. See the following example:
<xs:simpleType name="AlphabeticalType">
  <xs:restriction base="xs:string">
    <xs:enumeration value="A"/>
    <xs:enumeration value="B"/>
    <xs:enumeration value="C"/>
  </xs:restriction>
</xs:simpleType>
public enum AlphabeticalType {
    A, B, C
}<root> <AlphabeticalType>A</AlphabeticalType> </root>
So if there is at least ONE facet that cannot be mapped directly to a valid java identifier, we need to extend the enum pattern. Examples for these cases are value="5" or value="-s". Castor now introduces an extended pattern, similar to the jaxb2 enum handling. The actual value of the enumeration facet is stored in a private String property, the name of the enum constant is translated into a valid identifier. Additionally, some convenience methods are introduced, details about these methods are described after the following example:
<xs:simpleType name="CompositeType">
  <xs:restriction base="xs:string">
    <xs:enumeration value="5"/>
    <xs:enumeration value="10"/>
  </xs:restriction>
</xs:simpleType>
public enum CompositeType {
    VALUE_5("5"),
    VALUE_10("10");

    private final java.lang.String value;

    private CompositeType(final java.lang.String value) {
        this.value = value;
    }

    public static CompositeType fromValue(final java.lang.String value) {
        for (CompositeType c: CompositeType.values()) {
            if (c.value.equals(value)) {
                return c;
            }
        }
        throw new IllegalArgumentException(value);
    }

    public java.lang.String value() {
        return this.value;
    }

    public java.lang.String toString() {
        return this.value;
    }
}
<root>
  <CompositeType>5</CompositeType>
</root>
Castor uses the static void fromValue(String value)
method to retrieve the correct instance from the value in the XML
input file. In our example, the input is "5", fromValue returns
CompositeType.VALUE_5.
Currently, we have to distinguish between enums with a class descriptor and the ones without. If you are using class descriptors, the EnumerationHandler uses the value() method to write the xml output.
If no descriptor classes are available, castor uses per default the
toString()
method to marshall the value. In this case, the override of the
java.lang.Enum.toString() method is mandatory, because
java.lang.Enum.toString() returns the NAME of the
facet instead of the VALUE. So in our example, VALUE_10
would be returned instead of "10". To avoid this, castor expects an
implementation of toString() that returns
this.value.
If the java version is set to "5.0", the new default behavior of castor is to generate complex java5 enums for simpleType enumerations, as described above. In java 1.4 mode, nothing has changed and the old style enumeration classes using a HashMap are created.
Users, who are in java5 mode and still want to use the old style java
1.4 classes, can force this by setting the new
org.exolab.castor.builder.forceJava4Enums property
to true as follows:
 # Forces the code generator to create 'old' Java 1.4 enumeration classes instead
 # of Java 5 enums for xs:simpleType enumerations, even in Java 5 mode.
 #
 # Possible values:
 # - false (default)
 # - true
org.exolab.castor.builder.forceJava4Enums=false
Bound properties are "properties" of a class, which when
updated the class will send out a java.beans.PropertyChangeEvent
to all registered java.beans.PropertyChangeListeners.
To enable bound properties, please add a property definition to your custom builder configuration file as follows:
# To enable bound properties uncomment the following line. Please
# note that currently *all* fields will be treated as bound properties
# when enabled. This will change in the future when we introduce
# fine grained control over each class and it's properties.
#
org.exolab.castor.builder.boundproperties=true
When enabled, all properties will be treated as bound properties. For
each class that is generated a setPropertyChangeListener method is
created as follows:
/**
 * Registers a PropertyChangeListener with this class.
 * @param pcl The PropertyChangeListener to register.
 **/

public void addPropertyChangeListener (java.beans.PropertyChangeListener pcl)
{
   propertyChangeListeners.addElement(pcl);
} //-- void addPropertyChangeListener
Whenever a property of the class is changed, a
java.beans.PropertyChangeEvent will be sent to
all registered listeners. The property name, the old value and
the new value will be set in the
java.beans.PropertyChangeEvent.
| Note |
|---|---|
| To prevent unnecessary overhead, if the property is a collection, the old value will be null. |
The source generator can treat the XML Schema structures such as
<complexType> and <element>
in two main ways. The first, and current default method is called the
"element" method. The other is called the "type" method.
Table 2.2. <column> - Definitions
| Method | Explanation |
|---|---|
| 'element' |
The "element" method creates classes for all elements whose type is a <complexType>. Abstract classes are created for all top-level <complexType>s. Any elements whose type is a top-level type will have a new class create that extends the abstract class which was generated for that top-level complexType. Classes are not created for elements whose type is a <simpleType>. |
| 'type' |
The "type" method creates classes for all top-level <complexType>s, or elements that contain an "anonymous" (in-lined) <complexType>. Classes will not be generated for elements whose type is a top-level type. |
To change the "method" of class creation, please add the following property definition to your custom builder configuration file:
# Java class mapping of <xsd:element>'s and <xsd:complexType>'s
#
org.exolab.castor.builder.javaclassmapping=type
Please note that setting this property will not affect class creation when the
defaultBindingType is explicitely used in a binding file. In that case,
the value set there will take precedence.
The source generator enables the user to set a super class to all the generated classes (of course, class descriptors are not affected by this option). Please note that, though the binding file, it is possible to define a super class for individual classes
To set the global super class, please add the following property definition to your custom builder configuration file:
# This property allows one to specify the super class of *all*
# generated classes
#
org.exolab.castor.builder.superclass=com.xyz.BaseObject
An XML Schema instance is identified by a namespace. For data-binding purposes, especially code generation it may be necessary to map namespaces to Java packages.
This is needed for imported schema in order for Castor to generate the correct imports during code generation for the primary schema.
To allow the mapping between namespaces and Java packages , edit the castorbuilder.properties file :
# XML namespace mapping to Java packages
#
#org.exolab.castor.builder.nspackages=\
   http://www.xyz.com/schemas/project=com.xyz.schemas.project,\
   http://www.xyz.com/schemas/person=com.xyz.schemas.person
Since version: 0.9.1
The Source Generator can override the equals()
and hashCode() method for the generated objects.
To have equals() and hashCode() methods generated,
override the following property in your custom
castorbuilder.properties file:
# Set to true if you want to have an equals() and
# hashCode() method generated for each generated class;
# false by default
org.exolab.castor.builder.equalsmethod=true
Since version: 1.3.2
Specifies whether cycle breaker code should be added to generated
methods equals() and hashcode().
# Property specifying whether cycle breaker code should be added
# to generated methods 'equals' and 'hashcode'.
#
# Possible values:
# - true (default)
# - false
#
# <pre>
# org.exolab.castor.builder.useCycleBreaker
# </pre>
org.exolab.castor.builder.useCycleBreaker=true
Since version 0.9.4
It may be convenient to use java objects instead of primitives, the Source Generator provides a way to do it. Thus the following mapping can be used:
boolean to java.lang.Boolean
byte to java.lang.Byte
double to java.lang.Double
float to java.lang.Float
int and integer to java.lang.Integer
long to java.lang.Long
short to java.lang.Short
To enable this property, edit the castor builder.properties file:
# Set to true if you want to use Object Wrappers instead
# of primitives (e.g Float instead of float).
# false by default.
#org.exolab.castor.builder.primitivetowrapper=false
Since version 1.1.1
With this property enabled, the XML code generator will use a new automatic class name resolution mode that has special logic implemented to automatically resolve class name conflicts.
This new mode deals with various class name conflicts where previously a binding file had to be used to resolve these conflicts manually.
To enable this feature (turned off by default), please add the
following property definitio to your custom castorbuilder.properties
file:
# Specifies whether automatic class name conflict resolution
# should be used or not; defaults to false.
#
org.exolab.castor.builder.automaticConflictResolution=true
Specifies whether extra (additional) methods
should be created for collection-style fields. Set this to true
if you want your code to be more compatible with Castor JDO (or other
persistence frameworks in general).
By setting this property to true, additional getter/setter methods
for the field in question, such as get/set by reference and set as copy methods, will
be added. In order to have these additional methods generated, please override the
following code generator property in a custom
castorbuilder.properties as shown:
# Enables generation of extra methods for collection fields, such as get/set by
# reference and set as copy.  Extra methods are in addition to the usual
# collection get/set methods.  Set this to true if you want your code to be
# more compatible  with Castor JDO.
#
# Possible values:
# - false (default)
# - true
org.exolab.castor.builder.extraCollectionMethods=true
As of release 1.2, Castor supports the use of Velocity-based code templates for code generation. For the time being, Castor will support two modes for code generation, i.e. the new Velocity-based and an old legacy mode. Default will be the legacy mode; this will be changed with a later release of Castor.
In order to use the new Velocity-based code generation, please
call the method setJClassPrinterType(String) on
org.exolab.castor.builder.SourceGenerator
with a value of velocity.
As we consider the code stable enough for a major release, we do encourage users to use the new Velocity-based mode and to provide us with (valuable) feedback.
Please note that we have changed the mechanics of changing the JClass printing type between releases 1.2 and 1.2.1.
As of release 1.2, the Castor XML code generator - if configured as shown below - now supports generation of additional methods to allow programmatic access to <xs:documentation> elements for top-level type/element definitions as follows:
public java.lang.String getXmlSchemaDocumentation(final java.lang.String source);
public java.util.Map getXmlSchemaDocumentations();
In order to have these additional methods generated as shown above,
please override the following code generator property in a custom
castorbuilder.properties as shown:
# Property specifying whether extra members/methods for extracting XML schema
# documentation should be made available; defaults to false
org.exolab.castor.builder.extraDocumentationMethods=true
This section defines the Castor XML binding file and describes - based upon the use of examples - how to use it.
The default binding used to generate the Java Object Model from an XML schema may not meet your expectations. For instance, the default binding doesn't deal with naming collisions that can appear because XML Schema allows an element declaration and a complexType definition to use the same name. The source generator will attempt to create two Java classes with the same qualified name. However, the latter class generated will simply overwrite the first one.
Another example of where the default source generator binding may not meet your expectations is when you want to change the default datatype binding provided by Castor or when you want to add validation rules by implementing your own validator and passing it to the Source Generator.
The binding declaration is an XML-based language that allows the user to control and tweak details about source generation for the generated classes. The aim of this section is to provide an overview of the binding file and a definition of the several XML components used to define this binding file.
A more in-depth presentation will be available soon in the Source Generator User Document (PDF).
<binding
    defaultBindingType = (element|type)>
    (include*,
     package*,
     namingXML?,
     elementBinding*,
     attributeBinding,
     complexTypeBinding,
     groupBinding)
</binding>
The binding element is the root element and contains the binding information.
Table 2.3. <column> - Definitions
| Name | Description | Default | Required ? |
|---|---|---|---|
| defaultBindingType | Controls the class creation mode
for details on the available modes. Please note that the mode
specified in this attribute will override the binding type specified
in the castorbuilder.properties file. | element | No |
<include
    URI = xsd:anyURI/>
This element allows you to include a binding declaration defined in another file. This allows reuse of binding files defined for various XML schemas.
Attributes of <include>
- URI:
The URI of the binding file to include.
<package>
    name = xsd:string
    (namespace|schemaLocation) = xsd:string>
</package>
Table 2.4. <package> - Definitions
| Name | Description |
|---|---|
| name | A fully qualified java package name. |
| namespace | An XML namespace that will be mapped to the package name defined by the name element. |
| schemaLocation | A URL that locates the schema to be mapped to the package name defined by the name element. |
The targetNamespace attribute of an XML schema
identifies the namespace in which the XML schema elements are defined. This
language namespace is defined in the generated Java source as a package
declaration. The <package/> element allows you to define
the mapping between an XML namespace and a Java package.
Moreover, XML schema allows you to factor the definition of an XML
schema identified by a unique namespace by including several XML
schemas instances to build one XML schema using the
<xsd:include/> element. Please make sure you understand
the difference between <xsd:include/> and
<xsd:import/>. <xsd:include/> #
relies on the URI of the included XML schema. This element allows you to keep the
structure hierarchy defined in XML schema in a single generated Java
package. Thus the binding file allows you to define the mapping
between a schemaLocation attribute and a Java package.
<namingXML>
   (elementName,complexTypeName,modelGroupName)
</namingXML>

<elementName|complexTypeName|modelGroupName>
    (prefix?, suffix?) = xsd:string
</elementName|complexTypeName|modelGroupName>
Table 2.5. <namingXML> - Definitions
| Name | Description |
|---|---|
| prefix | The prefix to add to the names of the generated classes. |
| suffix | The suffix to append to the the names of the generated classes. |
One of the aims of the binding file is to avoid naming collisions. Indeed, XML schema allows <element>s and <complexType>s to share the same name, resulting in name collisions when generating sources. Defining a binding for each element and complexType that share the same name is not always a convenient solution (for instance the BPML XML schema and the UDDI v2.0 XML schema use the same names for top-level complexTypes and top-level elements).
The main aim of the <namingXML/> element is to define
default prefices and suffices for the names of the classes generated for an
<element>, a <complexType> or a model group definition.
| Note |
|---|---|
It is not possible to control the names of the classes generated to represent nested model groups (all, choice, and sequence). |
<elementBinding|attributeBinding|complexTypeBinding|groupBinding
    name = xsd:string>
   ((java-class|interface|member|contentMember),
     elementBinding*,
     attributeBinding*,
     complexTypeBinding*,
     groupBinding*)
</elementBinding|attributeBinding|complexTypeBinding|groupBinding>
Table 2.6. <componentBinding> - Definitions
| Name | Description |
|---|---|
| name | The name of the XML schema component for which we are defining a binding. |
These elements are the tenets of the binding file since they contain
the binding definition for an XML schema element, attribute,
complex type and model group definition. The first child element
(<java-class/>, <interface>,
<member> or <contentMember/>)
will determine the type of binding one is defining. Please note that
defining a <java-class> binding on an XML schema
attribute will have absolutely no effect.
The binding file is written from an XML schema point of view; there are two distinct ways to define the XML schema component for which we are defining a binding.
(XPath-style) name
Embedded definitions
First we can define it through the name attribute.
The value of the name attribute uniquely identifies the XML schema component. It can refer to the top-level component using the NCName of that component or it can use a location language based on XPath. The grammar of that language can be defined by the following BNF:
[1]Path         ::= '/'LocationPath('/'LocationPath)*
[2]LocationPath ::= (Complex|ModelGroup|Attribute|Element|Enumeration)
[3]Complex      ::= 'complexType:'(NCName)
[4]ModelGroup   ::= 'group:'NCName
[5]Attribute    ::= '@'NCName
[6]Element      ::= NCName
[7]Enumeration  ::= 'enumType':(NCName)
Please note that all values for the name attribute
have to start with a '/'.
The second option to identify an XML schema component is to embed its binding definition inside its parent binding definition.
Considering below XML schema fragment ...
<complexType name="fooType">
    <sequence>
        <element name="foo" type="string" />
    </sequence>
</complexType>
the following binding definitions are equivalent and
identify the <element> foo defined in the top-level
<complexType> fooType.
<elementBinding name="/complexType:fooType/foo>
   <member name="MyFoo" handler="mypackage.myHandler"/>
</elementBinding>

<complexTypeBinding name="/fooType">
   <elementBinding name="/foo>
      <member name="MyFoo" handler="mypackage.myHandler"/>
   </elementBinding>
<complexTypeBinding>
<java-class
    name? = xsd:string
    package? = xsd:string
    final? = xsd:boolean
    abstract? = xsd:boolean
    equals? = xsd:boolean
    bound? = xsd:boolean
    (implements*,extends?)
</java-class>
This element defines all the options for the class to be generated, including common properties such as class name, package name, and so on.
Attributes of <java-class>
- name:
The name of the class that will be generated.
- package:
The package of the class to be generated. if set, this option overrides the mapping defined in the
<package/>element.- final:
If true, the generated class will be final.
- abstract:
If true, the generated class will be abstract.
- equals:
If true, the generated class will implement the
equals()andhashCode()method.- bound:
If true, the generated class will implement bound properties, allowing property change notification.
For instance, the following binding definition instructs the source
generator to generate a class CustomTest for a global
element named 'test', replacing the default class name Test
with CustomTest.
<elementBinding name="/test">
   <java-class name="CustomTest" final="true"/>
</elementBinding>
In addition to the properties listed above, it is possible to define that the class generated will extend a class given and/or implement one or more interfaces.
For instance, the following binding definition instructs the source
generator to generate a class TestWithInterface that
implements the interface org.castor.sample.SomeInterface in
addition to java.io.Serializable.
<elementBinding name="/test">
   <java-class name="TestWithInterface">
      <implements>org.castor.sample.SomeInterface</implements>
   </java-class>
</elementBinding>
The subsequent binding definition instructs the source generator to
generate a class TestWithExtendsAndInterface that
implements the interface org.castor.sample.SomeInterface in
addition to java.io.Serializable, and extends from a
(probably abstract) base class SomeAbstractBaseClass.
<elementBinding name="/test">
   <java-class name="TestWithExtendsAndInterface">
      <extends>org.castor.sample.SomeAbstractBaseClass</extends>
      <implements>org.castor.sample.SomeInterface</implements>
   </java-class>
</elementBinding>
The generated class SomeAbstractBaseClass will have a class
signature as shown below:
...

public class TestWithExtendsAndInterface
   extends SomeAbstractBaseClass
   implements SomeInterface, java.io.Serializable {
   ...
 <member
  name? = xsd:string
  java-type? = xsd:string
  wrapper? = xsd:boolean
  handler? = xsd:string
  visibility? = (public|protected|private)
  collection? = (array|vector|arraylist|hashtable|collection|odmg|set|map|sortedset)
  validator? = xsd:string/>
This element represents the binding for class member. It allows the definition of its name and java type as well as a custom implementation of FieldHandler to help the Marshaling framework in handling that member. Defining a validator is also possible. The names given for the validator and the fieldHandler must be fully qualified.
Table 2.7. <member> - Definitions
| Name | Description |
|---|---|
| name | The name of the class member that will be generated. |
| java-type | Fully qualified name of the java type. |
| wrapper | If true, a wrapper object will be generated in case the Java type is a java primitive. |
| handler | Fully qualified name of the custom FieldHandler to use. |
| collection | If the schema component can occur more than once then this attribute allows specifying the collection to use to represent the component in Java. |
| validator | Fully qualified name of the FieldValidator to use. |
| visibility |
A custom visibility of the content class member generated,
with the default being public.
|
For instance, the following binding definition:
<elementBinding name="/root/members">
   <member collection="set"/>
</elementBinding>
instructs the source generator to generate -- within a class
Root -- a Java member named
members using the
collection type java.util.Set instead of the default
java.util.List:
         public class Root {

            private java.util.Set members;

            ...

         }
The following (slightly amended) binding element:
<elementBinding name="/root/members">
   <member name="memberSet" collection="set"/>
</elementBinding>
instructs the source generator to generate -- again within a class
Root -- a Java member named
memberSet (of the same
collection type as in the previous example), overriding the name of
the member as specified in the XML schema:
public class Root {

   private java.util.Set memberSet;

   ...

}
          <contentMember
           name? = xsd:string
           visiblity? = (public|protected|private)
This element represents the binding for content class member generated as a result of a mixed mode declaration of a complex type definition. It allows the definition of its name and its visibility
- name:
The name of the class member that will be generated, overriding the default name of
_content.- visibility:
A custom visibility of the content class member generated, with the default being
public.
For a complex type definition declared to be mixed such as follows ...
<complexType name="RootType" mixed="true">
   <sequence>
      ...
   >/sequence>
>/complexType>
... the following binding definition ...
<elementBinding name="/complexType:RootType">
   <contentMember name="customContentMember"/>
</elementBinding>
instructs the source generator to generate -- within a class
RootType -- a Java member named
customContentMember of type
java.lang.String:
public class RootType {

   private java.util.String customContentMember;

   ...
}
<enumBinding>
   (enumDef)
</enumBinding>

<enumDef>
   (enumClassName = xsd:string, enumMember*)
</enumDef>

<enumMember>
   (name = xsd:string, value = xsd:string)
</enumMember>
The <enumBinding> element allows more control on the
code generated for type-safe enumerations, which are used to
represent an XML Schema <simpleType> enumeration.
For instance, given the following XML schema enumeration definition:
<xs:simpleType name="durationUnitType">
  <xs:restriction base='xs:string'>
    <xs:enumeration value='Y' />
    <xs:enumeration value='M' />
    <xs:enumeration value='D' />
    <xs:enumeration value='h' />
    <xs:enumeration value='m' />
    <xs:enumeration value='s' />
  </xs:restriction>
</simpleType>
the Castor code generator would generate code where the default
naming convention used during the generation would overwrite the
first constant definition for value 'M' with the one
generated for value 'm'.
The following binding definition defines -- through the means of
an <enumMember> definition for the enumeration
value 'M' -- a special binding for this value:
<enumBinding name="/enumType:durationUnitType">
  <enum-def>
    <enumMember>
      <value>M</value>
      <javaName>CUSTOM_M</javaName>
    </enumMember>
  </enum-def>
</enumBinding>
and instructs the source generator to generate -- within a class
DurationUnitType -- a constant definition named
CUSTOM_M for the enumeration value M.
The <javadoc> element allows one to enter the
necessary JavaDoc representing the generated classes or members.
As mentioned previously, you use a binding file for two main reasons:
To customize the Java code generated
To avoid class generation conflicts.
For the latter case, you'll (often) notice such collisions by looking at generated Java code that frequently does not compile. Whilst this is relatively easy for small(ish) XML schema(s), this task gets tedious for more elaborate XML schemas. To ease your life in the context of this 'collision detection', the Castor XML code generator provides you with a few advanced features. The following sections cover these features in detail.
During code generation, the Castor XML code generator will run into situations where a class (about to be generated, and as such about to be written to the file system) will overwrite an already existing class. This, for example, is the case if within one XML schema there's two (local) element definitions within separate complex type definitions with the same name. In such a case, Castor will emit warning messages that inform the user that a class will be overwritten.
As of release 1.1, the Castor XML code generator supports two
reporting modes that allow different levels of control in the event
of such collisions, warnViaConsoleDialog and informViaLog
mode.
Table 2.8. <column> - Definitions
| Mode | Description | Since |
|---|---|---|
warnViaConsoleDialog | Emits warning messages to stdout and ask the
users whether to continue. | 0.9 |
informViaLog | Emits warning messages only via the standard logger. | 1.1 |
Please select the reporting mode of your choice according to your needs, the
default being warnViaConsoleDialog. Please note that the
informViaLog reporting mode should be the preferred choice
when using the XML code generator in an automated environment.
In general, the warning messages produced are very useful in assisting
you in your creation of the binding file, as shown in below example
for the warnViaConsoleDialog mode:
 Warning: A class name generation conflict has occurred between element
         '/Data/OrderReceipt/LineItem' and element '/Data/PurchaseOrder/LineItem'.
         Please use a Binding file to solve this problem.Continue anyway [not recommended] (y|n|?)y
 Warning: A class name generation conflict has occurred between element
         '/Data/OrderReceipt/LineItem' and element '/Data/PurchaseOrder/LineItem'.
         Please use a Binding file to solve this problem.Continue anyway [not recommended] (y|n|?)y
 Warning: A class name generation conflict has occurred between element
         '/Data/OrderReceipt/LineItem' and element '/Data/PurchaseOrder/LineItem'.
         Please use a Binding file to solve this problem.Continue anyway [not recommended] (y|n|?)y
 Warning: A class name generation conflict has occurred between element
         'complexType:ReceiptLineItemType/Sku' and element 'complexType:LineItemType/Sku'.
         Please use a Binding file to solve this problem.Continue anyway [not recommended] (y|n|?)y
 Warning: A class name generation conflict has occurred between element
         'complexType:ReceiptLineItemType/Sku' and element 'complexType:LineItemType/Sku'.
         Please use a Binding file to solve this problem.Continue anyway [not recommended] (y|n|?)y
 Warning: A class name generation conflict has occurred between element
         'complexType:ReceiptLineItemType/Sku' and element 'complexType:LineItemType/Sku'.
         Please use a Binding file to solve this problem.Continue anyway [not recommended] (y|n|?)y
As already mentioned, this mode emits warning messages to stdout, and
asks you whether you want to continue with the code generation or not. This
allows for very fine grained control over the extent of the code generation.
Please note that there is several setter methods on the
org.exolab.castor.builder.SourceGenerator that allow you to fine-tune
various settings for this reporting mode. Genuinely, we believe that for
automated code generation through either Ant or Maven, the new informViaLog
is better suited for these needs.
As of Castor 1.1.1, support has been added to the Castor XML code generator for a (nearly) automatic conflict resolution. To enable this new mode, please override the following property in your custom property file as shown below:
 # Specifies whether automatic class name conflict resolution
 # should be used or not; defaults to false.
 #
 org.exolab.castor.builder.automaticConflictResolution=true
As a result of enabling automatic conflict resolution, Castor will try to resolve such name collisions automatically, using one of the following two strategies:
Table 2.9. <column> - Definitions
| Name | Description | Since | Default |
|---|---|---|---|
xpath | Prepends an XPATH fragment to make the suggested Java name unique. | 1.1.1 | Yes |
type | Appends type information to the suggested Java name. | 1.1.1 | No |
For selecting one of the two strategies during XML code generation, please see the documentation for the following code artifacts:
setClassNameConflictResolveronorg.exolab.castor.builder.SourceGeneratororg.exolab.castor.builder.SourceGeneratorMain"
In order to explain the modus operandi of these two modes, please
assume two complex type definitions AType and BType
in an XML schema, with both of them defining a local element named c.
<xs:complexType name="AType">
    <xs:sequence>
        <xs:element name="c" type="CType1" />
    </xs:sequence>
</xs:complexType>

<xs:complexType name="BType">
    <xs:sequence>
        <xs:element name="c" type="CType2" />
    </xs:sequence>
</xs:complexType>
Without automatic collision resolution enabled, Castor will create
identically named classes C.java for both members, and one
will overwrite the other. Please note the different types for the
two c element definitions, which requires two class files to be
generated in order not to lose this information.
This strategy will prepend an XPATH fragment to the default Java name as derived during code generation, the default name (frequently) being the name of the XML schema artifact, e.g. the element name of the complex type name. The XPATH fragment being prepended is minimal in the sense that the resulting rooted XPATH is unique for the XML schema artifact being processed.
With automatic collision resolution enabled and the strategy 'XPATH' selected, Castor will create the following two classes, simply prepending the name of the complex type to the default element name:
ATypeC.java
BTypeC.java
This strategy will append 'type' information to the default Java name as derived during code generation, the default name (frequently) being the name of the XML schema artifact, e.g. the element name of the complex type name.
With automatic collision resolution enabled and
the strategy 'TYPE' selected, Castor will create the following two
classes, simply appending the name of the complex type to the default
element name (with a default 'By' inserted):
CByCType1.java
CByCType2.java
To override the default 'By' inserted between the default
element name and the type information, please override the following
property in your custom property file as shown below:
# Property specifying the 'string' used in type strategy to be inserted
# between the actual element name and the type name (during automatic class name
# conflict resolution); defaults to 'By'.
org.exolab.castor.builder.automaticConflictResolutionTypeSuffix=ByBy
The Castor XML code generator, with automatic collision resolution enabled, is capable of resolving the following collisions automatically:
Name of local element definition same as name of a global element
Name of local element definition same as name of another local element definition.
| Note |
|---|---|
Please note that collision resolution for a local to local collision will only take place for the second local element definition encountered (and subsequent ones). |
An alternative to using the command line as shown in the previous section, the Castor Source Generator Ant Task can be used to call the source generator for class generation. The only requirement is that the castor-<version>-codegen-antask.jar must additionally be on the CLASSPATH.
As shown in the subsequent table, there's multiple ways of specifying the input for the Castor code generator. At least one input source has to be specified.
Table 2.10. <column> - Definitions
| Attribute | Description | Required | Since |
|---|---|---|---|
| file | The XML schema, to be used as input for the source code generator. | No. | - |
| dir | Sets a directory such that all XML schemas in this directory will have code generated for them. | No | - |
| schemaURL | URL to an XML schema, to be used as input for the source code generator. | No. | 1.2 |
In addition, a nested <fileset> can be specified as the source of input. Please refer to the samples shown below.
Please find below the complete list of parameters that can be set on the Castor source generator to fine-tune the execution behavior.
Table 2.11. Ant task properties
| Attribute | Description | Required | Since |
|---|---|---|---|
| package | The default package to be used during source code generation. | No; if not given, all classes will be placed in the root package. | - |
| todir | The destination directory to be used during source code generation. In this directory all generated Java classes will be placed. | No | - |
| bindingfile | A Castor source generator binding file. | No | - |
| lineseparator | Defines whether to use Unix- or Windows- or Mac-style line separators during source code generation. Possible values are: 'unix', 'win' or 'mac'. | No; if not set, system property 'line.separator' is used instead. | - |
| types | Defines what collection types to use (Java 1 vs. Java 2). Possible values: 'vector', 'arraylist' (aka 'j2') or 'odmg'. | No; if not set, the default collection used will be Java 1 type | - |
| verbose | Whether to output any logging messages as emitted by the source generator | No | - |
| warnings | Whether to suppress any warnings as otherwise emitted by the source generator | No | - |
| nodesc | If used, instructs the source generator not to generate *Descriptor classes. | No | - |
| generateMapping | If used, instructs the source generator to (additionally) generate a mapping file. | No | - |
| nomarshal | If specified, instructs the source generator not to create (un)marshalling methods within the Java classes generated. | No | - |
| caseInsensitive | If used, instructs the source generator to generate code for enumerated type lookup in a case insensitive manner. | No | - |
| sax1 | If used, instructs the source generator to generate SAX-1 compliant code. | No | - |
| generateImportedSchemas | If used, instructs the source generator to generate code for imported schemas as well. | No | - |
| nameConflictStrategy | If used, sets the name conflict strategy to use during XML code generation;
possible values are 'warnViaConsoleDialog' and
'informViaLog'. | No | - |
| properties | Location of file defining a set of properties to be used during source code
generation. This overrides the default mechanisms of configuring the source
generator through a castorbuilder.properties (that has to be
placed on the CLASSPATH) | No | - |
| automaticConflictStrategy | If used, sets the name conflict resolution strategy used during XML
code generation; possible values are 'type' and 'xpath'
(default being 'xpath'). | No | - |
| jClassPrinterType | Sets the mode for printing JClass instances during XML
code generation; possible values are 'standard' and 'velocity'
(default being 'standard'). | No | 1.2.1 |
| generateJdoDescriptors | If used, instructs the source generator to generate JDO class descriptors as well; default is false. | No | 1.3 |
| resourceDestination |
Sets the destination directory for (generated) resources,
e.g. .castor.cdr files.
| No | 1.3.1 |
Below is an example of how to use this task from within an Ant target definition named 'castor:gen:src':
<target name="castor:gen:src" depends="init"
         description="Generate Java source files from XSD.">

    <taskdef name="castor-srcgen"
             classname="org.castor.anttask.CastorCodeGenTask"
             classpathref="castor.class.path" />
    <mkdir dir="generated" />
    <castor-srcgen file="src/schema/sample.xsd"
                   todir="generated-source"
                   package="org.castor.example.schema"
                   types="j2"
                   warnings="true" />
</target>
Below is the same sample as above, this time using the url attribute as the source of input instead:
<target name="castor:gen:src" depends="init"
         description="Generate Java source files from XSD.">

    <taskdef name="castor-srcgen"
             classname="org.castor.anttask.CastorCodeGenTask"
             classpathref="castor.class.path" />
    <mkdir dir="generated" />
    <castor-srcgen schemaURL="http://some.domain/some/path/sample.xsd"
                   todir="generated-source"
                   package="org.castor.example.schema"
                   types="j2"
                   warnings="true" />
</target>
Below is the same sample as above, this time using the url attribute as the source of input instead:
<target name="castor:gen:src" depends="init"
         description="Generate Java source files from XSD.">

    <taskdef name="castor-srcgen"
             classname="org.castor.anttask.CastorCodeGenTask"
             classpathref="castor.class.path" />
    <mkdir dir="generated" />
    <castor-srcgen todir="generated-source"
                   package="org.castor.example.schema"
                   types="j2"
                   warnings="true" >
       <fileset dir="${basedir}/src/schema">
          <include name="**/*.xsd"/>
       </fileset>
    </castor-srcgen>
</target>
For those of you working with Maven 2 instead of Ant, the Maven 2 plugin for Castor can be used to integrate source code generation from XML schemas with the Castor XML code generator as part of the standard Maven build life-cycle. The following sections show how to configure the Maven 2 Castor plugin and hwo to instruct Maven 2 to generate sources from your XML schemas.
To be able to start source code generation from XML schema from within Maven, you will have to configure the Maven 2 Castor plugin as follows:
<plugin>
   <groupId>org.codehaus.mojo</groupId>
   <artifactId>castor-maven-plugin</artifactId>
   <version>2.0</version>
</plugin>
Above configuration will trigger source generation using the default
values as explained at the
Castor plugin page,
assuming that the XML schema(s) are located at src/main/castor, and code will
be saved at target/generated-sources/castor. When generating sources
for multiple schemas at the same time, you can put namespace to
package mappings into src/main/castor/castorbuilder.properties.
To e.g. change some of these default locations, please add a <configuration> section to the plugin configuration as follows:
<plugin>
   <groupId>org.codehaus.mojo</groupId>
   <artifactId>castor-maven-plugin</artifactId>
   <version>2.0</version>
   <configuration>
      <schema>src/main/resources/org/exolab/castor/builder/binding/binding.xsd</schema>
      <packaging>org.exolab.castor.builder.binding</packaging>
      <properties>src/main/resources/org/exolab/castor/builder/binding.generation.properties</properties>
   </configuration>
 </plugin>
Details on the available configuration properties can be found here.
By default, the Maven Castor plugin has been built and tested against a particular version of Castor. To switch to a newer version of Castor (not the plugin itself), please use a <dependencies> section as shown below to point the plugin to e.g. a newer version of Castor:
<plugin>
   <groupId>org.codehaus.mojo</groupId>
   <artifactId>castor-maven-plugin</artifactId>
   <version>2.0</version>
   <dependencies>
     <dependency>
       <groupId>org.codehaus.castor</groupId>
       <artifactId>castor</artifactId>
       <version>1.3.1-SNAPSHOT</version>
     </dependency>
   </dependencies>
 </plugin>
To integrate source code generation from XML schema into your standard build life-cycle, you will have to add an <executions> section to your standard plugin configuration as follows:
<plugin>
   <groupId>org.codehaus.mojo</groupId>
   <artifactId>castor-maven-plugin</artifactId>
   <version>2.0</version>
   <executions>
      <execution>
         <goals>
            <goal>generate</goal>
         </goals>
      </execution>
   </executions>
</plugin>
java org.exolab.castor.builder.SourceGeneratorMain -i foo-schema.xsd \
    -package com.xyz
This will generate a set of source files from the the XML Schema
foo-schema.xsd and place them in the package
com.xyz.
To compile the generated classes, simply run javac or your favorite compiler:
javac com/xyz/*.java
Created class will have marshal and
unmarshal methods which are used to
go back and forth between XML and an Object instance.
The source code generator has a number of different options which may
be set. Some of these are done using the command line and others are
done using a properties file located by default at
org/exolab/castor/builder/castorbuilder.properties.
There's more than one way of specifying the input for the Castor code generator. At least one input source must be specified.
Table 2.12. Input sources
| Option | Args | Description | Version |
|---|---|---|---|
| i | filename | The input XML Schema file | - |
| is | URL | URL of an XML Schema | 1.2 and newer |
Table 2.13. Other command line options
| Option | Arguments | Description | Optional? |
|---|---|---|---|
-package | package-name | The package for the generated source. | Optional |
-dest | path | The destination directory in which to create the generated source | Optional |
-line-separator | unix | mac | win | Sets the line separator style for the desired platform. This is useful if you are generating source on one platform, but will be compiling/modifying on another platform. | Optional |
-types | type-factory | Sets which type factory to use. This is useful if you want JDK 1.2 collections instead of JDK 1.1 or if you want to pass in your own FieldInfoFactory (see Section 2.5.3.2.2.1, “Collection Types”). | Optional |
-h | Shows the help/usage information. | Optional | |
-f | Forces the source generator to suppress all non-fatal errors, such as overwriting pre-existing files. | Optional | |
-nodesc | Do not generate the class descriptors | Optional | |
-gen-mapping | (Additionally) Generate a mapping file. | Optional | |
-nomarshall | Do not generate the marshaling framework methods (marshal, unmarshal, validate) | Optional | |
-testable | Generate the extra methods used by the CTF (Castor Testing Framework) | Optional | |
-sax1 | Generate marshaling methods that use the SAX1 framework (default is false). | Optional | |
-binding-file | <<binding file name>>. | Configures the use of a Binding File to allow finely-grained control of the generated classes | Optional |
-generateImportedSchemas | Generates sources for imported XML Schemas in addition to the schema provided on the command line (default is false). | Optional | |
-case-insensitive | The generated classes will use a case insensitive method for looking up enumerated type values. | Optional | |
-verbose | Enables extra diagnostic output from the source generator | Optional | |
-nameConflictStrategy | <<conflict strategy name>> | Sets the name conflict strategy to use during XML code generation | Optional |
-fail | Instructs the source generator to fail on the first error. When you are trying to figure out what is failing during source generation, this option will help. | Optional | |
-classPrinter | <<JClass printing mode>>. | Specifies the JClass printing mode to use during XML code generation; possible
values arestandard (default) and velocity; if no value
is specified, the default mode is standard. | Optional |
-gen-jdo-desc | (Additionally) generate JDO class descriptors. | Optional | |
-resourcesDestination | <destination> | An (optional) destination for (generated) resources | Optional |
The source code generator has the ability to use the following
types of collections when generating source code, using the
-type option:
Table 2.14. Collection types
| Option value | Type | Default |
|---|---|---|
-types j1 | Java 1.1 | java.util.Vector |
-type j2 | Java 1.2 | java.util.Collection |
-types odmg | ODMG 3.0 | odmg.DArray |
The Java class name shown in above table indicates the default collection type that will be emitted during generation.
You can also write your own FieldInfoFactory to handle specific collection types. All you have to do is to pass in the fully qualified name of that FieldInfoFactory as follows:
-types com.personal.MyCoolFactory
| Tip |
|---|---|
| For additional information about the Source Generator and its options, you can download the Source Generator User Document (PDF). Please note that the use of a binding file is not dicussed in that document. |
Castor XML supports the W3C XML Schema 1.0 Second Edition Recommendation document (10/28/2004) The Schema Object Model (located in the package org.exolab.castor.xml.schema) provides an in-memory representation of a given XML schema whereas the XML code generator provides a binding between XML schema data types and structures into the corresponding ones in Java.
The Castor Schema Object Model can read (org.exolab.castor.xml.schema.reader) and write (org.exolab.castor.xml.schema.writer) an XML Schema as defined by the W3C recommandation. It allows you to create and manipulate an in-memory view of an XML Schema.
The Castor Schema Object Model supports the W3C XML Schema recommendation with no limitation. However the Source Generator does currently not offer a one to one mapping from an XML Schema component to a Java component for every XML Schema components; some limitations exist. The aim of the following sections is to provide a list of supported features in the Source Generator. Please keep in mind that the Castor Schema Object Model again can handle any XML Schema without limitations.
Some Schema types do not have a corresponding type in Java. Thus the
Source Generator uses Castor implementation of these specific types
(located in the org.exolab.castor.types package).
For instance the duration type is implemented directly in
Castor. Remember that the representation of XML Schema datatypes does
not try to fit the W3C XML Schema specifications exactly. The aim is to
map an XML Schema type to the Java type that is the best fit to the XML
Schema type.
You will find next a list of the supported XML Schema data types and structures in the Source Code Generator. For a more detailed support of XML Schema structure and more information on the Schema Object Model, please refer to Source Generator User Document (PDF).
The following is a list of the supported datatypes with the corresponding facets and the Java mapping type.
Table 2.15. Supported primitive data types
| XML Schema Type | Supported Facets | Java mapping type |
|---|---|---|
| anyURI | enumeration | java.lang.String |
| base64Binary | byte[] | |
| boolean | pattern |
boolean or java.lang.Boolean[a]
|
| date | enumeration, maxInclusive, maxExclusive, minInclusive, minExclusive, pattern, whitespace[b] | org.exolab.castor.types.Date |
| dateTime | enumeration, maxInclusive, maxExclusive, minInclusive, minExclusive, pattern, whitespace[b] | java.util.Date |
| decimal | totalDigits, fractionDigits, pattern, whiteSpace, enumeration, maxInclusive, maxExclusive, minInclusive, minExclusive, whitespace[b] | java.math.BigDecimal |
| double | enumeration, maxInclusive, maxExclusive, minInclusive, minExclusive, pattern, whitespace[b] |
double or java.lang.Double[c]
|
| duration | enumeration, maxInclusive, maxExclusive, minInclusive, minExclusive, pattern, whitespace[b] | org.exolab.castor.types.Duration |
| float | enumeration, maxInclusive, maxExclusive, minInclusive, minExclusive, pattern, whitespace[b] |
float or java.lang.Float[c]
|
| gDay | enumeration, maxInclusive, maxExclusive, minInclusive, minExclusive, pattern, whitespace[b] | org.exolab.castor.types.GDay |
| gMonth | enumeration, maxInclusive, maxExclusive, minInclusive, minExclusive, pattern, whitespace[b] | org.exolab.castor.types.GMonth |
| gMonthDay | enumeration, maxInclusive, maxExclusive, minInclusive, minExclusive, pattern, whitespace[b] | org.exolab.castor.types.GMonthDay |
| gYear | enumeration, maxInclusive, maxExclusive, minInclusive, minExclusive, pattern, whitespace[b] | org.exolab.castor.types.GYear |
| gYearMonth | enumeration, maxInclusive, maxExclusive, minInclusive, minExclusive, pattern, whitespace[b] | org.exolab.castor.types.GYearMonth |
| hexBinary | byte[] | |
| QName | length, minLength, maxLength, pattern, enumeration | java.lang.String |
| string | length, minLength, maxLength, pattern, enumeration, whiteSpace | java.lang.String |
| time | enumeration, maxInclusive, maxExclusive, minInclusive, minExclusive, pattern, whitespace[b] | org.exolab.castor.types.Time |
[a] For the various numerical types, the
default behavior is to generate primitive types. However, if the
use of wrappers is enabled by the following line in the
[b] For the date/time and numeric types, the only supported value for whitespace is "collapse". | ||
Table 2.16. Supported derived data types
| Type | Supported Facets | Java mapping type |
|---|---|---|
| byte | totalDigits, fractionDigits[a], pattern, enumeration, maxInclusive, maxExclusive, minInclusive, minExclusive, whitespace[b] |
byte/java.lang.Byte
[c]
|
| ENTITY | Not implemented | |
| ENTITIES | Not implemented | |
| ID | enumeration | java.lang.String |
| IDREF | java.lang.Object | |
| IDREFS | java.util.Vector of java.lang.Object | |
| int | totalDigits, fractionDigits[a], pattern, enumeration, maxInclusive, maxExclusive, minInclusive, minExclusive, whitespace[b] |
int/java.lang.Integer[c]
|
| integer | totalDigits, fractionDigits[a], pattern, enumeration, maxInclusive, maxExclusive, minInclusive, minExclusive, whitespace[b] |
long/java.lang.Long[c]
|
| language | length, minLength, maxLength, pattern, enumeration, whiteSpace |
treated as a xsd:string[d]
|
| long | totalDigits, fractionDigits[a], pattern, enumeration, maxInclusive, maxExclusive, minInclusive, minExclusive, whitespace[b] |
long/java.lang.Long[c]
|
| Name | Not implemented | |
| NCName | enumeration | java.lang.String |
| negativeInteger | totalDigits, fractionDigits[], pattern, enumeration, maxInclusive, maxExclusive, minInclusive, minExclusive, whitespace[b] |
long/java.lang.Long[c]
|
| NMTOKEN | enumeration, length, maxlength, minlength | java.lang.String |
| NMTOKENS | java.util.Vector of java.lang.String | |
| NOTATION | Not implemented | |
| nonNegativeInteger | totalDigits, fractionDigits[a], pattern, enumeration, maxInclusive, maxExclusive, minInclusive, minExclusive, whitespace[b] |
long/java.lang.Long[c]
|
| nonPositiveInteger | totalDigits, fractionDigits[a], pattern, enumeration, maxInclusive, maxExclusive, minInclusive, minExclusive, whitespace[b] |
long/java.lang.Long[c]
|
| normalizedString | enumeration, length, minLength, maxLength, pattern | java.lang.String |
| positiveInteger | totalDigits, fractionDigits[a], pattern, enumeration, maxInclusive, maxExclusive, minInclusive, minExclusive, whitespace[b] |
long/java.lang.Long[c]
|
| short | totalDigits, fractionDigits[a], pattern, enumeration, maxInclusive, maxExclusive, minInclusive, minExclusive, whitespace[b] |
short/java.lang.Short[c]
|
| token | length, minLength, maxLength, pattern, enumeration, whiteSpace |
treated as a xsd:string[d],
|
| unsignedByte | totalDigits, fractionDigits[a], maxExclusive, minExclusive, maxInclusive, minInclusive, pattern, whitespace[b] |
short/java.lang.Short[c]
|
| unsignedInt | totalDigits, fractionDigits[a], maxExclusive, minExclusive, maxInclusive, minInclusive, pattern, whitespace[b] |
long/java.lang.Long[c]
|
| unsignedLong | totalDigits, fractionDigits[a], pattern, enumeration, maxInclusive, maxExclusive, minInclusive, minExclusive, whitespace[b] | java.math.BigInteger |
| unsignedShort | totalDigits, fractionDigits[a], pattern, enumeration, maxInclusive, maxExclusive, minInclusive, minExclusive, whitespace[b] |
int or java.lang.Integer[c]
|
[a] For the integral types, the only allowed value for fractionDigits is 0. [b] For the date/time and numeric types, the only supported value for whitespace is "collapse". [c] For the various numerical types, the
default behavior is to generate primitive types. However, if the
use of wrappers is enabled by the following line in the
[d]
Currently, | ||
Supporting XML schema structures is a constant work. The main structures are already supported with some limitations. The following will give you a rough list of the supported structures. For a more detailed support of XML Schema structure in the Source Generator or in the Schema Object Model, please refer to Source Generator User Document (PDF).
Supported schema components:
Attribute declaration (
<attribute>)Element declaration (
<element>)Complex type definition (
<complexType>)Attribute group definition (
<attributeGroup>)Model group definition (
<group>)Model group (
<all>,<choice>and<sequence>)Annotation (
<annotation>)Wildcard (
<any>)Simple type definition (
<simpleType>)
Grouping support covers both model group definitions
(<group>) and model groups
(<all>, <choice> and
<sequence>). In this section
we will label as a 'nested group' any model group whose first parent
is another model group.
For each top-level model group definition, a class is generated either when using the 'element' mapping property or the 'type' one.
If a group -- nested or not -- appears to have
maxOccurs > 1, then a class is generated to represent the items contained in the group.For each nested group, a class is generated. The name of the generated class will follow this naming convention:
Name,Compositor+,Counter?where'Name' is name of the top-level component (element, complexType or group).
'Compositor' is the compositor of the nested group. For instance, if a 'choice' is nested inside a sequence, the value of Compositor will be
SequenceChoice('Sequence'+'Choice'). Note: if the 'choice' is inside a Model Group and that Model Group parent is a Model Group Definition or a complexType then the value of'Compositor' will be only 'Choice'.'Counter' is a number that prevents naming collision.
In this section we illustrate the use of the XML code generator by discussing the classes generated from given XML schemas. The XML code generator is going to be used with the “java class mapping” property set to element (default value).
The input file is the schema file given with the XML code generator example in the distribution of Castor (under /src/examples/SourceGenerator/invoice.xsd).
<?xml version="1.0"?>
<xsd:schema xmlns:xsd="http://www.w3.org/2001/XMLSchema"
    targetNamespace="http://castor.exolab.org/Test/Invoice">

    <xsd:annotation>
        <xsd:documentation>
            This is a test XML Schema for Castor XML.
        </xsd:documentation>
    </xsd:annotation>

    <!--
        A simple representation of an invoice. This is simply an example
        and not meant to be an exact or even complete representation of an invoice.
    -->
    <xsd:element name="invoice">
        <xsd:annotation>
            <xsd:documentation>
                A simple representation of an invoice
            </xsd:documentation>
        </xsd:annotation>

        <xsd:complexType>
            <xsd:sequence>
                <xsd:element name="ship-to">
                    <xsd:complexType>
                        <xsd:group ref="customer" />
                    </xsd:complexType>
                </xsd:element>
                <xsd:element ref="item"
                    maxOccurs="unbounded" minOccurs="1" />
                <xsd:element ref="shipping-method" />
                <xsd:element ref="shipping-date" />
            </xsd:sequence>
        </xsd:complexType>
    </xsd:element>

    <!-- Description of a customer -->
    <xsd:group name="customer">
        <xsd:sequence>
            <xsd:element name="name" type="xsd:string" />
            <xsd:element ref="address" />
            <xsd:element name="phone"
                type="TelephoneNumberType" />
        </xsd:sequence>
    </xsd:group>

    <!-- Description of an item -->
    <xsd:element name="item">
        <xsd:complexType>
            <xsd:sequence>
                <xsd:element name="Quantity"
                    type="xsd:integer" minOccurs="1" maxOccurs="1" />
                <xsd:element name="Price" type="PriceType"
                    minOccurs="1" maxOccurs="1" />
            </xsd:sequence>
            <xsd:attributeGroup ref="ItemAttributes" />
        </xsd:complexType>
    </xsd:element>

    <!-- Shipping Method -->
    <xsd:element name="shipping-method">
        <xsd:complexType>
            <xsd:sequence>
                <xsd:element name="carrier"
                    type="xsd:string" />
                <xsd:element name="option"
                    type="xsd:string" />
                <xsd:element name="estimated-delivery"
                    type="xsd:duration" />
            </xsd:sequence>
        </xsd:complexType>
    </xsd:element>

    <!-- Shipping date -->
    <xsd:element name="shipping-date">
        <xsd:complexType>
            <xsd:sequence>
                <xsd:element name="date" type="xsd:date" />
                <xsd:element name="time" type="xsd:time" />
            </xsd:sequence>
        </xsd:complexType>
    </xsd:element>

    <!-- A simple U.S. based Address structure -->
    <xsd:element name="address">
        <xsd:annotation>
            <xsd:documentation>
                Represents a U.S. Address
            </xsd:documentation>
        </xsd:annotation>

        <xsd:complexType>
            <xsd:sequence>
                <!-- street address 1 -->
                <xsd:element name="street1"
                    type="xsd:string" />
                <!-- optional street address 2 -->
                <xsd:element name="street2"
                    type="xsd:string" minOccurs="0" />
                <!-- city-->
                <xsd:element name="city" type="xsd:string" />
                <!-- state code -->
                <xsd:element name="state"
                    type="stateCodeType" />
                <!-- zip-code -->
                <xsd:element ref="zip-code" />
            </xsd:sequence>
        </xsd:complexType>
    </xsd:element>

    <!-- A U.S. Zip Code -->
    <xsd:element name="zip-code">
        <xsd:simpleType>
            <xsd:restriction base="xsd:string">
                <xsd:pattern value="[0-9]{5}(-[0-9]{4})?" />
            </xsd:restriction>
        </xsd:simpleType>
    </xsd:element>

    <!-- State Code
        obviously not a valid state code....but this is just
        an example and I don't feel like creating all the valid
        ones.
    -->
    <xsd:simpleType name="stateCodeType">
        <xsd:restriction base="xsd:string">
            <xsd:pattern value="[A-Z]{2}" />
        </xsd:restriction>
    </xsd:simpleType>

    <!-- Telephone Number -->
    <xsd:simpleType name="TelephoneNumberType">
        <xsd:restriction base="xsd:string">
            <xsd:length value="12" />
            <xsd:pattern value="[0-9]{3}-[0-9]{3}-[0-9]{4}" />
        </xsd:restriction>
    </xsd:simpleType>

    <!-- Cool price type -->
    <xsd:simpleType name="PriceType">
        <xsd:restriction base="xsd:decimal">
            <xsd:fractionDigits value="2" />
            <xsd:totalDigits value="5" />
            <xsd:minInclusive value="1" />
            <xsd:maxInclusive value="100" />
        </xsd:restriction>
    </xsd:simpleType>

    <!-- The attributes for an Item -->
    <xsd:attributeGroup name="ItemAttributes">
        <xsd:attribute name="Id" type="xsd:ID" minOccurs="1"
            maxOccurs="1" />
        <xsd:attribute name="InStock" type="xsd:boolean"
            default="false" />
        <xsd:attribute name="Category" type="xsd:string"
            use="required" />
    </xsd:attributeGroup>
</xsd:schema>
The structure of this schema is simple: it is composed of a
top-level element which is a complexType with references to
other elements inside. This schema represents a simple
invoice: an invoice is a customer (customer top-level
group), an article (item element), a shipping method
(shipping-method element) and a shipping date
(shipping-date element). Notice that the ship-to element
uses a reference to an address element. This address
element is a top-level element that contains a reference to
a non-top-level element (the zip-cod element). At the end
of the schema we have two simpleTypes for representing a
telephone number and a price. The Source Generator is used
with the element property set for class creation
so a class is going to be generated for all top-level elements. No classes
are going to be generated for complexTypes and simpleTypes since the
simpleType is not an enumeration.
To summarize, we can expect 7 classes : Invoice, Customer,
Address, Item, ShipTo, ShippingMethod
and ShippingDate and the 7 corresponding class descriptors. Note
that a class is generated for the top-level group customer
To run the source generator and create the source from the
invoice.xsd file in a package test, we just call
in the command line:
java -cp %CP% org.exolab.castor.builder.SourceGeneratorMain -i invoice.xsd -package test
To simplify this example we now focus on the item element.
<!-- Description of an item -->
<xsd:element name="item">
  <xsd:complexType>
    <xsd:sequence>
      <xsd:element name="Quantity" type="xsd:integer"
                   minOccurs="1" maxOccurs="1" />
      <xsd:element name="Price" type="PriceType"
                   minOccurs="1" maxOccurs="1" />
    </xsd:sequence>
    <xsd:attributeGroup ref="ItemAttributes" />
  </xsd:complexType>
</xsd:element>

<!-- Cool price type -->
<xsd:simpleType name="PriceType">
  <xsd:restriction base="xsd:decimal">
    <xsd:fractionDigits value="2" />
    <xsd:totalDigits value="5" />
    <xsd:minInclusive value="1" />
    <xsd:maxInclusive value="100" />
  </xsd:restriction>
</xsd:simpleType>

<!-- The attributes for an Item -->
<xsd:attributeGroup name="ItemAttributes">
  <xsd:attribute name="Id" type="xsd:ID" minOccurs="1" maxOccurs="1" />
  <xsd:attribute name="InStock" type="xsd:boolean" default="false" />
  <xsd:attribute name="Category" type="xsd:string" use="required" />
</xsd:attributeGroup>
To represent an Item object, we need to know its Id, the
Quantity ordered and the Price for one item. So we can
expect to find a least three private variables: a string for
the Id element, an int for the quantity element (see the
section on XML Schema support if you want to see the mapping
between a W3C XML Schema type and a java type), but what type
for the Price element?
While processing the Price
element, Castor is going to process the type of Price i.e.
the simpleType PriceType which base is decimal. Since
derived types are automatically mapped to parent types and
W3C XML Schema decimal type is mapped to a
java.math.BigDecimal, the price element will be a
java.math.BigDecimal. Another private variable is created
for quantity: quantity is mapped to a primitive java type,
so a boolean has_quantity is created for monitoring the
state of the quantity variable. The rest of the code is the
getter/setter methods and the Marshalling framework
specific methods. Please find below the complete Item class
(with Javadoc comments stripped off):
/**
 * This class was automatically generated with
 * Castor 1.0.4,
 * using an XML Schema.
 */

package test;

public class Item implements java.io.Serializable {

   //--------------------------/
   //- Class/Member Variables -/
   //--------------------------/

   private java.lang.String _id;

   private int _quantity;

   /**
    * keeps track of state for field: _quantity
    */
   private boolean _has_quantity;

   private java.math.BigDecimal _price;

   //----------------/
   //- Constructors -/
   //----------------/

   public Item() {
      super();
   } //-- test.Item()


   //-----------/
   //- Methods -/
   //-----------/

   public java.lang.String getId() {
      return this._id; $
   } //-- java.lang.String getId()

   public java.math.BigDecimal getPrice() {
      return this._price;
   } //-- java.math.BigDecimal getPrice()

   public int getQuantity() {
      return this._quantity;
   } //-- int getQuantity()

   public boolean hasQuantity() {
      return this._has_quantity;
   } //-- boolean hasQuantity()

   public boolean isValid() {
      try {
         validate();
      } catch (org.exolab.castor.xml.ValidationException vex) {
         return false;
      }
      return true;
   } //-- boolean isValid()

   public void marshal(java.io.Writer out)
   throws org.exolab.castor.xml.MarshalException,org.exolab.castor.xml.ValidationException {
      Marshaller.marshal(this, out);
   } //-- void marshal(java.io.Writer)

   public void marshal(org.xml.sax.DocumentHandler handler)
   throws org.exolab.castor.xml.MarshalException, org.exolab.castor.xml.ValidationException {
      Marshaller.marshal(this, handler);
   } //-- void marshal(org.xml.sax.DocumentHandler)

   public void setId(java.lang.String _id) {
      this._id = _id;
   } //-- void setId(java.lang.String)

   public void setPrice(java.math.BigDecimal _price) {
      this._price = _price;
   } //-- void setPrice(java.math.BigDecimal)

   public void setQuantity(int _quantity) {
      this._quantity = _quantity;
      this._has_quantity = true;
   } //-- void setQuantity(int)

   public static test.Item unmarshal(java.io.Reader reader)
   throws org.exolab.castor.xml.MarshalException,org.exolab.castor.xml.ValidationException {
      return (test.Item) Unmarshaller.unmarshal(test.Item.class, reader);
   } //-- test.Item unmarshal(java.io.Reader)

   public void validate()
   throws org.exolab.castor.xml.ValidationException {
      org.exolab.castor.xml.Validator.validate(this, null);
   } //-- void validate()

}
The ItemDescriptor class is a bit more complex. This class is containing inner classes which are the XML field descriptors for the different components of an ‘Item’ element i.e. id, quantity and price.
In this section, we focus on the 'invoice' element as shown again below:
<xsd:element name="invoice">
   <xsd:complexType>
      <xsd:sequence>
         <xsd:element name="ship-to">
            <xsd:complexType>
               <xsd:group ref="customer" />
            </xsd:complexType>
         </xsd:element>
         <xsd:element ref="item"    minOccurs="1" maxOccurs="unbounded" />
         <xsd:element ref="shipping-method" />
         <xsd:element ref="shipping-date" />
      </xsd:sequence>
   </xsd:complexType>
</xsd:element>
Amongst other things, an <invoice> is made up of at least
one, but potentially many <item> elements. The Castor XML code
generator creates a Java collection named 'itemList' for this
unbounded element declaration, of type java.util.List
if the scode generator is used with the 'arraylist'
field factory.
private java.util.List _itemList;If the 'j1' field factory is used, this will be replaced
with ...
private java.util.Vector _itemList;The complete class as generated (with irrelevant code
parts removed) in 'j2' (aka 'arraylist')
mode is shown below:
public class Invoice implements java.io.Serializable {


    ...

    private java.util.List _itemList;

    ...

    public Invoice()
     {
        super();
        this._itemList = new java.util.ArrayList();
    } //-- xml.c1677.invoice.generated.Invoice()

    ...

    public void addItem(xml.c1677.invoice.generated.Item vItem)
        throws java.lang.IndexOutOfBoundsException
    {
        this._itemList.add(vItem);
    } //-- void addItem(xml.c1677.invoice.generated.Item)

    public void addItem(int index, xml.c1677.invoice.generated.Item vItem)
        throws java.lang.IndexOutOfBoundsException
    {
        this._itemList.add(index, vItem);
    } //-- void addItem(int, xml.c1677.invoice.generated.Item)

    public java.util.Enumeration enumerateItem()
    {
        return java.util.Collections.enumeration(this._itemList);
    } //-- java.util.Enumeration enumerateItem()

    public xml.c1677.invoice.generated.Item getItem(int index)
        throws java.lang.IndexOutOfBoundsException
    {
        // check bounds for index
        if (index < 0 || index >= this._itemList.size()) {
            throw new IndexOutOfBoundsException("getItem: Index value '" + index
               + "' not in range [0.." + (this._itemList.size() - 1) + "]");
        }

        return (xml.c1677.invoice.generated.Item) _itemList.get(index);
    } //-- xml.c1677.invoice.generated.Item getItem(int)

    public xml.c1677.invoice.generated.Item[] getItem()
    {
        int size = this._itemList.size();
        xml.c1677.invoice.generated.Item[] array = new xml.c1677.invoice.generated.Item[size];
        for (int index = 0; index < size; index++){
            array[index] = (xml.c1677.invoice.generated.Item) _itemList.get(index);
        }

        return array;
    } //-- xml.c1677.invoice.generated.Item[] getItem()

    public int getItemCount()
    {
        return this._itemList.size();
    } //-- int getItemCount()

    public java.util.Iterator iterateItem()
    {
        return this._itemList.iterator();
    } //-- java.util.Iterator iterateItem()

    public void removeAllItem()
    {
        this._itemList.clear();
    } //-- void removeAllItem()

    public boolean removeItem(xml.c1677.invoice.generated.Item vItem)
    {
        boolean removed = _itemList.remove(vItem);
        return removed;
    } //-- boolean removeItem(xml.c1677.invoice.generated.Item)

    public xml.c1677.invoice.generated.Item removeItemAt(int index)
    {
        Object obj = this._itemList.remove(index);
        return (xml.c1677.invoice.generated.Item) obj;
    } //-- xml.c1677.invoice.generated.Item removeItemAt(int)

    public void setItem(int index, xml.c1677.invoice.generated.Item vItem)
        throws java.lang.IndexOutOfBoundsException
    {
        // check bounds for index
        if (index < 0 || index >= this._itemList.size()) {
            throw new IndexOutOfBoundsException("setItem: Index value '"
               + index + "' not in range [0.." + (this._itemList.size() - 1) + "]");
        }

        this._itemList.set(index, vItem);
    } //-- void setItem(int, xml.c1677.invoice.generated.Item)

    public void setItem(xml.c1677.invoice.generated.Item[] vItemArray)
    {
        //-- copy array
        _itemList.clear();

        for (int i = 0; i < vItemArray.length; i++) {
                this._itemList.add(vItemArray[i]);
        }
    } //-- void setItem(xml.c1677.invoice.generated.Item)

}
Two companies wish to trade with each other using a Supply Chain messaging system. This system sends and receives Purchase Orders and Order Receipt messages. After many months of discussion they have finally decided upon the structure of the Version 1.0 of their message XSD and both are presently developing solutions for it. One of the companies decides to use Java and Castor XML support for (un)marshaling and Castor's code generator to accelerate their development process.
            <title>supplyChainV1.0.xsd</title>
<?xml version="1.0" encoding="UTF-8"?>
<xs:schema xmlns:xs="http://www.w3.org/2001/XMLSchema"
           elementFormDefault="qualified"
           attributeFormDefault="unqualified">

    <xs:element name="Data">
      <xs:annotation>
        <xs:documentation>
          This section contains the supply chain message data
        </xs:documentation>
      </xs:annotation>
      <xs:complexType>
        <xs:choice>
          <xs:element name="PurchaseOrder">
            <xs:complexType>
              <xs:sequence>
                <xs:element name="LineItem" type="LineItemType" maxOccurs="unbounded"/>
              </xs:sequence>
              <xs:attribute name="OrderNumber" type="xs:string" use="required"/>
            </xs:complexType>
          </xs:element>
          <xs:element name="OrderReceipt">
            <xs:complexType>
              <xs:sequence>
                <xs:element name="LineItem" type="ReceiptLineItemType" maxOccurs="unbounded"/>
              </xs:sequence>
              <xs:attribute name="OrderNumber" type="xs:string" use="required"/>
            </xs:complexType>
          </xs:element>
        </xs:choice>
      </xs:complexType>
    </xs:element>

    <xs:complexType name="SkuType">
      <xs:annotation>
        <xs:documentation>Contains Product Identifier</xs:documentation>
      </xs:annotation>
      <xs:sequence>
        <xs:element name="Number" type="xs:integer"/>
        <xs:element name="ID" type="xs:string"/>
      </xs:sequence>
    </xs:complexType>

    <xs:complexType name="ReceiptSkuType">
      <xs:annotation>
        <xs:documentation>Contains Product Identifier</xs:documentation>
      </xs:annotation>
      <xs:complexContent>
        <xs:extension base="SkuType">
          <xs:sequence>
            <xs:element name="InternalID" type="xs:string"/>
          </xs:sequence>
        </xs:extension>
      </xs:complexContent>
    </xs:complexType>

    <xs:complexType name="LineItemType">
      <xs:sequence>
        <xs:element name="Sku" type="SkuType"/>
        <xs:element name="Value" type="xs:double"/>
        <xs:element name="BillingInstructions" type="xs:string"/>
        <xs:element name="DeliveryDate" type="xs:date"/>
        <xs:element name="Number" type="xs:integer"/>
      </xs:sequence>
    </xs:complexType>

    <xs:complexType name="ReceiptLineItemType">
      <xs:sequence>
        <xs:element name="Sku" type="ReceiptSkuType"/>
        <xs:element name="Value" type="xs:double"/>
        <xs:element name="PackingDescription" type="xs:string"/>
        <xs:element name="ShipDate" type="xs:dateTime"/>
        <xs:element name="Number" type="xs:integer"/>
      </xs:sequence>
    </xs:complexType>
</xs:schema>If you run the Castor CodeGenerator on the above XSD you end up with the following set of classes. (You also get lots of warning messages with the present version.)
Data.java
DataDescriptor.java
LineItem.java
LineItemDescriptor.java
LineItemType.java
LineItemTypeDescriptor.java
OrderReceipt.java
OrderReceiptDescriptor.java
PurchaseOrder.java
PurchaseOrderDescriptor.java
ReceiptLineItemType.java
ReceiptLineItemTypeDescriptor.java
ReceiptSkuType.java
ReceiptSkuTypeDescriptor.java
Sku.java
SkuDescriptor.java
SkuType.java
SkuTypeDescriptor.java
The problem here is that there are two different elements with the same name in different locations in the XSD. This causes a Java code generation conflict. By default, Castor uses the element name as the name of the class. So the second class generated for the LineItem definition, which is different than the first, overwrites the first class generated.
A binding file is therefore necessary to help the Castor code generator differentiate between these generated classes and as such avoid such generation conflicts. That is, you can 'bind' an element in the XML schema to a differently named class file that you want to generate. This keeps different elements separate and ensures that source is properly generated for each XML Schema object.
| Tip |
|---|---|
The warning messages for Castor 0.99+ are very useful in assisting you in your creation of the binding file. For the example the warning messages for the example are:
    Warning: A class name generation conflict has occurred between element
            '/Data/OrderReceipt/LineItem' and element '/Data/PurchaseOrder/LineItem'.
            Please use a Binding file to solve this problem.Continue anyway [not recommended] (y|n|?)y
    Warning: A class name generation conflict has occurred between element
            '/Data/OrderReceipt/LineItem' and element '/Data/PurchaseOrder/LineItem'.
            Please use a Binding file to solve this problem.Continue anyway [not recommended] (y|n|?)y
    Warning: A class name generation conflict has occurred between element
            '/Data/OrderReceipt/LineItem' and element '/Data/PurchaseOrder/LineItem'.
            Please use a Binding file to solve this problem.Continue anyway [not recommended] (y|n|?)y
    Warning: A class name generation conflict has occurred between element
            'complexType:ReceiptLineItemType/Sku' and element 'complexType:LineItemType/Sku'.
            Please use a Binding file to solve this problem.Continue anyway [not recommended] (y|n|?)y
    Warning: A class name generation conflict has occurred between element
            'complexType:ReceiptLineItemType/Sku' and element 'complexType:LineItemType/Sku'.
            Please use a Binding file to solve this problem.Continue anyway [not recommended] (y|n|?)y
    Warning: A class name generation conflict has occurred between element
            'complexType:ReceiptLineItemType/Sku' and element 'complexType:LineItemType/Sku'.
            Please use a Binding file to solve this problem.Continue anyway [not recommended] (y|n|?)y
|
The following binding file definition will overcome the naming issues for the generated classes:
<binding xmlns="http://www.castor.org/SourceGenerator/Binding"
         xmlns:xsi="http://www.w3.org/2001/XMLSchema-instance"
         xsi:schemaLocation="http://www.castor.org/SourceGenerator/Binding C:\\Castor\\xsd\\binding.xsd"
         defaultBinding="element">

   <elementBinding name="/Data/PurchaseOrder/LineItem">
      <java-class name="PurchaseOrderLineItem"/>
   </elementBinding>

   <elementBinding name="/Data/OrderReceipt/LineItem">
      <java-class name="OrderReceiptLineItem"/>
   </elementBinding>

   <elementBinding name="/complexType:ReceiptLineItemType/Sku">
      <java-class name="OrderReceiptSku"/>
   </elementBinding>

   <elementBinding name="/complexType:LineItemType/Sku">
      <java-class name="PurchaseOrderSku"/>
   </elementBinding>

</binding>
One thing to notice in the above binding.xml file is that
the name path used is relative to the root of the XSD and not
the root of the target XML. Also notice that the two complex types
have the "complexType:" prefix to identify them followed by the name
path relative to the root of the XSD.
The new list of generated classes is:
Data.java
DataDescriptor.java
LineItem.java
LineItemDescriptor.java
LineItemType.java
LineItemTypeDescriptor.java
OrderReceipt.java
OrderReceiptDescriptor.java
OrderReceiptLineItem.java
OrderReceiptLineItemDescriptor.java
OrderReceiptSku.java
OrderReceiptSkuDescriptor.java
PurchaseOrder.java
PurchaseOrderDescriptor.java
PurchaseOrderLineItem.java
PurchaseOrderLineItemDescriptor.java
PurchaseOrderSku.java
PurchaseOrderSkuDescriptor.java
ReceiptLineItemType.java
ReceiptLineItemTypeDescriptor.java
ReceiptSkuType.java
ReceiptSkuTypeDescriptor.java
Sku.java
SkuDescriptor.java
SkuType.java
SkuTypeDescriptor.java
The developers can now use these generated classes with Castor to (un)marshal the supply chain messages sent by their business partner.
Castor JDO is an Object-Relational Mapping and Data-Binding Framework, which is written in 100% pure Java[tm]. Castor can map relational database data into Java Data Object based on user-defined mapping schema. In the other point-of-view, it provides java data objects a persistence layer.
It frees programmer from dealing with database directly and replacing the entire burden of composing updating the database. Proper SQL statements are automatically generated for loading, updating, creating and deleting. Changes to objects in transaction are automatically done to data source at commit time. Thus programmer can stay in pure-Java without remember all the details in the backing database, after the creation of database tables and the mapping schema. The separation of persistence and programming logic also enable much clearer object-oriented design, which is important in larger projects.
JDO is transactional. Data objects loaded in Castor are properly locked and isolated from other transactions. Castor supports full 2-phase commit via xa.Synchronzation. Castor supports several locking modes, including "shared", "exclusive", "database locked", and "read-only".
Shared access, the default, is useful for situations in which it is common for two or more transactions to read the same objects, and/or update different objects.
Exclusive access uses in-memory locks implemented by Castor to force competing transactions to serialize access to an object. This is useful for applications in which it is common for more than one transaction to attempt to update the same object, and for which most, if not all access to the database is performed through Castor.
Database-Locked access is often used for applications in which exclusive locking is required, but in which the database is frequently accessed from applications outside of Castor, bypassing Castor's memory-based locking mechanism used by "exclusive access" locking.
Read-Only access performs no locking at all. Objects read using this access mode are not locked, and those objects do not participate in transaction commit/rollback.
In addition, Castor supports "long transactions", whichs allow objects to be read in one transaction, modified, and then committed in a second transaction, with built-in dirty-checking to prevent data that has been changed since the initial transaction from being overwritten.
Through automatic dirty-checking and deadlock detection, Castor can be used to ensure data integrity and reduce unnecessary database updates.
A subset of OQL, defined in the Object Management Group (OMG) 3.0 Object Query Language Specification, is supported for interacting with the database. OQL is similar to SQL, though operations are performed directly on Java objects instead of database tables, making the language more appropriate for use within a Java-based application.
Castor implements a data cache to reduce database accesses, providing several alternative LRU-based caching strategies.
Castor supports different cardinalities of relationship, including one-to-one, one-to-many and many-to-many. It also supports both object and database record inheritance. It distinguishes between related (i.e. association) and dependent (i.e. aggregation) relationships during an object's life cycle, automatically creating and deleting dependent objects at appropriate times in the independent object's life cycle.
Multiple-column primary keys, and a variety of key generators are supported.
Castor automatically manages persistence for objects that contain Java collection types, including Vector, Hashtable, Collection, Set, and Map. Lazy loading (of collections as well as simple 1:1 relations) is implemented to reduce unnecessary database loading. Lazy loading can be turned on or off for each individual field (of any supported collection type for 1-to-many and many-to-many relations).
Other features include a type converter for all Java primitive types (see the info on supported types).
No pre-processor (aka pre-compiler), class enhancer (bytecodes modification) is needed or used for data-binding and object persistence.
Castor JDO works in an application that uses multiple ClassLoaders, making it possible to use in an EJB container or servlet, for example. A Castor-defined callback interface, "Persistent", can be implemented if the objects wants to be notified on Castor events: jdoLoad(), jdoCreate(), jdoRemove() and jdoTransient(). This makes it possible to create user-defined actions to take at various times in an object's life cycle.
The Java-XML Data-Binding Framework (Castor XML) has been merged with Castor JDO for users who need both O/R Mapping and Java-XML Data-Binding together.
The following relational databases are supported:
DB2
Derby
Generic DBMS
Hypersonic SQL
Informix
InstantDB
Interbase
MySQL
Oracle
PostgreSQL
Progress
SAP DB / MaxDB
SQLServer
Sybase
Database support includes Oracle 8.1.x and different versions of Sybase Enterprise and Anywhere. Users can implement the Driver interface to adapt Castor to the differences in SQL syntax supported by different relational DBMS's, as long as the DBMS supports JDBC 2.0, multiple ResultSet, and transactions. Thanks to many individual open source contributors, drivers for different database are available.
This guide assumes that you do not have any experience with CASTOR JDO, but would like to make your first steps into the world of persistence and object/relation mapping tools. The following sections show how to setup and configure Castor JDO so that it is possible to perform persistence operations on the domain objects presented.
The sample domain objects used in here basically define a
Catalogue,
which is a collection of Products.
public class Catalogue {

   private long id;
   private List products = new ArrayList();

   public long getId() { ... }
   public void setId(long id) { ... }

   public String getProducts() { ... }
   public void setProducts(List products) { ... }

}

public class Product {

   private long id;

   private String description;

   public long getId() { ... }
   public void setId(long id) { ... }

   public String getDescription() { ... }
   public void setDescription(String description) { ... }

}
In order to be able to perform any persistence operation (such as loading products, deleting products from a catalogue, ...) on these domain objects through Castor JDO, a Castor JDO mapping has to be provided, defining class and field level mappings for the Java classes given and their members:
<class name="org.castor.sample.Catalogue">
   <map-to table="catalogue"/>
   <field name="id" type="long">
      <sql name="id" type="integer" />
   </field>
   <field name="products" type="org.castor.sample.Product" collection="arraylist">
      <sql many-key="c_id" />
   </field>
</class>

<class name="org.castor.sample.Product">
   <map-to table="product"/>
   <field name="id" type="long">
      <sql name="id" type="integer" />
   </field>
   <field name="description" type="string">
      <sql name="desc" type="varchar" />
   </field>
</class>
To e.g. load a given Catalogue instance as defined
by its identity, and all its associated Product instances,
the following code could be used, based upon the Castor-specific interfaces
JDOManager and Database.
JDOManager.loadConfiguration("jdo-conf.xml");
JDOManager jdoManager = JDOmanager.createInstance("sample");

Database database = jdoManager.getDatabase();
database.begin();
Catalogue catalogue = database.load(catalogue.class, new Long(1));
database.commit();
database.close();
For brevity, exception handling has been ommitted completely. But is is quite obvious that - when using such code fragments again and again, to e.g. implement various methods of a DAO - there's a lot of redundant code that needed to be written again and again - and exception handling is adding some additional complexity here as well.
As shown in above code example, before you can perform any persistence operations on your domain objects, Castor JDO has to be configured by the means of a JDO configuration file. as part of this JDO configuration, the user defines one or more databases and everything required to connect to this database (user credentials, JDBC connection string, ....).
A valid JDO configuration file for HSQL looks as follows:
<?xml version="1.0" ?>
<!DOCTYPE jdo-conf PUBLIC "-//EXOLAB/Castor JDO Configuration DTD Version 1.0//EN" "http://castor.org/jdo-conf.dtd">
<jdo-conf>
  <database name="hsqldb" engine="hsql">
    <driver class-name="org.hsqldb.jdbcDriver" url="jdbc:hsqldb:hsql://localhost:9002/dbname">
      <param name="user" value="sa"/>
      <param name="password" value=""/>
    </driver>
    <mapping href="mapping.xml"/>
  </database>
  <transaction-demarcation mode="local"/>
</jdo-conf>
Castor JDO supports two type of environments, client applications and J2EE servers.
Client applications
are responsible for configuring the database connection and managing transactions
explicitly.
J2EE applications
use JNDI to obtain a pre-configured database connection, and use
UserTransaction or container managed transactions (CMT) to
manage transactions. If you have been using JDBC in these two environments,
you will be readily familiar with the two models and the differences between
them.
Client applications are responsible for defining the JDO configuration, and managing
the transaction explicitly. The database is by default configured through a separate
XML file which links to the mapping file. Alternatively, it can be configured using the
utility class org.exolab.castor.jdo.util.JDOConfFactory.
In the example code I refer to the JDO configuration file as
jdo-conf.xml, but any name can be used. See
Castor JDO Configuration
for more information.
As of release 0.9.6, a new JDOManager class is provided, that replaces the former JDO class. Any new features will be implemented against the new JDOManager class only.
As with its predecessor, org.exolab.castor.jdo.JDOManager defines the database
name and properties and is used to open a database connection. An instance of this class
is constructed with a two-step approach:
Statically load the JDO configuration file through one of the loadConfiguration() methods, e.g.
org.exolab.castor.jdo.JDOManager.loadConfiguration(java.lang.String).Create an instance of the JDO engine using the factory method
org.exolab.castor.jdo.JDOManager.createInstance(java.lang.String)where you supply one of the database names defined in the configuration file loaded in step 1).
The org.exolab.castor.jdo.Database object represents
an open connection to the database. By definition the database object is not
thread safe and should not be used from concurrent threads. There is little
overhead involved in opening multiple Database
objects, and a JDBC connection is acquired only per open transaction.
The following code fragment creates an instance of JDOManager for a database 'mybd', opens a database, performs a transaction, and closes the database - as it will typically appear in client applications (for brevity, we have ommitted any required exception handling):
JDOManager jdoManager;
Database db;

// load the JDO configuration file and construct a new JDOManager for the database 'mydb'
JDOManager.loadConfiguration("jdo-conf.xml");
jdoManager = JDOManager.createInstance("mydb");

// Obtain a new database
Database db = jdoManager.getDatabase();

// Begin a transaction
db.begin();

// Do something
. . .

// Commit the transaction and close the database
db.commit();
db.close();
For an example showing how to set up a database configuration on the fly without the need of a preconfigured XML configuration file) see JdoConfFactory.
J2EE applications depend on the J2EE container (Servlet, EJB, etc) to configure the database connection and use JNDI to look it up. This model allows the application deployer to configure the database properties from a central place, and gives the J2EE container the ability to manage distributed transactions across multiple data sources.
Instead of constructing a
org.exolab.castor.jdo.JDOManager
the application uses the JNDI namespace to look it up.
We recommend enlisting the JDOManager
object under the java:comp/env/jdo namespace,
compatible with the convention for listing JDBC resources.
The following code fragment uses JNDI to lookup a database, and uses the JTA
UserTransaction interface to manage the transaction:
InitialContext  ctx;
UserTransaction ut;
Database        db;

// Lookup databse in JNDI
ctx = new InitialContext();
db = (Database) ctx.lookup( "java:comp/env/jdo/mydb" );

// Begin a transaction
ut = (UserTransaction) ctx.lookup( "java:comp/UserTransaction" );
ut.begin();
// Do something
. . .
// Commit the transaction, close database
ut.commit();
db.close();
If the transaction is managed by the container, a common case with EJB beans and in particular entity beans, there is no need to begin/commit the transaction explicitly. Instead the application server takes care of enlisting the database in the ongoing transaction and executes commit/rollback at the proper time.
The following code snippet relies on the container to manage the transaction
InitialContext  ctx;
UserTransaction ut;
Database        db;

// Lookup database in JNDI
ctx = new InitialContext();
db = (Database) ctx.lookup( "java:comp/env/jdo/mydb" );

// Do something
. . .
// Close the database
db.close();
All JDO operations occur within the context of a transaction. JDO works by loading data from the database into an object in memory, allowing the application to modify the object, and then storing the object's new state when the transaction commits. All objects can be in one of two states: transient or persistent.
Transient: Any object whose state will not be saved to the database when the transaction commits. Changes to transient objects will not be reflected in the database.
Persistent: Any object whose state will be saved to the database when the transaction commits. Changes to persistent objects will be reflected in the database.
An object becomes persistent in one of two ways: it is the result of a query,
(and the query is not performed in read-only mode) or it is added to the database
using
org.exolab.castor.jdo.Database.create(java.lang.Object)
or
org.exolab.castor.jdo.Database.update(java.lang.Object).
All objects that are not persistent are transient. When the transaction commits
or rolls back, all persistent objects become transient.
In a client application, use
org.exolab.castor.jdo.Database.begin(),
org.exolab.castor.jdo.Database.commit() and
org.exolab.castor.jdo.Database.rollback()
to manage transactions. In a J2EE application, JDO relies on the container
to manage transactions either implicitly (based on the transaction attribute
of a bean) or explicitly using the
javax.transaction.UserTransaction interface.
If a persistent object was modified during the transaction, at commit time the modifications are stored back to the database. If the transaction rolls back, no modifications will be made to the database. Once the transaction completes, the object is once again transient. To use the same object in two different transactions, you must query it again.
An object is transient or persistent from the view point of the database to which
the transaction belongs. An object is generally persistent in a single database,
and calling
org.exolab.castor.jdo.Database">isPersistent(java.lang.Object)
from another database will return false. It is possible to make an object persistent
in two database, e.g. by querying it in one, and creating it in the other.
OQL queries are used to lookup and query objects from the database. OQL queries are
similar to SQL queries, but use object names instead of SQL names and do not require
join clauses. For example, if the object being loaded is of type TestObject,
the OQL query will load FROM TestObject, whether the actual table name in
the database is test, test_object, or any other name.
If a join is required to load related objects, Castor will automatically perform the join.
The following code snippet uses an OQL query to load all the objects in a given group. Note that product and group are related objects, the JDBC query involves a join:
OQLQuery     oql;
QueryResults results;

// Explicitly begin transaction
db.begin();

// Construct a new query and bind its parameters
oql = db.getOQLQuery("SELECT p FROM Product p WHERE Group=$1");
oql.bind(groupId);

// Retrieve results and print each one
results = oql.execute();
while (results.hasMore()) {
  System.out.println(results.next());
}

// Explicitly close the QueryResults
results.close();

// Explicitly close the OQLQuery
oql.close();

// Explicitly commit transaction
db.commit();
db.close();
The following code snippet uses the previous query to obtain products, mark down their price by 25%, and store them back to the database (in this case using a client application transaction):
OQLQuery     oql;
QueryResults results;

// Explicitly begin transaction
db.begin();

// Construct a new query and bind its parameters
oql = db.getOQLQuery("SELECT p FROM Product p WHERE Group=$1");
oql.bind(groupId);

// Retrieve results and mark up each one by 25%
Product prod;
while (results.hasMore()) {
  prod = (Product) results.next();
  prod.markDown(0.25);
  prod.setOnSale(true);
}

// Explicitly close the QueryResults
results.close();

// Explicitly close the OQLQuery
oql.close();

// Explicitly commit transaction
db.commit();
db.close();
As illustrated above, a query is executed in three steps. First a query object is
created from the database using an OQL statement. If there are any parameters, the
second step involves binding these parameters. Numbered parameters are bound using
the order specified in their names. (e.g. first $1, after that $2, and so on...)
The third step involves executing the query and obtaining a result set of type
org.exolab.castor.jdo.QueryResults.
A query can be created once and executed multiple times. Each time it is executed the bound parameters are lost, and must be supplied a second time. The result of a query can be used while the query is being executed a second time.
There is also a special form of query that gives a possibility to call stored procedures:
oql = db.getOQLQuery("CALL sp_something($) AS myapp.Product");
Here sp_something is a stored procedure returning one or more ResultSets with the same sequence of fields as Castor-generated SELECT for the OQL query "SELECT p FROM myapp.Product p" (for objects without relations the sequence is: identity, then all other fields in the same order as in mapping.xml).
The method
org.exolab.castor.jdo.Database.create(java.lang.Object)
creates a new object in the database, or in JDO terminology makes a transient
object persistent. An object created with the create method
will remain in the database if the transaction commits;
if the transaction rolls back the object will be removed from the database.
An exception is thrown if an object with the same identity already exists in
the database.
The following code snippet creates a new product with a group that was previously queried:
Database db = ...;
db.begin();

//load product group
ProductGroup furnitures = db.load(...);

// Create the Product object
Product prod;
prod = new Product();
prod.setSku(5678);
prod.setName("Plastic Chair");
prod.setPrice(55.0 );
prod.setGroup(furnitures);

// Make it persistent
db.create(prod);

db.commit();
The method
org.exolab.castor.jdo.Database.remove(java.lang.Object)
has the reverse effect, deleting a persistent object. Once removed the object is no
longer visible to any transaction. If the transaction commits, the object will be removed
from the database, however, if the transaction rolls back the object will remain in
the database. An exception is thrown when attempting to remove an object that is not
persistent.
The following code snippet deletes the previously created Product instance:
Database db = ...;
db.begin();

// load the Product instance with sku = 5678
Product prod = db.load (Product.class, new Integer(5678);

// delete the Product instance
db.remove(prod);

db.commit();
There's no special method offering on the
org.exolab.castor.jdo.Database
to update an existing persistent object. Simply load the object to be updated, change
one or more of its properties, and commit the transaction. Castor JDO will automatically
figure that that the object in question has changed and will persist these changes
to the underlying database.
The following code snippet loads a previously created Product instance, changes its description property and commits the transaction.
Database db = ...;
db.begin();

// load the Product instance with sku = 5678
Product prod = db.load (Product.class, new Integer(5678);

// change the object properties
prod.setDescription("New plastic chair");

//commit the transaction
db.commit();
Castor JDO and Castor XML can be combined to perform transactional database operations that use XML as the form of input and output. The following code snippet uses a combination of persistent and transient objects to describe a financial operation.
This example retrieves two account objects and moves an amount from one account to the other. The transfer is described using a transient object (i.e. no record in the database), which is then used to generate an XML document describing the transfer. An extra step (not shown here), uses XSLT to transform the XML document into an HTML page.
Transfer tran;
Account  from;
Account  to;
OQLQuery oql;

tran = new Transfer();

// Construct a query and load the two accounts
oql = db.getOQLQuery("SELECT a FROM Account a WHERE Id=$");
oql.bind(fromId);
from = oql.execute().nextElement();
oql.bind(toId);
to = oql.execute().nextElement();

// Move money from one account to the other
if (from.getBalance() >= amount) {
  from.decBalance(amount);
  to.incBalance(amount);
  trans.setStatus(Transfer.COMPLETE);
  trans.setAccount(from);
  trans.setAmount(amount);
} else {
  // Report an overdraft
  trans.setStatus( Transfer.OVERDRAFT );
}

// Produce an XML describing the transfer
Marshaller.marshal(trans, outputStream);
The XML produced by the above code might look like:
<?xml version="1.0"?>
<report>
  <status>Completed</status>
  <account id="1234-5678-90" balance="50"/>
  <transfer amount="49.99"/>
</report>
Castor JDO allows for two simple ways of specifying its required configuration, e.g.
by the means of supplying Castor JDO with an XML-based configuration file, and by
specifying its configuration programmatically via the
org.exoalb.castor.util.jdo.JDOConfFactory class.
The default way to configure how Castor interacts with a specific database system is by using a configuration file. It specifies the means to obtain a connection to the database server, the mapping between Java classes and tables in that database server, and the service provider to use for talking to that server (For a more flexible, programmatic way without configuration files see section JDOConfFactory).
The application will access the database(s) by its given name
(database/name) and will be able to persist all objects
specified in the included mapping file(s).
The engine attribute specifies the persistence engine for this
database server. Different database servers vary in the SQL syntax and
capabilites they support, and this attribute names the service provider to use.
The following names are supported in Castor:
Table 3.1. Supported engine names
| engine name | RDBMS |
|---|---|
| db2 | DB/2 |
| derby | Derby |
| generic | Generic JDBC support |
| hsql | Hypersonic SQL |
| informix | Informix |
| instantdb | InstantDB |
| interbase | Interbase |
| mysql | MySQL |
| oracle | Oracle 7 - Oracle 9i |
| postgresql | PostgreSQL 7.1 |
| sapdb | SAP DB / MaxDB |
| sql-server | Microsoft SQL Server |
| sybase | Sybase 11 |
| pointbase | Borland Pointbase |
| progress | Progress RDBMS |
| Note |
|---|---|
Castor doesn't work with JDBC-ODBC bridge from Sun. In particular, MS Access is not supported. |
The means to acquire a database connection is specified in one of three
ways: as a JDBC driver URL, as a JDBC DataSource, or as a DataSource
to lookup through JNDI. When Castor is used inside a J2EE application server
it is recommended to use JNDI lookup (see the jndi element),
allowing the application server to manage connection pooling and distributed
transactions.
The class mapping is included from an external mapping file, allowing multiple mappings to be included in the same database configuration, or two databases to share the same mappings. For concurrency and integrity reasons, two database configurations should never attempt to use overlapping mappings. It is recommended to use one database configuration per database server.
The mapping file is specified using a URL, typically a file: URL.
If the database configuration file and mapping file reside in the same
directory, use a relative URL. Relative URLs also work if the database
configuration and mapping files are obtained from the application JAR and
reside in the same classpath.
The driver element specifies the JDBC driver for obtaining
new connections to the database server. The driver is obtained from the JDBC
DriverManager and must be located in the class path. The JDBC URL
locates the driver and provides the access properties. Additional properties
may be specified using param elements (e.g. buffer size, network
protocol, etc).
Use the class-name attribute to specify the driver class for
automatic registration with the JDBC DriverManager. If missing,
the driver must be registered in any other means, including properties file,
Class.forName(), etc.
For example, to configure an Oracle 8 thin driver, use:
  <jdo-conf>
     <database name="ebiz" engine="oracle">
        <driver class-name="oracle.jdbc.driver.OracleDriver"
                url="jdbc:oracle:thin:@host:port:SID">
           <param name="user" value="scott" />
           <param name="password" value="tiger" />
        </driver>
        ...
     </database>
     ...
  </jdo-conf>
The data-source element specifies the JDBC DataSource for
obtaining new connections to the database server. DataSources are defined
in the JDBC 2.0 standard extension API which is included with Castor, and
implement the interface javax.sql.DataSource.
The DataSource implementation class name is specified by the
class-name attribute and configured through Bean-like accessor
methods specified for the param element.
The DTD for the param element is undefined
and depends on the DataSource being used.
For example, to configure a PostgreSQL 7.1 DataSource, use:
  <jdo-conf>
     <database name="ebiz" engine="oracle">
        <data-source class-name="org.postgresql.PostgresqlDataSource">
           <param name="serverName" value="host" />
           <param name="portNumber" value="5432" />
           <param name="databaseName" value="db" />
           <param name="user" value="user" />
           <param name="password=" value="secret" />
        </data-source>
        ...
     </database>
     ...
  </jdo-conf>
The jndi element specifies the JDBC DataSource for obtaining
new connections to the database server through a JNDI lookup. The JNDI environment
naming context (ENC) is used to obtain a suitable DataSource..
When running inside a J2EE application server, this is the preferred method for obtaining database connections. It enables the J2EE application server to configure the connection, maintain a connection pool, and manage distributed transactions.
For example, to specify a J2EE DataSource, use:
  <jdo-conf>
     <database name="ebiz" engine="oracle">
        <jndi name="java:comp/env/jdbc/mydb" />
     </database>
     ...
  </jdo-conf>
As opposed to release pre 0.9.6, transaction demarcation is now configured
in the JDO configuration file. As such, the user has to specify which transaction
demarcation to use. Transactions when used with Castor JDO can either be
local or global,
and you instruct Castor to use a specific mode by supplying
a <transaction-demarcation> element.
When using Castor JDO stand-alone and you want Castor to control
transaction demarcation, please use the
<transaction-demarcation> element as follows:
<transaction-demarcation mode="local" />
When running inside a J2EE application server, and you want to use
global (XA) transactions, please make use the
<transaction-demarcation> element as follows:
<transaction-demarcation mode="global">
   <transaction-manager name="jndi" />
</transaction-demarcation>
In this mode, the <transaction-manager>
element specifies the transaction manager that is used by your
J2EE container to control these transactions.
The following transaction managers are supported in Castor:
Table 3.2. Supported transaction managers
| Name | Description |
|---|---|
| jndi | TM looked up in the JNDI ENC |
| websphere | IBM WebSphere 4 and previous releases |
| websphere5 | IBM WebSphere 5 |
| websphere51 | IBM WebSphere 5.1 |
| jotm | JOTM |
| atomikos | Atomikos |
In addition to specifying the transaction manager name, it is possible to pass arbitrary name/value pairs to the transaction manager instance.
| Note |
|---|---|
At the moment, only the JNDI transaction manager factory supports such an attribute. In this context, the jndiEnc attribute can be used to specify what JNDI ENC to use to lookup the transaction manager as shown below: |
  <transaction-demarcation mode="global">
     <transaction-manager name="jndi">
        <param name="jndiEnc" value="java:comp/env/TransactionManager"/>
     </transaction-manager>
  </transaction-demarcation>
The following configuration file instructs Castor JDO to execute against an Oracle RDBMS using the thin (type 4) JDBC driver, and refers to three mapping files that define mappings for product, order and customer related data.
  <?xml version="1.0"?>
  <jdo-conf name="order-system">
     <database name="ebiz" engine="oracle">
        <driver class-name="oracle.jdbc.driver.OracleDriver"
                url="jdbc:oracle:thin:@machine:post:SID">
           <param name="user" value="scott"/>
           <param name="password" value="tiger"/>
        </driver>
        <mapping href="products.xml"/>
        <mapping href="orders.xml"/>
        <mapping href="customers.xml"/>
     </database>
     <transaction-demarcation mode="local"/>
  </jdo-conf>
The following configuration file uses a connection obtained from the J2EE application server and a single mapping file:
  <?xml version="1.0"?>
  <jdo-conf>
     <database name="ebiz" engine="oracle">
        <jndi name="java:comp/env/jdbc/mydb"/>
        <mapping href="ebiz.xml"/>
     </database>
     <transaction-demarcation mode="global">
        <transaction-manager name="jndi">
           <param name="jndiEnc" value="java:comp/env/TransactionManager"/>
        </transaction-manager>
     </transaction-demarcation>
  </jdo-conf>
Castor JDO uses JDBC prepared statements to execute SQL statements against the specified RDBMS of your choice. Per definition, Castor JDO does not provide any prepared statement pooling. As such, Castor relies on prepared statement pooling being provided by different means.
One such way is to use Jakarta's Commons DBCP as database connection pool, and to turn prepared statement pooling on by configuring DBCP accordingly.
Please check with Using Pooled Database Connections for general information about hot to use DBCP with Castor.
Besides the examples listed above, more configuraton examples can be found in the
configuration files for the Castor JDO tests, which can be found in
src/tests/jdo once you have downloaded and expanded the Castor
source package. For each database (vendor) supported, you are going to find a
database-specific JDO configuration file in this directory, e.g.
src/tests/jdo/mysql.xml for
mySQL™ or
src/tests/jdo/oracle.xml
for Oracle™.
  ...
  <!-- JDBC data source for Sybase using jConnect -->
  <data-source class-name="com.sybase.jdbc2.jdbc.SybDataSource">
    <param name="user" value="user" />
    <param name="password value="secret" />
    <param name="portNumber" value="4100" />
    <param name="serverName" value="host" />
  </data-source>
  ...
  ...
  <!-- JDBC data source for PostgreSQL -->
  <data-source class-name="org.postgresql.PostgresqlDataSource">
     <param name="serverName" value="host" />
     <param name="portNumber" value="5432" />
     <param name="databaseName" value="db" />
     <param name="user" value="user" />
     <param name="password" value="secret" />
   </data-source>
   ...
  ...
  <!-- JDBC driver definition for Oracle -->
  <driver class-name="oracle.jdbc.driver.OracleDriver"
          url="jdbc:oracle:thin:@host:post:SID">
    <param name="user" value="scott" />
    <param name="password" value="tiger" />
  </driver>
  ...
  ...
  <!-- JDBC data source for mySQL -->
  <driver class-name="com.mysql.jdbc.Driver"
          url="jdbc:mysql:/localhost:2206/test">
    <param name="user" value="scott" />
    <param name="password" value="tiger" />
  </driver>
  ...
Many applications need to connect to a database using varying
user accounts or database instances. To accomplish this, the utility class
org.exolab.castor.jdo.util.JDOConfFactory">JDOConfFactory
and a
JDOManager.loadConfiguration(org.exolab.castor.jdo.conf.JdoConf)
method has been added to Castor.
The following code snippet shows an example how to create a JDO configuration without the use of a default XML-based database configuration file:
  private static final String DRIVER = "oracle.jdbc.driver.OracleDriver";
  private static final String CONNECT = "jdbc:oracle:thin:localhost:1521:SID";
  private static final String USERNAME = "scott";
  private static final String PASSWORD = "tiger";
  private static final String MAPPING = "mapping.xml";
  private static final String DATABASE = "mydb";
  private static final String ENGINE = "oracle";

  // create driver configuration
  org.castor.jdo.conf.Driver driverConf =
      JDOConfFactory.createDriver(DRIVER, CONNECT, USERNAME, PASSWORD);

  // create mapping configuration
  org.castor.jdo.conf.Mapping mappingConf =
      JDOConfFactory.createMapping(getClass().getResource(MAPPING).toString());

  // create database configuration
  org.castor.jdo.conf.Database dbConf =
      JDOConfFactory.createDatabase(DATABASE, ENGINE, driverConf, mappingConf);

  // create and load jdo configuration
  JDOManager.loadConfiguration(JDOConfFactory.createJdoConf(dbConf));

  // Construct a new JDOManager for the database
  jdoManager = JDOManager.createInstance(DATABASE);

  // Obtain a new database
  Database db = jdoManager.getDatabase();
As an alternative to using a org.exolab.castor.jdo.conf.Driver, you can also configure Castor to use a JDBC 2.0 DataSource:
  private static final String DS = "oracle.jdbc.pool.OracleConnectionCacheImpl";
  private static final String CONNECT = "jdbc:oracle:thin:localhost:1521:SID";
  private static final String USERNAME = "scott";
  private static final String PASSWORD = "tiger";
  private static final String MAPPING = "mapping.xml";
  private static final String DATABASE = "mydb";
  private static final String ENGINE = "oracle";

  // setup properties for datasource configuration
  Properties props = new Properties();
  props.put("URL", CONNECT);
  props.put("user", USERNAME);
  props.put("password", PASSWORD);

  // create datasource configuration
  org.castor.jdo.conf.DataSource dsConf =
      JDOConfFactory.createDataSource(DS, props);

  // create mapping configuration
  org.castor.jdo.conf.Mapping mappingConf =
      JDOConfFactory.createMapping(getClass().getResource(MAPPING).toString());

  // create database configuration
  org.castor.jdo.conf.Database dbConf =
      JDOConfFactory.createDatabase(DATABASE, ENGINE, dsConf, mappingConf);

  // create and load jdo configuration
  JDOManager.loadConfiguration(JDOConfFactory.createJdoConf(dbConf));

  // Construct a new JDOManager for the database
  jdoManager = JDOManager.createInstance(DATABASE);

  // Obtain a new database
  Database db = jdoManager.getDatabase();
For validation, the configuration file should include the following document type definition. For DTD validation use:
  <!DOCTYPE jdo-conf PUBLIC "-//EXOLAB/Castor JDO Configuration DTD Version 1.0//EN"
                            "http://castor.org/jdo-conf.dtd">
For XML Schema validation use:
  <!DOCTYPE jdo-conf PUBLIC "-//EXOLAB/Castor JDO Configuration Schema Version 1.0//EN"
                             "http://castor.org/jdo-conf.xsd">
The Castor namespace URI is http://castor.org/.
The Castor JDO database configuration DTD is:
  <!ELEMENT jdo-conf ( database+, transaction-demarcation )>

  <!ATTLIST jdo-conf
            name CDATA "jdo-conf">

  <!ELEMENT database ( ( driver | data-source | jndi )?, mapping+ )>

  <!ATTLIST database
            name ID      #REQUIRED
            engine CDATA "generic">

  <!ELEMENT mapping EMPTY>
  <!ATTLIST mapping
            href CDATA #REQUIRED>

  <!ELEMENT driver ( param* )>
  <!ATTLIST driver
            url        CDATA #REQUIRED
            class-name CDATA #REQUIRED>

  <!ELEMENT data-source ( param* )>
  <!ATTLIST data-source
            class-name CDATA #REQUIRED>

  <!ELEMENT jndi ANY>
  <!ATTLIST jndi
            name CDATA #REQUIRED>

  <!ELEMENT transaction-demarcation ( transaction-manager? )>
  <!ATTLIST transaction-demarcation
            mode CDATA #REQUIRED>

  <!ELEMENT transaction-manager ( param* )>
  <!ATTLIST transaction-manager
            name CDATA #REQUIRED>

  <!ELEMENT param EMPTY>
  <!ATTLIST param
            name  CDATA #REQUIRED
            value CDATA #REQUIRED>
The Castor type mechanism assures proper conversion between Java types and external types.
Castor JDO converts Java fields into SQL columns which are persisted through the JDBC driver. Due to implementation details, the field type expected by the JDBC driver is not always the field type defined for the mapped object.
The most common occurrences of mistyping is when using fields of type FLOAT, DOUBLE, NUMERIC, and DECIMAL. SQL type FLOAT actually maps to Java type java.lang.Double. SQL types NUMERIC and DECIMAL map to Java type java.math.BigDecimal.
When such an inconsistency occurs, Castor JDO will throw an
IllegalArgumentException during object persistence with a
message indicating the two conflicting types.
In order to avoid runtime exceptions, we recommend explicitly specifying types in the mapping file using the SQL typing convention. See SQL Type Conversion.
Castor DAX converts all Java fields into LDAP attribute values. LDAP attribute values are always textual and are represented as the string value of the field, e.g. "5" or "true".
LDAP attributes may also contain binary values. When storing byte arrays or serialized Java objects, DAX will store them as byte arrays.
The field element includes an optional attribute called
type which can be used to specify
the Java type of the field. This attribute is optional since Castor
can always derive the exact Java type from the class definition.
We highly recommend that developers use the type field in their mapping file as a means to provide static type checking. When loading a mapping file, Castor will compare the actual Java type with the type specified in the mapping and will complain about inconsistencies.
The field type can be specified either given the full class name (e.g. java.lang.Integer) or using a short name. The following table lists all the acceptable short names and the Java types they represent:
Table 3.3. Acceptable short names
| short name | Primitive type? | Java Class |
|---|---|---|
| big-decimal | N | java.math.BigDecimal |
| boolean | Y | java.lang.Boolean.TYPE |
| byte | Y | java.lang.Byte.TYPE |
| bytes | N | byte[] |
| char | Y | java.lang.Character.TYPE |
| chars | N | char[] |
| clob | N | java.sql.Clob |
| date | N | java.util.Date |
| double | Y | java.lang.Double.TYPE |
| float | Y | java.lang.Float.TYPE |
| integer | Y | java.lang.Integer.TYPE |
| locale | N | java.util.Locale |
| long | Y | java.lang.Long.TYPE |
| other | N | java.lang.Object |
| short | Y | java.lang.Short.TYPE |
| string | N | java.lang.String |
| strings | N | String[] |
| stream | N | java.io.InputStream |
In addition, support for the following Castor-internal field types has been added:
Table 3.4. Castor-internal field types
| short name | Primitive type? | Java Class |
|---|---|---|
| duration | N | org.exolab.castor.types.Duration |
Castor will use the JDBC
ResultSet.getDate(int, Calendar)
and related methods which take a Calendar object to specify the timezone of
the data retrieved from the database when the timezone information is not
already specified in the data; this ensures that the "current"
timezone is applied.
The default time zone can be configured in the castor.properties file; see the configuration section for details on how to configure Castor with information about your default time zone.
To change the timezone to a different timezone than the default, please
set a (different) value on the
org.exolab.castor.jdo.defaultTimeZone property:
# Default time zone to apply to dates/times fetched from database fields,
# if not already part of the data.  Specify same format as in
# java.util.TimeZone.getTimeZone, or an empty string to use the computer's
# local time zone.
org.exolab.castor.jdo.defaultTimeZone=
#org.exolab.castor.jdo.defaultTimeZone=GMT+8:00
Castor JDO uses the JDBC getObject/setObject methods
in order to retrieve and set fields. These methods do not perform
automatic type conversion, often resulting in unexpected behavior.
For example, when using a NUMERIC field with direct JDBC access,
application developers tend to call getInteger()
or getFloat(), but the Java object returned from
a call to getObject is often a
java.math.BigDecimal.
Castor JDO implements automatic type conversion between Java and SQL.
For this mechanism to work, the mapping file must specify the SQL type
being used for Castor to employ the proper convertor. If no SQL type
is specified, no conversion will occur, possibly resulting in an
IllegalArgumentException being thrown.
SQL types are specified with the
sql-type attribute using either
the default Java type returned by the JDBC driver
(e.g. java.lang.Integer or the proper SQL type name
(without precision). The following table lists the supported SQL type
names and the corresponding Java types:
Table 3.5. Supported SQL type names
| SQL Type | Java Type |
|---|---|
| bigint | java.lang.Long |
| binary | byte[] |
| bit | java.lang.Boolean |
| blob | java.io.InputStream |
| char | java.lang.String |
| clob | java.sql.Clob |
| decimal | java.math.BigDecimal |
| double | java.lang.Double |
| float | java.lang.Double |
| integer | java.lang.Integer |
| longvarbinary | byte[] |
| longvarchar | java.lang.String |
| numeric | java.math.BigDecimal |
| real | java.lang.Float |
| smallint | java.lang.Short |
| time | java.sql.Time |
| timestamp | java.sql.Timestamp |
| tinyint | java.lang.Byte |
| varbinary | byte[] |
| varchar | java.lang.String |
| other | java.lang.Object |
| javaobject | java.lang.Object |
The following example illustrates how to specify SQL type in field mapping:
  <field name="prodId" type="integer">
    <sql name="prod_id" type="numeric"/>
  </field>
Please note that java.util.Date is not automatically converted into a java.sql.Date object; while it is in theory possible to do so, there are three different possible storage formats for date information: as a java.sql.Date, java.sql.Time, and java.sql.Timestamp. Rather than impose a possibly inappropriate data mapping on an entry, no automatic transformation will take place.
JDBC drivers which do not, themselves, perform a mapping between java.util.Date and the sql format specified on the database will throw an error when java.util.Date is passed to them on the prepared statement. Moreover, auto-conversion of java.util.Date is outside of the JDBC specification; it is not a supported auto-convert format.
Users wishing to store date information into the database should ensure
that they set date, time, or timestamp as the sql type on the
sql-type attribute.
Some of the type convertors may have a string parameter, which changes the conversion algorithm. The parameter is specified in square brackets after the SQL type, for example:
  <field name="active" type="boolean">
    <sql name="acc_active" type="char[01]"/>
  </field>
where "0" is the character value for false and "1" is the character value for true.
In the above example the first of a bunch of parameterized type convertors is used, "boolean --> char" convertor. The parameter must have length 2, the first character is the value for false, the second character is the value for true. The default value is "FT". The actual SQL type should be char(1).
The second and third convertors are "boolean --> integer" and "boolean --> numeric". Its parameter must be + for +1 or - for -1 representing true. False is always converted to 0. For example:
  <field name="flagWithMinusOneForTrue" type="boolean">
    <sql name="flag" type="integer[-]"/>
  </field>
If the parameter is not specified, true is converted to +1.
The fourth convertor is "date --> char". Its parameter must be a correct pattern for SimpleDateFormat. For example:
  <field name="dateOfBirth" type="date">
    <sql name="pers_dob" type="char[MMM d, yyyy]"/>
  </field>
If the parameter is not specified, the conversion is performed using toString() method of the Date class.
The fifth and the sixth convertors are "date --> integer" and "date --> numeric". Their parameters are also patterns having syntax based on the SimpleDateFormat syntax, but repeated characters are eliminated. The following table shows the substitution rules that are used to obtain the SimpleDateFormat pattern from the parameter.
Table 3.6. Substitution rules
| Y,y | yyyy | year |
| M | MM | month in year |
| D,d | dd | day in month |
| h,H | HH | hour in day (0~23) |
| m | mm | minute in hour |
| s | ss | second in minute |
| S | SSS | millisecond |
For example, "YMD" parameter is expanded to "yyyyMMdd" SimpleDateFormat pattern, "YMDhmsS" parameter is expanded to "yyyyMMddHHmmssSSS" SimpleDateFormat pattern. The length of the expanded parameter gives the minimal number of decimal digits that the actual SQL type must support. The default value of the parameter is "YMD".
The date and time types of org.exolab.castor.types package support 2 timelines as defined by XML schema specification. One for timezoned values and one for non-timezoned values which are treated to be local. When converting such types to long the timezone information is lost. In most cases it is no problem to loose for which timezone the value was specified if the value get converted to UTC time before. But we also loose if the value had a timezone or not. This causes that we do not know to which timeline the value belongs. If we just treat it as non-timezoned value while it has been a timezoned one we have changed the value.
Therefore we have added support for another parameterized type converter. This one
allows you to specify if the date and time values created out of a persisted long
value are meant to be timezoned or not. By default, without a parameter, local
date or time instances are created without a timezone. If you specify the parameter
utc in mapping the date or time values are created based on UTC timezone.
It need to be noted that such a mapping can only handle date and time values of one
of the 2 timelines defined by XML schema specification. Having said that this only
applies to the conversion of such values to long and does not cause issues when
converting to string and back.
  <field name="timeOfBirth" type="org.exolab.castor.types.Time">
    <sql name="pers_tob" type="bigint[utc]"/>
  </field>
BLOB and CLOB stand for binary and character large objects (or in
Sybase, IMAGE and TEXT types, respectively). This means that most
likely you don't want to load the whole objects into memory, but
instead want to read and write them as streams. Usually these types are
not comparable via the WHERE clause of a SQL statement.
That is why you should disable dirty checking for such fields, e.g.
  <field name="text" type="string">
    <sql name="text" type="clob" dirty="ignore" />
  </field>
In this example CLOB field will be read as a String. This may cause
OutOfMemoryError if the text is really large, but in many cases mapping
CLOB to String is acceptable. The advantage of mapping to String is
that we obtain a Serializable value that can be passed via RMI.
Similarly you can map BLOB and CLOB to byte[] and
char[] types, respectively:
  <field name="photo" type="bytes">
    <sql name="photo" type="blob" dirty="ignore" />
  </field>
  <field name="resume" type="chars">
    <sql name="resume" type="clob" dirty="ignore" />
  </field>
Now, assume that mapping to String is not acceptable. The natural Java
type mapping for the BLOB type is java.io.InputStream,
and this mapping is supported by Castor:
  <field name="cdImage" type="stream">
    <sql name="cd_image" type="blob" dirty="ignore" />
  </field>
The natural Java type mapping for the CLOB type is
java.io.Reader, but this mapping is
not supported by Castor because
java.io.Reader doesn't provide information
about the length of the stream and this information is necessary
for JDBC driver (at least for the Oracle driver) to write the value to
the database. This is why the CLOB type is mapped to
java.sql.Clob:
  <field name="novel" type="clob">
    <sql name="novel" type="clob" dirty="ignore" />
  </field>
When you read data from the database, you can use the
getCharacterStream() method to obtain a
java.io.Reader from java.sql.Clob.
When you write data to the database, you can either use the helper class
org.exolab.castor.jdo.engine.ClobImpl to construct
java.sql.Clob from java.io.Reader
and the length:
object.setClob(new ClobImpl(new FileReader(file), file.length());
or implement the java.sql.Clob interface yourself.
But be aware of the followng restriction: if you map BLOB to
java.io.InputStream or CLOB to
java.sql.Clob, then you should turn caching
off for the Java class containing those values, e.g.:
  <class ...>
    <cache-type type="none"/>
      ...
      <field name="novel" type="clob">
        <sql name="novel" type="clob" dirty="ignore" />
      </field>
  </class>
Blob and Clob values cannot be cached, because they are alive only while the ResultSet that produced them is open. In particular, this means that you cannot use dirty checking for long transactions with such classes.
Release 1.0 M3:
Added collection type 'iterator'.
Added collection type 'enumerate'.
Added additional syntax for specifying the identity of a class.
The Castor mapping file also provides a mechanism for binding a Java object model to a relational database model. This is usually referred to as object-to-relational mapping (O/R mapping). O/R mapping bridges the gap between an object model and a relational model.
The mapping file provides a description of the Java object model to Castor JDO. Via Castor XML, Castor JDO uses the information in the mapping file to map Java objects to relational database tables. The following is a high-level example of a mapping file:
  <mapping>
      <class ... >
          <map-to ... />
          <field ... >
              <sql ... />
          </field>
          ...
      </class>
  </mapping>
Each Java object is represented by a <class> element composed of attributes, a <map-to> element and <field> elements. The <map-to> element contains a reference to the relational table to which the Java object maps. Each <field> element represents either a public class variable or the variable's accessor/mutator methods (depending upon the mapping info). Each <field> element is composed of attributes and one <sql> element. The <sql> element represents the field in the relational table to which the <field> element maps.
It is possible to use the mapping file and Castor's default behavior in conjunction. When Castor handles an object but is unable to locate information about it in the mapping file, it will rely upon its default behavior. Castor makes use of the Java programming language Reflection API to introspect the Java objects to determine the methods to use. This is the reason some attributes are not required in the mapping file.
<!ELEMENT mapping ( description?, include*, class*, key-generator* )>
The <mapping> element is the root element of a mapping file. It contains:
an optional description
zero or more <include> which facilitates reusing mapping files
zero or more <class> descriptions: one for each class we intend to give mapping information
zero or more <key-generator>: not used for XML mapping
A mapping file look like this:
  <?xml version="1.0"?>
  <!DOCTYPE mapping PUBLIC "-//EXOLAB/Castor Object Mapping DTD Version 1.0//EN"
                           "http://castor.org/mapping.dtd">

  <mapping>
     <description>Description of the mapping</description>
     <include href="other_mapping_file.xml"/>

     <class name="A">
         ...
     </class>

     <class name="B">
        ...
     </class>
  </mapping>
  <!ELEMENT class ( description?, cache-type?, map-to?, field+ )>
  <!ATTLIST class
            name            ID       #REQUIRED
            extends         IDREF    #IMPLIED
            depends         IDREF    #IMPLIED
            auto-complete   ( true |false ) "false"
            identity        CDATA    #IMPLIED
            access          ( read-only | shared | exclusive | db-locked )  "shared"
            key-generator   IDREF    #IMPLIED >
The <class> element contains all the information used to map a Java object to a relational database. The content of <class> is mainly used to describe the fields that will be mapped.
Description of the attributes:
name: The fully qualified package name of the Java object to map to.
extends: Should be used only if this Java object extends another Java object for which mapping information is provided. It should not be used if the extended Java object is not referenced in the mapping file.
depends: For more information on this field, please see Dependent and related relationships.
identity: For more information on this field, please see Design -> Persistence.
access: For more information on this field, please see Locking Modes.
key-generator: For more information on this field, please see KeyGen.
Description of the elements:
<description>: An optional description.
<cache-type>: For more information on this field please see Bounded Dirty Checking and Caching.
<map-to>: Used to tell Castor the name of the relational table to which to map.
<field>: Zero or more <field> elements are used to describe properties of each Java object.
  <!ELEMENT map-to EMPTY>
  <!ATTLIST map-to
            table      NMTOKEN  #IMPLIED
            xml        NMTOKEN  #IMPLIED
            ns-uri     NMTOKEN  #IMPLIED
            ns-prefix  NMTOKEN  #IMPLIED
            ldap-dn    NMTOKEN  #IMPLIED
            ldap-oc    NMTOKEN  #IMPLIED>
<map-to> is used to specify the name of the item that should be associated with the given Java object. The <map-to> element is only used for the root Java object.
Description of the attributes:
table: The name of the relational database table to which the Java object is associated.
  <!ELEMENT field ( description?, sql?, xml?, ldap? )>
  <!ATTLIST field
            name           NMTOKEN  #REQUIRED
            type           NMTOKEN  #IMPLIED
            required       ( true | false )  "false"
            direct         ( true | false )  "false"
            lazy           ( true | false )  "false"
            transient      ( true | false )  "false"
            identity       ( true | false )  "false"
            get-method     NMTOKEN  #IMPLIED
            set-method     NMTOKEN  #IMPLIED
            create-method  NMTOKEN  #IMPLIED
            collection     ( array | enumerate | collection | set |
                             arraylist | vector | map | hashtable | sortedset | iterator )  #IMPLIED
            comparator     NMTOKEN  #IMPLIED>
The <field> element is used to describe a property of a Java object. It provides:
the identity ('name') of the property
the type of the property (inferred from 'type' and 'collection')
the access method of the property (inferred from 'direct', 'get-method', 'set-method')
From this information, Castor is able to access a given property in the Java object.
In order to determine the signature that Castor expects, there are two easy rules to apply.
1. Determine <type>.
If there is no 'collection' attribute, the object type is the value of the 'type' attribute. The value of the type attribute can be a fully qualified Java object like 'java.lang.String' or one of the allowed aliases:
short name Primitive type? Java Class big-decimal N java.math.BigDecimal big-integer Y java.math.BigInteger boolean Y java.lang.Boolean.TYPE byte Y java.lang.Byte.TYPE bytes N byte[] char Y java.lang.Character.TYPE chars N char[] clob N java.sql.Clob date N java.util.Date double Y java.lang.Double.TYPE float Y java.lang.Float.TYPE int Y java.lang.Integer.TYPE integer Y java.lang.Integer locale N java.util.Locale long Y java.lang.Long.TYPE other N java.lang.Object serializable Y java.io.Serializable short Y java.lang.Short.TYPE sqldate Y java.sql.Date sqltime Y java.sql.Date string N java.lang.String strings N String[] stream N java.io.InputStream timestamp N java.sql.Timestamp Castor will try to cast the data in the mapping file to the proper Java type.
If there is a collection attribute, the items in the following table can be used:
name type default implementation added in release array <type_attribute>[] <type_attribute>[] enumerate java.util.Enumeration - 1.0 M3 collection java.util.Collection java.util.ArrayList set java.util.Set java.util.HashSet arraylist java.util.ArrayList java.util.ArrayList vector java.util.Vector java.util.Vector map java.util.Map java.util.HashMap hashtable java.util.Hashtable java.util.Hashtable sortedset java.util.SortedSet java.util.TreeSet 1.0 M2 iterator java.util.Iterator n/a 1.0 M3 The type of the object inside the collection is the 'type' attribute. The 'default implementation' is the type used if the object holding the collection is found to be null and needs to be instantiated.
For hashtable and map, Castor will add an object using the put(object, object) method - the object is both the key and the value. This will be improved in the future.
It is necessary to use a collection when the content model of the element expects more than one element of the specified type. This is how the 'to-many' portion of a relationship is described.
| Note |
|---|---|
It is not possible to use a collection of type 'iterator' or 'enumerate' with lazy loading enabled. |
2. Determine the signature of the method
If 'direct' is set to true, Castor expects to find a public Java object variable with the given signature:
public <type> <name>;If 'direct' is set to false or omitted, Castor will access the property though accessor methods. Castor determines the signature of the accessors and mutators as follows: If the 'get-method' or 'set-method' attributes are supplied, it will try to find a function with the following signature:
public <type> <get-method>();or
public void <set-method>(<type> value);
If 'get-method' or 'set-method' attributes are not provided, Castor will try to find the following functions:
public <type> is<capitalized-name>();or
public <type> get<capitalized-name>();the former for boolean types, the latter for all other types (or if the 'is<capitalized-name>()' method is not defined for a boolean type), and a standard set method of
public void set<capitalized-name>(<type> value);
If there are more than one set<capitalized-name> method it first tries to find the one that exactly matches <type>. If no such method is available and <type> is a java primitive type it tries to find a method with the corresponing java object type.
<capitalized-name> means that Castor uses the <name> attribute by changing its first letter to uppercase without modifying the other letters.
The content of the <field> element will contain the information about how to map this field to the relational table.
Description of the attributes:
name: If 'direct' access is used, 'name' should be the name of a public variable in the object we are mapping (the field must be public, not static and not transient). If no direct access and no 'get-/set-method' is specified, this name will be used to infer the name of the accessor and mutator methods.
type: The Java type of the field. This is used to access the field. Castor will use this information to cast the data type(e.g. string into integer). It is also used to define the signature of the accessor and mutator methods. If a collection is specified, this is used to specify the type of the object inside the collection. See description above for more details.
required: If true, the field is not optional.
transient: If true, the field will be ignored during persistence (and XML un-/marshalling). If you want this field to be ignored during any persistence-related operations only, please use the 'transient' attribute at the <sql> level.
identity: If true, the field is part of the class identity. Please use this as an alternative way of specifying the identity of an object.
direct: If true, Castor expects a public variable in the object and will modify it directly.
collection: If a parent object expects more than one occurrence of one of its fields, it is necessary to specify which collection type Castor will use to handle them. The type specified is used to define the type of the content inside the collection.
comparator: If the collection type equals 'sortedset', it is possible to specify a
java.util.Comparatorinstance that will be used with thejava.util.SortedSet(implementation) to specify a custom sort order. Please use this attribute to specify the class name of the Comparator instance to be used. Alternatively, it is possible to not specify a Comparator instance and have the Java objects stored in the SortedSet implementjava.util.Comparableto specify the sort order.get-method: An optional name of the accessor method Castor should use. If this attribute is not set, Castor will try to guess the name with the algorithm described above.
set-method: An optional name of the mutator method Castor should use. If this attribute is not set, Castor will try to guess the name with the algorithm described above.
create-method: Factory method for instantiation of the object.
  <!ELEMENT sql EMPTY>
  <!ATTLIST sql
            name        NMTOKENS  #IMPLIED
            type        NMTOKENS  #IMPLIED
            many-key    NMTOKENS  #IMPLIED
            many-table  NMTOKEN   #IMPLIED
            transient   ( true | false )    "false"
            read-only   ( true | false )    "false"
            dirty       ( check | ignore )  "check">
            cascading	( create | delete | update | all | none ) "none"
The <sql> element is used to denote information about the database column to which a Java object is mapped. It should be declared for all <field> elements. Each <field> element contains one <sql> element. The <sql> element correlates directly to the <map-to> element for the containing <class> element. The <sql> elements contains the following attributes:
name: The name of the column in the database table.
type: The JDBC type of the column. It is inferred from the object when the type of this field is a persistent Java class that is defined elsewhere in the mapping. The complete list of automatic type conversions, and which values require manual mapping (e.g, java.util.Date) is listed in the SQL Type Conversion section of the Type Support document.
read-only: If true, the column in the relational database table will only be read, not updated or deleted.
transient (as of 0.9.9): If true, the field will be ignored during persistence only. If you want this field to be ignored during XML un-/marshalling as well, please use the 'transient' attribute at the <field> level.
dirty: If the value is 'ignore', the field will not be checked against the database for modification.
cascading: If the field is a relation, this attribute specifies which operations to cascade. Possible values are: 'all', none', 'create', 'update' or 'delete'; when not specifying 'none' or 'all', it is possibel to specify more than one value, using whitespace as a delimiter (e.g. 'create update'). For further information see HOW-TO on using cascading operation.
There are two more attributes used only with 'to-many' relations.
many-key: Specifies the name of the column that holds the foreign key to this object. That column is in the database table that stores objects of the Java type of this field.
many-table: Specifies the name of the bridge table that contains the primary keys of the object on each side of the relationship. This is only used for many-to-many relationships.
No, Castor JDO doesn't comply with the SUN's JDO specification.
Although Castor JDO carries very similar goals as SUN's JDO, it has been developed independently from the JSR.
Although it is not impossible to shape (perhaps "hammer" is a more descriptive verb) Castor JDO into the SUN's JDO specification, there are several major technical differences which make it unfavorable to do so. Castor is RDBMS centric. Each persistence object loaded by Castor is locked. Locks in Castor are observable, meaning that locks may not be granted because of timeout or deadlock. On the other hand, the SUN's JDO hides details about locks.
Internally, Castor JDO maintains a single copy of lock (and cache) for each active persistence object for all transaction. SUN's JDO specification implicitly requires a copy of cache per object per transaction. SUN's JDO also implicitly requires a bytecode modifier which Castor doesn't require.
Castor also provides other features, such as key generators, long transaction support and OQL query which cannot be found in SUN's JSR.
The relation between JDO and EJB Container-Managed Persistence is more complicated than simply saying, "one is better than the other".
An Entity Bean may manage persistence itself - the EJB specification calls this Bean Managed Persistence (BMP). Alternatively, the Entity Bean may rely on an EJB container to manage all peersistence automatically - the EJB specification calls this Container Managed Persistence (CMP). When implementing BMP, an Entity Bean may use Castor JDO as its persistence mechanism, or it may use others methods, such as dealing with JDBC directly. During CMP, an EJB Container vendor may implement their CMP on top of Castor JDO. In such an implementation, Castor JDO will be used to persist the Entity Bean.
If a developer would like to take advantage of an EJB's life-cycle management, security, the "write once deploy anywhere" promise and other distributed business application facilities, then EJB will be the right choice. Otherwise, the fact that Castor is simple, is Open Source (you can always include Castor in your application or product), has much less overhead, provides more design freedom, and is integrated with Castor XML may be enough of a reason to choose Castor JDO.
No. The decision of putting XML and JDO together is NOT intended to make XML marshalling transactional. Instead, the integration is done to help developers of a typical client-server situation whereby an application server receives incoming XML messages, process the messages and replies to the client.
With Castor, incoming XML messages can be unmarshaled into data objects. Required information can be obtained from a database using JDO in form of data objects. With this approach, all data manipulation can be done in an object-oriented way. Changes to JDO data objects can be committed transactionally, and result data objects can be marshaled into XML and returned to the client.
No, Castor does not provide an OQL query facility on a XML file. If querying is important for you, you should consider using a DBMS to store your data instead of using XML files, especially if querying performance is a concern.
Another alternative is parse an XML Document directly and use XPath to retrieve Nodes and/or NodeSets from an XML Document. Other open source tools which provide this functionality are:
Download the full SVN snapshot and look into the src/tests/jdo directory.
It cannot be used with Castor, because it doesn't allow more than one
open ResultSet at the same time.
Either use JDBC driver of type > 1, or use some other JDBC-ODBC
bridge without such a restriction
(for example, from Easysoft).
You should initialize the Collection yourself:
private Collection _children = new ArrayList();

public Collection getChildren() {
    return _children;
}
In general, no. If you need some behavior that is not directly supported by Castor, you can implement interface org.exolab.castor.jdo.Persistent. In order to use dirty checking for long transaction you should implement interface org.exolab.castor.jdo.TimeStampable. If you need an example of use of these interfaces, see Persistent.java and TestPersistent.java among Castor JDO tests.
First of all, let's agree upon terminology. We distinguish dependent and independent objects:
dependent objects are bounded to the parent object's lifecycle
independent objects have independent lifecycle
Thus, dependent objects are created/removed automatically, when their parent object is created/removed, while all operations on independent objects should be performed explicitly.
However, with Castor 0.8.x you cannot describe explicitly the kind of object. Instead, the following rule applies: if you have one-to-many relation, and each side of the relation refers to another (Collection attribute on "one" side, simple attribute on "many" side), then "many" side is a dependent object. All other objects are independent. In particular, related objects via one-to-one relation are not created/removed automatically.
With Castor 0.9 dependent objects should be described via "depends" attribute of "class" element in mapping configuration file.
If you wish some independent object was created and/or removed automatically on operations on other independent object, you may use interface Persistent to code the desired behavior.
No, Castor JDO doesn't have any built-in JDBC resource pooling. However the framework can transparently use any resource pooling facilities provided through DataSource implementation or -even better- through JDNI. In fact we even recommend people to use some Connection and PreparedStatement pool with Castor as this can increase Castor's performance 3-5 fold.
For example the following set of statements:
db.begin();
db.execute(...)
db.commit()
will be executed in much less time with the resource pooling because it will avoid creating a new physical JDBC connection at every execution.
With Oracle, instead of specifying the usual JDBC driver you can use a DataSource that specifically provides some Connection caching/pooling.
Thus if your jdo config file looks like :
<database name="..." engine="oracle" >
<driver class-name="oracle.jdbc.driver.OracleDriver"
URL="jdbc:oracle:thin:@localhost:1521:TEST" >
<param name="user" value="SYSTEM"/>
<param name="password" value="manager"/>
</driver>
...
</database>
then it can be changed into (for example):
<database name="..." engine="oracle" >
<data-source class-name="oracle.jdbc.pool.OracleConnectionCacheImpl">
<params URL="jdbc:oracle:thin:@localhost:1521:TEST"
user="scott"
password="tiger"
/>
</data-source>
...
</database>
When Castor is used inside a Container such as an EJB container (within BMP or Session Bean), then the Container usually provides the JDBC resource through the JNDI ENC, which implicitely includes pooling facilities.
Probably castor.jar file is in jre/lib/ext directory. In this case you should call:
jdo.setClassLoader(getClass().getClassLoader());
before jdo.getDatabase().
In this case as well as in many others you can get more information with the help of logging. Call:
jdo.setLogWriter(Logger.getSystemLogger());
and seek in the output for warnings and errors.
You should not add/remove dependent objects directly. In order to add/remove the dependent object you should just add/remove it from the collection in the master object and call db.commit()
Dependent objects cannot be created/removed explicitly. It's created automatically when it is added to a master object, and removed automatically when it de-linked/dereferenced from a master object.
Otherwise, we will be encounter into problem where a dependent object created explicitly but removed implicitly (delinked from a master object), or vice versa. It can also lead to other problems that are harder to detect.
It is recommended to replace literals with parameters and to set them
via OQLQuery.bind(), for example:
OQLQuery query = db.getOQLQuery(
"SELECT p FROM Person p "
+ "WHERE name LIKE $1 AND dob>$2 AND married=$3");
query.bind("John %");
query.bind((new SimpleDateFormat("yyyy-MM-dd"))
.parse("1960-01-01"));
query.bind(false);
Your JDBC driver is not JDBC 2.0 compliant, upgrade it or find another one.
Typcially a relationship between two objects is either one-way
(aka uni-directional) or two-way (aka bi-directional).
Officially, Castor currently only supports bi-directional relationships.
For example, if an Order object contains a
reference to a LineItem object, the
LineItem object must contain a reference to the
Order object. However, this requirement is not enforced in all
situations.
This is a very complex problem to solve. So until Castor is expanded the support uni-directional relationships, the best policy is to implement the bi-directionalality for all relationships. This will ensure proper functionality.
This is a very common occurrence in an object model and is known as
a self-referenential relationship. Unfortunately, Castor does not
currently support self-referential relationships. An example of such
a relationship occurs when a Folder object contains
a reference to another Folder object.
Castor does not currently support this. However, there are ways
around this limitation.
One way is to manage this type of relationship manually. For example,
let's say that a parent object FolderA needs to hold
references to child objects FolderB,
FolderC and FolderD.
The Folder object contains not only a property
to hold its own id, but also a property to hold its parent id
(we'll call this parentId).
The parentId property is used to determine
if there is a relationship to another Folder object.
If parentId is null, there is no relationship.
If parentId is populated, there is a relationship
and the object tree can be walked by comparing the object id to the
parentId. When the two properties are equal,
you're at the top of the tree.
Another say to solve this problem is to make use of an intermediary
object. For example, a Folder object contains a
Reference object in lieu of the actual
Folder object. The Reference
object is somewhat of a proxy object whereby it only contains enough
information to identify the object to which the
Reference object refers. Then the
Folder object can be easily instantiated via the
information contained in the Reference object.
The dirty checking engine will throw an
ObjectModifiedException when the values in the
cache and in the database are different. This can happen when
someone else changed the database content, but also when type
mapping is not reversible.
For example, if a java timestamp (java.util.Date)
is stored as a DATE, the time part is lost and the dirty checking
will fail. Oracle cannot tell the difference between an empty String
and a null value: if an attribute value is an empty String, dirty
checking will also fail. Some precision loss sometimes occur with
floating point numbers.
To avoid this, always use reversible mapping conversions. If this
is not possible, mark the fields with dirty="ignore"
in the mapping file.
When using Weblogic Portal 4.0 with Oracle I am receiving the following error:
java.sql.SQLException: ORA-01461: can bind a LONG value only for insert into a LONG column
According to Weblogic Release Notes, this error can remedied by setting a Weblogic environment variable.
Most probably the object that is being updated has more than 100 related objects of one class and the cache size for this class is not enough. You should either increase the size of the cache or change the cache type to time-limited (the default cache type is count-limited, the default size is 100), for example:
<class ...> <cache-type type="count-limited" capacity="1000"/> ... </class>
As of release 0.9.5.3, you cannot. When using a cache of type 'none' with your 'Timestampable' objects, a MappingException is thrown when performing long transactions. Currently, Castor requires a (performance) cache of type other than 'none' to be used with classes that implement the TimeStampable interface. In other words, if you want to use long transactions, please make sure that you use one of these cache types: 'unlimited', 'count-limited' or 'time-limited'.
The next entry has some more information about a potential cause of confusion in the context of long transactions and a cache type other than 'unlimited'.
With long transactions, sometimes update() throws a PersistenceException. As of release 0.9.5.3, Castor requires a (performance) cache (of type other than 'none') to be used with classes that implement the TimeStampable interface.
Please note that if you are using a cache type other than 'unlimited', it is possible that objects expire from the cache. This case will be highlighted to you by a PersistenceException being thrown.
In this cases, please consider switching to cache type 'unlimited' (if possible) or increase the size of the cache according to your needs when using 'count-limited' (which has a default capacity of 100).
Yes. It is available from the Castor website: Advanced JDO —> OQL
We are currently working on Phase 3.
Yes or no. Castor OQL supports implicit joins. And, in most case, you simply don't need explicit join.
Consider the following example,
SELECT o FROM Order o, LineItem i WHERE o.id = i.id AND i.price > 100
It is simply equivalent to the following OQL
SELECT o FROM Order o WHERE o.lineItem.price > 100
Yes. Just put "CALL SQL" keywords in front of your SQL statement. For example,
OQLQuery oql = castorDb.getOQLQuery(
"CALL SQL SELECT id, name, date "
+"FROM user WHERE upper(name) like $1 AS myapp.Product");
But remember that the order of the fields listed must match what is defined in the mapping file.
No, Castor OQL doesn't support struct. For example, the following query CANNOT be done:
select c.name, c.age from Client c
A query using the 'LIKE' expression includes the use of the SQL
wildcard '%'. The wildcard must be included in the
bind() statement:
OQLQuery oql = castorDb.getOQLQuery(
"SELECT p FROM Product p WHERE p.name LIKE $1" );
oql.bind( "%widget%" );
Yes. However, the full expression is a bit different using the LIST keyword. The following example provides a demonstration:
SELECT p FROM Product p WHERE p.id IN LIST ( 123, 456, 789 )
If identifiers other than numbers are used, those identifiers must be quoted:
SELECT p FROM Product p WHERE p.name IN LIST ( "abc", "jkl", "xyz" )
To include NULL values in the 'IN' list, use the 'nil' keyword:
SELECT p FROM Product p WHERE p.name IN LIST( "ABC", nil )
It is even possible to include bind values in the 'IN' lists using the following syntax:
SELECT p FROM Product p WHERE p.id IN LIST( $(int)1, $2, $3 )
Unfortunately, the answer is no. We're aware that many users need this feature so it is a very high priority in our todo list.
If foreign key is the primary key, as a workaround you may consider using the 'extends' relationship.
Unfortunately, the answer is no.
In version 0.8.11, we tried to enable polymorphic collection by introducing the notation of Object Reloading. Object Reloading delegates the determination of the class to a data object. However, it is proved that reloading can only be done before any instance of the target object is returned to user, and we have no way to determine that. As a result, we removed the support in version 0.9.x.
In the near future, we are going to use a new mechanism to provide extends. The new mechanism loads a table with an SQL statement that outer-joins all of the extending tables with the base. The existence of an extended table row can be used to determine the class of a data object. Notice that all extended table rows of the same entity should always be stored in the same data-store.
In the further future, we also want to let users to define a discriminator column (or determinance field). Basing on the value of discriminator columns in the base table, the bridge layer fetches the additional information and returns the combined entity with the appropriate list of entity classes.
Yes, if the two tables share the same identity, you can specify one data object to "extends" the other. When the extended data object is loaded, its table (specified in <map-to/> will be joined with all the tables of its super classes'.
Another solution (in my opinion more flexible) is having two set of methods in the main object. One for Castor JDO and another for application.
Consider the following example:
class Employee { private int _employeeNumber; private Address _address; private Collection _workGroup; public int getEmployeeNumber() { return _employeeNumber; } public void setEmployeeNumber( int id ) { _employeeNumber = id; } // methods for Castor JDO public Address getAddress() { return _address; } public void setAddress( Address address ) { _address = address; } public Collection getWorkGroup() { return _workGroup; } public Collection setWorkGroup( Collection workGroup ) { _workGroup = workGroup; } // methods for application public String getAddressCity() { return _address.getCity(); } public String getAddressZip() { return _address.getZip(); } // ... }
Yes, as long as the deleted object is the same instance as the one being recreated.
Dependent object is actually a concept from the object-oriented database world. A dependent object's lifetime depends on its master object. So, create/delete/update of the master object will trigger the proper actions, newly linked dependent object will be automatically created and de-referenced dependent object will be removed.
The concept was also used in the earlier CMP 2.0 draft, although it is later removed.
Let's use object loading as an example.
When an application invoke db.load, the underneath
TransactionContext is invoked.
If the object with the requested identity exists in the
TransactionContext, previously loaded object in the
TransactionContext is returned. Otherwise,
TransactionContext creates a new instance
of the interested type and invokes LockEngine to "fill" the object.
LockEngine acquires a lock of the object,
and it makes sure ClassMolder has a thread-safe
environment when it invokes ClassMolder.
In ClassMolder, if the interested set of fields
representing the object is not existed in the cache yet,
SQLEngine will be invoked and the set of fields
from the underneath data store will be returned.
ClassMolder binds the loaded or cached fields into
the new instance. ClassMolder requests the
TransactionContext to load the related and the
dependent objects. Eventually, the object is returned after all of
the relationships are resolved.
The process of commit has several states. The first state is
preStore. In preStore state, objects existing in the
TransactionContext are checked for modification
one by one, including dependent and related objects.
De-referenced dependent objects are marked as delete-able,
and reachable dependent objects are added into
TransactionContext. An object is marked
"dirty" if it is modified. Also, if any modification should cause
any related or dependent to be dirty, the related or dependent object
is marked as dirty as well.
After the preStore state, all dirty object is properly stored. And, all marked delete object will be removed. Then, the connection is committed. If succeed, all cache with be updated. Finally, all lock is released.
Yes, via javax.transaction.Synchronization interface.
For Castor to work with global transactions, Castor must be configured to use global transaction demarcation in its main configuration file:
<jdo-conf> ... <transaction-demarcation mode="global" > <transaction-manager name="jndi" /> </transaction-demarcation> </jdo-conf>
When retrieving a Database instance via
... JDOManager.loadConfiguration("jdo-conf.xml"); JDOManager jdo = JDOManager.createInstance("mydb"); ... Database db = jdo.getDatabase();
the Database implementation will authomatically
be registered with the transaction manager, as it implements
javax.jta.Synchronization interface.
Subsequently, the transaction manager communicates with Castor
via the beforeCompletion() and afterCompletion() calls.
Yes, starting from PostgreSQL 7.1, where outer joins support has been added.
Yes, starting from MySQL version 3.23, where transaction support has been added. Note: if you use Mark Matthews MySQL JDBC driver, then you need version 2.0.3 or higher.
For now only with PostgreSQL 7.1 and SAP DB you get a full set of Castor features. Other Open Source databases don't support select with write lock, so db-locked locking mode doesn't work properly (it works in the same way as exclusive locking mode).
All other Castor features are supported with MySQL, Interbase, InstantDB and Hypersonic SQL.
MySQL in it's current releases (4.0.x and 4.1.x) does not store fractions of a second in fields of type DATETIME that are mapped to java.sql.TimeStamp fields. As a result, Castor will throw ObjectModifiedExceptions during commits as Castor internally maintains fractions of a seconds.
Instead, Please use a column type that can be mapped to a long value, as Castor internally handles conversion between java.util.Date and long values with the required precision.
In MySQL, fields of type 'Timestamp' exhibit special behaviour wih regards to NULLs. When inserting a "NULL" into such a field, it actually inserts the current date and time. This causes problems for Castor's caching mechanism since Castor internally believes the field is still NULL. If you subsequently perform an update on the entry whilst it is still in the cache, an ObjectModifiedException will be thrown, because Castor believes that the database record has changed in the meantime.
The workaround is to use a DATETIME field instead of TIMESTAMP.
As with many other open source products, MySQL seems to be changing slightly from version to version. There seems to be a problem with concurrency in MySQL 4.1.5 that can be resolved by upgrading to 4.1.7 or higher.
At Castor we frequently use Connector/J 3.0.16, 3.1.13 and nowadays 5.1.6 to execute our test farmework. If you use one of this versions of Connector/J you should be on the safe side. If you are hit by any problems using one of these versions, please let us know.
As of Oracle release 10g, the problem of Castor to handle BLOBs with a size greater than 2kB and CLOBs with a size greater than 4 kB correctly has been resolved. With the 10 release of Oracle's JDBC driver, both driver types (type 2 and type 4) can be used. With earlier releases, only the OCI driver (type 2) seems to work.
The 10g release of the Oracle JDBC Driver can be downloaded here.
Please see this message from the mailing list. It includes an adapter class that will provide this functionality. (Thanks John!)
Yes, you can. By default, Castor uses JDBC proxy classes (wrapping
java.sql.Connection and
java.sql.PreparedStatement) that capture the
core SQL statements as generated by Castor and the user-supplied
parameters at execution timeof the various persistence operations,
and outputs them to the standard logger used by Castor.
By default, these output statements are not visible,
as the log level is set to level 'info'. To see these SQL statements,
please increase the log level to level 'debug' in
log4j.xml.
As of release 0.9.7, a new property
org.exolab.castor.persist.useProxies
has been added to castor.properties to allow
configuration of the JDBC proxy classes mentioned above.
If enabled, JDBC proxy classes will be used for logging SQL statements.
When turned off, no logging statements will be generated at all.
Let us convert one of the classes from the JDO examples to use lazy-loading.
In the example model, every Product belongs to one ProductGroup. This is reflected in the conventional mapping as below. Here's the mapping for Product:
<!-- Mapping for Product --> <class name="myapp.Product" identity="id"> <description>Product definition</description> <map-to table="prod" xml="product" /> <field name="id" type="integer"> <sql name="id" type="integer" /> <xml name="id" node="attribute"/> </field> <!-- more fields ... --> <!-- Product has reference to ProductGroup, many products may reference same group --> <field name="group" type="myapp.ProductGroup"> <sql name="group_id" /> <bind-xml name="group" node="element" /> </field> </class>
Let us now make the relationship between Product and ProductGroup use lazy loading. The relevant field in Product can be re-written like so:
<field name="group" type="myapp.ProductGroup" lazy="true">
<sql name="group_id" />
<bind-xml name="group" node="element" />
</field>
There have been one change only. We have placed the attribute lazy="true" in the field element. Note that no change is required in the ProductDetail mapping.
Please note that Castor does not support full serialization of lazy-loaded objects at this time. Rather than serializing just the information required to re-build the underlying proxy implementation during deserialization, Castor will materialize (read: load from the persistence store) all objects before serialization. As this can lead to a lot of database accesses, please use this feature carefully. A full working solution will be provided with the next release.
Let us convert one of the classes from the JDO examples to use lazy-loading.
In the example model, one Product can contain many ProductDetails. This is reflected in the conventional mapping as below. First, the mapping for Product:
<!-- Mapping for Product --> <class name="myapp.Product" identity="id"> <description>Product definition</description> <map-to table="prod" xml="product" /> <field name="id" type="integer"> <sql name="id" type="integer" /> <xml name="id" node="attribute"/> </field> <!-- more fields ... --> <!-- Product has reference to ProductDetail many details per product --> <field name="details" type="myapp.ProductDetail" required="true" collection="vector"> <sql many-key="prod_id"/> <xml name="detail" node="element" /> </field> </class>
Now let us examine ProductDetail. Note, the relationship is mapped bi-directionally as must be all relationships when using Castor JDO.
<!-- Mapping for Product Detail --> <class name="myapp.ProductDetail" identity="id" depends="myapp.Product" > <description>Product detail</description> <map-to table="prod_detail" xml="detail" /> <field name="id" type="integer"> <sql name="id" type="integer"/> <xml node="attribute"/> </field> <field name="product" type="myapp.Product"> <sql name="prod_id" /> <xml name="product" node="element" /> </field> <!-- more fields ... --> </class>
Let us now make the relationship between Product and ProductDetail use lazy loading. We need only change the way that the relationship to ProductDetail is specified in the mapping of Product. The relevant field in Product can be re-written like so:
<field name="details" type="myapp.ProductDetail" required="true" lazy="true" collection="collection"> <sql many-key="prod_id"/> <xml name="detail" node="element" /> </field>
There have been two changes.
We have placed the attribute lazy="true" in the field element
We have changed the type of the underlying collection type to be a
java.util.Collectionby changing the field element attribute to collection="collection".
Note that no change is required in the ProductDetail mapping.
3.7.12.4. I have modified my mapping to use lazy loading. Now I get the error 'no method to set value for field: com.xyz.ClassB in class: ClassMolder com.xyz.ClassA' or 'org.exolab.castor.jdo.DataObjectAccessException: no method to set value for field: com.xyz.ClassB in class: ClassMolder com.xyz.ClassA'. What am I doing wrong?
To use lazy loading you must also change the persistent class that will hold the related objects. At the very highest level, you need to provide a set method that accepts a java.util.Collection for the field in question. This is demonstrated by changing the JDO examples below.
In the original Product class we have the following code:
import java.util.Vector; ... private Vector _details = new Vector(); ... public Vector getDetails() { return _details; } public void addDetail( ProductDetail detail ) { _details.add( detail ); detail.setProduct( this ); }
Let us now make the necessary changes to set up lazy loading.
As stated above we now require a special set method for the related
ProductDetails (stored originally as a
java.util.Vector) that accepts a
java.util.Collection as an argument. This mandates
that we must also use a java.util.Collection to
hold our ProductDetails. If this is not added, you will receive the
errors above.
import java.util.Collection; ... private Collection _details; ... public Collection getDetails() { return _details; } public void setDetails( Collection details ) { _details = details; }
Castor JDO provides a property in castor.properties
for adjusting the size of the JDBC driver's buffer for reading LOBs
(BLOBs and CLOBs) from the database. The propery is named
org.exolab.castor.jdo.lobBufferSize and its default
is 5120 bytes (5k). The size of this buffer can be tuned for larger LOBs,
but is dependent upon the JDBC driver implementation being used and what
it supports.
Due to a product limitation, AUTO_INCREMENT sequences in HSQL begin with 0 rather 1, as is the case with most other RDBMS. As a result of this, long transactions will not work for the object with the identity 0, and a ObjectModifiedException will be thrown.
To avoid this issue, we recommend inserting a temp object into the database in question, and removing thereafter so that no object with identity 0 is stored.
Some applications need to change the database connection or switch between different mapping files on the fly. Because Castor caches database configurations per name, you would have to register a new JDO configuration using a distinct name for any of the different configurations.
Instead you can call
org.exolab.castor.jdo.engine.DatabaseRegistry.clear()
to reset the database registry before registering the new configuration as
follows:
// Reset database registry
org.exolab.castor.jdo.engine.DatabaseRegistry.clear();
This document provides object mapping examples and the corresponding Java objects and DDL for the database table.
The following fragment shows the Java class declaration for the
Product class:
package myapp; public class Product { private int _id; private String _name; private float _price; private ProductGroup _group; public int getId() { ... } public void setId( int anId ) { ... } public String getName() { ... } public void setName( String aName ) { ... } public float getPrice() { ... } public void setPrice( float aPrice ) { ... } public ProductGroup getProductGroup() { ... } public void setProductGroup( ProductGroup aProductGroup ) { ... } }
The following fragment shows the Java class declaration for the
ProductGroup class:
public class ProductGroup { private int _id; private String _name; public int getId() { ... } public void setId( int id ) { ... } public String getName() { ... } public void setName( String name ) { ... } }
The following sections show the DDL for the relational database tables PROD, PROD_GROUP, and PROD_DETAIL:
PROD:
create table prod ( id int not null, name varchar(200) not null, price numeric(18,2) not null, group_id int not null );
PROD_GROUP:
create table prod_group ( id int not null, name varchar(200) not null );
PROD_DETAIL:
create table prod_detail ( id int not null, prod_id int not null, name varchar(200) not null );
The following code fragment shows the object mapping for the
ProductGroup class:
<?xml version="1.0"?> <!DOCTYPE mapping PUBLIC "-//EXOLAB/Castor Object Mapping DTD Version 1.0//EN" "http://castor.org/mapping.dtd"> <mapping> <class name="myapp.ProductGroup" identity="id"> <description>Product group</description> <map-to table="prod_group" xml="group" /> <field name="id" type="integer" > <sql name="id" type="integer"/> </field> <field name="name" type="string"> <sql name="name" type="char" /> </field> </class> </mapping>
As a result of that declaration, Castor JDO will create the following
SQL statements for creating, deleting, loading and updating instances
of ProductGroup:
create: INSERT INTO prod_group (id, name) VALUES (?,?)
delete: DELETE FROM prod_group WHERE id=?
load: SELECT prod_group.id, prod_group.name FROM prod_group WHERE prod_group.id=?;
update: UPDATE prod_group SET name=? WHERE id=?
To declare the name field read-only, the field definition above for the field name needs to be changed to:
<class name="myapp.ProductGroup" identity="id"> ... <field name="name" type="string"> <sql name="name" type="char" read-only="true" /> </field> </class>
As a result of that declaration, Castor JDO creates the following
SQL statements for creating, deleting, loading and updating
instances of ProductGroup:
create: INSERT INTO prod_group (id) VALUES (?)
delete: DELETE FROM prod_group WHERE id=?
load: SELECT prod_group.id, prod_group.name FROM prod_group WHERE prod_group.id=?;
update: /* no statement will be generated */
To declare the name field transient with regards to persistence, above field definition for the field name needs to be changed to:
<class name="myapp.ProductGroup" identity="id"> ... <field name="name" type="string" > <sql name="name" type="char" transient="true" /> </field> </class>
The following code fragment shows the mapping file for the Product
class. Apart from the simple field declarations, this includes a
simple 1:1 relation between Product and
ProductGroup, where every product instance
is associated with a ProductGroup:
<class name="myapp.Product" identity="id">
<map-to table="prod" />
<field name="id" type="integer">
<sql name="id" type="integer" />
</field>
<field name="name" type="string">
<sql name="name" type="char" />
</field>
<field name="price" type="float">
<sql name="price" type="numeric" />
</field>
<field name="group" type="myapp.ProductGroup" >
<sql name="group_id" />
</field>
<field name="details" type="myapp.ProductDetail"
collection="vector">
<sql many-key="prod_id"/>
</field>
<field name="categories" type="myapp.Category" collection="vector">
<sql name="category_id"
many-table="category_prod" many-key="prod_id" />
</field>
</class>
The following code fragment shows (again) the mapping file for
the Product class. The field definition highlighted
shows how to declare a 1:M relation between Product
and ProductDetail, where every product instance is
made up of many ProductDetails:
<class name="myapp.Product" identity="id">
<map-to table="prod" />
<field name="id" type="integer">
<sql name="id" type="integer" />
</field>
<field name="name" type="string">
<sql name="name" type="char" />
</field>
<field name="price" type="float">
<sql name="price" type="numeric" />
</field>
<field name="group" type="myapp.ProductGroup" >
<sql name="group_id" />
</field>
<field name="details" type="myapp.ProductDetail" collection="vector">
<sql many-key="prod_id"/>
</field>
<field name="categories" type="myapp.Category" collection="vector">
<sql name="category_id"
many-table="category_prod" many-key="prod_id" />
</field>
</class>
The following code fragment shows the corresponding mapping
entry for the ProductDetail class that defines the
second leg of the 1:M relation between Product and
ProductDetail.
<class name="myapp.ProductDetail" identity="id" depends="myapp.Product" > <description>Product detail</description> <map-to table="prod_detail" xml="detail" /> <field name="id" type="integer"> <sql name="id" type="integer"/> </field> <field name="name" type="string"> <sql name="name" type="char"/> </field> <field name="product" type="myapp.Product"> <sql name="prod_id" /> </field> </class>
The following code fragment shows (again) the mapping file for
the Product class. The field definition highlighted
shows how to declare a M:N relation between Product
and ProductCategory, where many products can be
mapped to many product categories:
<class name="myapp.Product" identity="id">
<map-to table="prod" />
<field name="id" type="integer">
<sql name="id" type="integer" />
</field>
<field name="name" type="string">
<sql name="name" type="char" />
</field>
<field name="price" type="float">
<sql name="price" type="numeric" />
</field>
<field name="group" type="myapp.ProductGroup" >
<sql name="group_id" />
</field>
<field name="details" type="myapp.ProductDetail" collection="vector">
<sql many-key="prod_id">/>
</field>
<field name="categories" type="myapp.Category" collection="vector">
<sql name="category_id"
many-table="category_prod" many-key="prod_id" />
</field>
</class>
The following code fragment shows the corresponding mapping
entry for the ProductCategory class that defines the
second leg of the M:N relation between Product and
Category.
<class name="myapp.Category" identity="id"> <description> A product category, any number of products can belong to the same category, a product can belong to any number of categories. </description> <map-to table="category" xml="category" /> <field name="id" type="integer"> <sql name="id" type="integer"/> </field> <field name="name" type="string"> <sql name="name" type="char"/> </field> <field name="products" type="myapp.Product" collection="vector"> <sql name="prod_id" many-table="category_prod" many-key="category_id" /> </field> </class>
As of release 0.9.9, Castor supports polymorphic queries on extend hierarchies. (That is, hierarchies where some entities "extend" other entities.) To highlight this new feature, let's add two new classes to what we have currently.
package myapp; public class Computer extends Product { private int _id; private String _make; public int getId() { ... } public void setId( int anId ) { ... } public String getmake() { ... } public void setMake( String aMake ) { ... } } public class Car extends Product { private int _id; private Date _registeredIn; public int getId() { ... } public void setId( int anId ) { ... } public Date getRegisteredIn() { ... } public void setRegisteredIn( Date aRegisteredIn ) { ... } }
The corresponding DDL statements for the relational database tables COMP and CAR would look as follows:
COMP:
create table comp ( id int not null, make varchar(200) not null );
CAR:
create table car ( id int not null, regIn int not null );
Based upon the mapping defined for the Product
class as shown above, the following code fragment shows the mapping
for the Computer and Car classes.
<class name="myapp.Computer" extends="myapp.Product" identity="id">
<map-to table="COMP" />
<field name="id" type="integer">
<sql name="id" type="integer" />
</field>
<field name="make" type="string">
<sql name="make" type="char" />
</field>
</class>
<class name="myapp.Car" extends="myapp.Product" identity="id">
<map-to table="CAR" />
<field name="id" type="integer">
<sql name="id" type="integer" />
</field>
<field name="registeredIn" type="date">
<sql name="regIn" type="long" />
</field>
</class>Based upon this mapping, it is possible to execute the following OQL queries against this class model:
OQLQuery query = d.getOQLQuery("SELECT c FROM myapp.Computer c");
To return all computers:
OQLQuery query = d.getOQLQuery("SELECT c FROM myapp.Computer c WHERE c.make = $");
To return all computers of a particular make:
OQLQuery query = d.getOQLQuery("SELECT p FROM myapp.Product p");
To return all products (where Castor will return the actual object
instances, i.e. a Computer instance if the object
returned by the query is of type Computer or a
Car instance if the object returned by the query is
of type Car):
OQLQuery query = d.getOQLQuery("SELECT p FROM myapp.Product p WHERE p.group.name = $");
To return all products that belong to the specified product group
(where Castor will return the actual object instances, i.e. a
Computer instance if the object returned by the query
is of type Computer or a Car instance
if the object returned by the query is of type Car):
This is a collection of HOW-TOs. The Castor project is actively seeking additional HOW-TO contributors to expand this collection. For information on how to do that, please see 'How to author a HOW-TO'.
Are you just interested in how Castor source looks like, want to report a bug or enhancement request or like to contribute to the project? The first step we suggest you to do is to setup a Castor project with eclipse IDE. As we use eclipse to work at Castor, there is everything in place to work with eclipse. While you are free to use other IDE's, you will need to configure things yourself with them.
Download and install JDK 1.5 or newer
Download and install Eclipse 3.x
Install the latest Subclipse eclipse plugin
Optionally install the latest CheckStyle eclipse plugin
Create a New Project in eclipse from
File -> New -> ProjectsSelect
"Checkout Projects from SVN"in"SVN"from"Select a wizard"window and clickNext(this option will only come if you have installed the subclipse plugin)Select
"Create a new repository location"and clickNextEnter the URL
"https://svn.codehaus.org/castor/castor"and clickNextSelect the folder
"trunk"from the list and clickNextIn
"Check Out As"window the name of the project will be"castor"then clickNextAt last, you can choose the workspace and click
FinishYou can see castor project in your
"Project Navigator" of eclipse
If you have trouble with Subclipse behind a proxy
server: In Windows development environment, open the file:
C:\Documents and
Settings\MyUserId\Application Data\Subversion\servers
in text editor. Near the bottom of that file is a [global] section with
http-proxy-host and http-proxy-port (user and password also) settings.
Uncommented those lines, modified them for your proxy server and go back
to the SVN Repository view in Eclipse. This should solve the problem.
At the time of this writing Castor JDO has 3 kinds of test suites:
Database independend plan unit tests.
A JUnit based test suite that is used to test various functional areas against different database engines to give developers/committers some reassurance when changing the codebase.
A Junit based test suite to evaluate impact of changes on performance.
This document provides general information about running Castor JDO's database independend unit tests.
To execute tests in eclipse, go and right click on
cpa/src/test/java source folder and select
"Run As -> JUnit Test".
At the time of this writing Castor JDO has 3 kinds of test suites:
Database independend plan unit tests.
A JUnit based test suite (CTF) that is used to test various functional areas against different database engines to give developers/committers some reassurance when changing the codebase.
A Junit based test suite (PTF) to evaluate impact of changes on performance.
This document provides general information about running Castor JDO's test suite (CTF).
Anyone who wants to run the CTF test suite. This document outlines the basic steps to get people unfamiliar with this area started.
Anybody wishing to run the CTF test suite should have access to the source code of Castor. This can be obtained in one of the following ways:
Download the sources distribution from the download page
Download the latest snapshot from SVN from Fisheye (see links on the bottom left corner)
Check out the latest code from SVN into your prefered developement environment. For instructions on this task, take a look at Subversion access. For eclipse How to setup Castor project in eclipse provides a detailed description of this task.
At the moment we are in the middle of replacing the old CTF with a new one. While the old CTF still is our reference for refactorings of Castor does the new CTF contain some tests which could not be added to the old one due to its limitations. On the other hand are not all tests ported to the new CTF yet.
In the next sections we describe how to setup the environment to execute both CTF versions. While both versions of CTF are designed to be executed against every supported database engine, we will describe things with regard to mysql. Having said that there are only scripts for mysql at the new CTF at the moment. At a later step of the CTF refactoring we will add scripts for other databases as well. In addition we intend to allow its execution with an embedded derby database out of the box, but this have not been implemented yet.
For those who might be wondering about the numbering of tests, the numbers of the old tests are just random. The numbers of the new tests are the jira issue numbers.
To execute tests against mysql database you probably need access to a mysql server. To create a database for CTF, you have to execute the following commands on mysql consol.
# create database test; # grant all on test.* at "localhost" to "test" identified by "test"; # use test; # source [path-to-script];
If the server is not installed on your local machine (the one you execute
the tests on) you have to replace "localhost" with the
IP of the machine the tests get executed on. The script to execute can be
found in "cpactf/src/old/ddl/"
directory. For mysql it's "mysql.sql".
If you like to use a different name for the database or use
other user credential you can adjust them at
"cpactf/src/old/resources/jdo/mysql.xml".
As we do not include JDBC drivers for every database with Castor you also have
to add the driver you like to use to your classpath to execute the tests.
The easiest way is to copy the driver to
"lib/" directory as all jar's
contained therein are added automatically. Another option is to modify
"bin/test.sh" or "bin/test.bat"
script depended on your operating system.
For mysql™ we still use
"mysql-connector-java-3.1.13-bin", also for
mysql server™ of version 5.
This version has proven to be stable. While other versions of
mysql connector™ may also work,
some of them have bugs from our experience.
As already explained you will find JDO configurations for every supported
database in
"cpactf/src/old/resources/jdo".
The JDO configurations are named mysql.xml,
oracle.xml etc. In the same directory you will also
find main mapping file "mapping.xml" that includes all
other mappings which are located in the
"cpactf/src/old/resources/ctf/jdo/..."
directories. There is one more important file for the old tests
"cpactf/src/old/resources/tests.xml",
it is the main config file which defines which test should be executed
against which database engine. As mentioned previously not every test
works with every database engine as some missing some features or castor
does not support everything of every engine.
From a command line (e.g a shell), please execute the following commands
to run the whole test suite against mysql (where
<castor-root> points to the directory
where you installed the Castor sources:
cd <castor-root>/bin
build clean
build tests
test castor.mysqlTo execute just one of the many tests of the complete test suite, please change this to:
cd <castor-root>/bin
build clean
build tests
test castor.mysql.TC30 | Note |
|---|---|
You have to execute "build clean" and "build tests" again if you have changed anything within eclipse (e.g. a configuration file or a class). |
Now, let's see how we can run these old CPACTF tests through eclipse.
Go to "/cpacft/src/old/java" and right click
Select
Run As -> Run...Select
"Java Application"from the left side menu and double click on it to create"New_configuration".Select
Project -> castorEnter
Main class -> MainAppSelect Arguments Tab
Enter
Program Argumentsfor example: "castor.mysql.TC31" or "castor.mysql"Now "Run"
As some features are not supported by all database engines (e.g. sequence keygenerator) or a test have not been verified against a database, only a subset of the following tests will be executed if you run CTF.
TC01 Duplicate key detection tests.
TC02 Concurrent access tests.
TC03 Read only tests.
TC04 Deadlock detection tests.
TC05 Update rollback tests.
TC06 Race tests.
TC07 Cache leakage tests.
TC08 Cache expiry measure.
TC09 TxSynchronizable interceptor tests.
TC10 Type handling tests.
TC11 Type handling of LOB tests.
TC12 Type Conversion tests.
TC13 Serializable object tests.
TC14 Rollback primitive tests.
TC15 Multiple columns primary keys tests.
TC15a Multiple columns primary keys only tests.
TC16 Nested fields tests.
TC17 Timestamp tests.
TC18 Persistence interface tests.
TC19 InstanceFactory interface tests.
TC20 Key generators: MAX, HIGH-LOW.
TC23 Key generator: IDENTITY.
TC24 Key generator: UUID.
TC25 Dependent objects tests.
TC26 Dependent objects tests.
TC27 Dependent update objects tests.
TC28 Dependent update objects tests.
TC30 OQL-supported syntax.
TC31 OQL queries for extends.
TC32 Test limit clause.
TC33 Test limit clause with offset.
TC34 Test limit clause with offset at extended object.
TC36 SizeOracle.
TC37 Absolute.
TC38 CALL SQL with parameters.
TC38a Named query support.
TC70 Collections.
TC71 Test special collections.
TC72 Test sorted collections.
TC73 ManyToMany.
TC74 ManyToManyKeyGen.
TC75 Expire Many-To-Many.
TC76 Cached OID with db-locked.
TC77 Query garbage collected.
TC78 JDBC connection.
TC79 Test the use of Database.isLocked().
TC79a Test auto-store attribute.
TC79aa Test auto-store attribute for 1:M relations.
TC79b Test the use of Database.isPersistent().
TC80 self-referential relation test with extend hierarchies.
TC81 Dependent relation test.
TC82 Dependent relation test (using no key generators).
TC83 Identity definition through identity attribute in field mapping.
TC84 Transient attribute.
TC85 TestEnum.
TC87 TestLazy1to1.
TC88 Lazy Loading.
TC89 Expire Lazy Employee.
TC93 Polymorphism Degenerated tests.
TC94 Polymorphism tests.
TC95 Polymorphism tests with key generator.
TC96 Polymorphism tests for depend relations.
TC97 Polymorphism tests.
TC98 Polymorphism tests in a threaded environment.
TC99 Polymorphism tests (many 2 many).
TC200 Self-referential relation tests.
TC201 Self-referential relation tests with extend hierarchy.
TC202 ForeignKeyFirst tests.
TC203 Timezone tests.
To execute tests against mysql database you probably need access to a mysql server. To create a database for CTF, you have to execute the following commands on mysql console.
# create database cpactf;
# grant all on cpactf.* at "localhost" to "test" identified by "test";
# use cpactf;
# source <path-to-script>;
If the server is not installed on your local maschine (the one you execute the
tests on) you have to replace "localhost" with the IP
of the maschine the tests get executed on. For mysql execute every
"mysql.sql" script found in subdirectories of
"cpactf/src/test/ddl/" directory.
If you like to use a different name for the database or use other user
credential you can adjust them at
"cpactf/src/test/resources/cpactf-conf.xml".
As we do not include JDBC drivers for every database with Castor you also have
to add the driver you like to use to your classpath to execute the tests.
The easiest way is to copy the driver to
"lib/" directory as all jar's
contained therein are added automatically. Another option is to modify
"bin/test.sh" or "bin/test.bat"
script depended on your operating system.
For mysql we still use "mysql-connector-java-3.1.13-bin",
also for mysql server™ of version 5. This version
has proven to be stable. While other versions of
mysql connector™ may also work,
some of them have bugs from our experience.
Execution of the new test suite from within eclipse against mysql™ is very simple.
Select "cpactf/src/test/java" and right click
Select "
Run as" -> "JUnit tests"
In in the configuration file "cpactf-conf.xml" mysql is configuerd as default database. To execute tests against another database engine or to force execution of tests that have been excluded you can pass VM parameter to the test framework. VM Arguments can also be specified in eclipse.
Select "
Run as" -> "Run.." from main menuSelect Arguments Tab
Enter
VM Argumentsfor example: "-Dname=value"Now "
Run"
The following VM parameters are supported by CTF.
- config
Path to an alternate configuration file.
- database
Name of the database configuration.
- transaction
Name of the transaction manager configuration.
- force
Force execution of excluded tests (true/false).
For those who face the following problem in eclipse while executing the tests
#An unexpected error has been detected by HotSpot Virtual Machine: # #EXCEPTION_ACCESS_VIOLATION (0xc0000005) at pc=0x7c918fea, pid=2460, tid=3712 # #Java VM: Java HotSpot(TM) Client VM (1.5.0-b64 mixed mode) #Problematic frame: #C [ntdll.dll+0x18fea] # #An error report file with more information is saved as hs_err_pid2460.log # # If you would like to submit a bug report, please visit: # http://java.sun.com/webapps/bugreport/crash.jsp #
It is a problem with memory configured for eclipse. It can be changed in
eclipse.ini file which can be found in installation
directory of Eclipse. By default it is -Xmx256m,
just increase it and problem go away.
At the time of this writing Castor JDO has 3 kinds of test suites:
Database independend plan unit tests.
A JUnit based test suite that is used to test various functional areas against different database engines to give developers/committers some reassurance when changing the codebase.
A Junit based test suite to evaluate impact of changes on performance.
This document provides general information about running Castor JDO's performance tests.
To execute performance tests against mysql database you probably need access to a mysql server. To create a database for PTF, you have to execute the following commands on mysql console.
# create database cpaptf;
# grant all on cpaptf.* at "localhost" to "test" identified by "test";
# use cpaptf;
# source [path-to-script];
If the server is not installed on your local machine (the one you execute
the tests on) you have to replace "localhost" with the IP
of the machine the tests get executed on. The script to execute is
"cpaptf/src/test/ddl/mysql.sql".
As we do not include JDBC drivers for every database with Castor you also have
to add the driver you like to use to your classpath to execute the tests.
The easiest way is to copy the driver to
"lib/" directory as all jar's
contained therein are added automatically.
For mysql we still use "mysql-connector-java-3.1.13-bin",
also for mysql server™ of version 5.
This version has proven to be stable. While other versions of
mysql connector™ may also work,
some of them have bugs from our experience.
Execution of the performance test suite from within eclipse is very simple.
Select "
cpaptf/src/test/java" -> "org.castor.cpaptf" -> "TestAll.java" and right clickSelect "
Run As" -> "JUnit Test"
By default the test uses 2000 service objects that get created, loaded with
various configurations and deleted afterwards. Obviously this will take quite
some time. Please be patient for normal termination of the tests as you will
need to clean test tables by hand otherwise. To execute tests with a different
number of objects you can adjust "FACTOR" constant in
"TestCreate.java". For example, if you set
"Factor" to 1.0 the tests will be executed with 10000
service objects. When using more test objects be aware that you may need to
increase heap size of the virtual machine for the test to finish.
By default you won't see any output of results on the console as logging level
of log4j is set to "warn" by default. But if you change log level of
"org.castor.cpaptf" package to "info"
you will see detailed execution times for every test on the console.
Be aware that there are quite some log4j.xml
configurations in the whole Castor project at the moment of which the one
first one on classpath will be used.
If you like to review some older test results you will find them under
"cpaptf/src/site/resources/results/"
but they depend heavy on the machine you are running the tests on.
Most of the traffic on the Castor Users mailing list is about people asking for help on various features of Castor (whether JDO or XML). Whilst there is nothing wrong about asking questions and looking for help if you are stuck, it seems that there is room to improve the structure of this 'conversation'.
If you have a look at some of these threads (e.g. at the searchable mailing list archive), it's quite easy to see that most of the time ...
An initial question is posted.
An initial reply is posted with some follow-up questions, e.g. request for code fragments, mapping files, etc.
One or more code fragments, mapping files, etc. are being posted.
etc.
This document will establish guidelines with regards to step 3) above.
This document provides step-by-step instructions on how to submit a problem report (when being asked to do so). It does so by walking you through a fictive problem and its resulting bug report, and providing instructions based upon this scenario.
Per definition, any problem report submitted (in other words, most likely attached to a bug report at http://jira.codehaus.org/browse/CASTOR) by the means of a patch has to include the following artefacts:
A JUnit test case that 'showcases' your problem.
Castor JDO configuration file.
Castor JDO mapping file.
One or more 'entity' classes required to run your test case.
A SQL schema file (to help in the creation of required tables).
A
READMEfile (with any additional information/instructions required to understand /run your test case.
| Note |
|---|---|
Whilst we can and will not impose these guidelines in their strictest sense, I think that the use of technologies such as JUnit will simplify problem resolution and as a result lead to shorter turn-around times. Which is ultimately where you, the user, gains.. |
To facilitate creation of a fully featured patch as discussed above,
we have provided you with an already existing bug template at
'src/bugs/jdo/template'.
| Note |
|---|---|
Please note that this directory is distributed only as part of the source archive(s). |
This directory holds all artefacts mentioned above, as is structured as follows:
Table 3.7. bug template artefacts
src | Source code |
src/bugs | Common root for bug reports |
src/bugs/jdo
| Common root for JDO bug reports |
src/bugs/jdo/template
| Patch template |
src/bugs/jdo/template/TestTemplate.java
| JUnit test case. |
src/bugs/jdo/template/EntityOne.java
| Entity required by the test case |
src/bugs/jdo/template/jdo-conf.xml
| Castor JDO configuration |
src/bugs/jdo/template/mapping.xml
| Castor mapping file |
src/bugs/jdo/template/create.sql
| SQL schema to create database table(s) |
src/bugs/jdo/template/README | Test instructions |
To create you own bug report, please copy
'template'
to e.g. bug1820,
assuming that 1820 is the number assigned to your BugZilla
problem report). Subsequently, please amend the files provided to
match your own requirements. After you have consolidated your changes,
the original directory structure in
src/bugs could look as follows:
Table 3.8.
directory structure of
src/bugs
src
| Source code |
src/bugs
| Common root for bug reports |
src/bugs/jdo
| Common root for JDO bug reports |
src/bugs/jdo/template
| Patch template |
src/bugs/jdo/template/TestTemplate.java
| JUnit test case. |
src/bugs/jdo/template/EntityOne.java
| Entity required by the test case |
src/bugs/jdo/template/jdo-conf.xml
| Castor JDO configuration |
src/bugs/jdo/template/mapping.xml
| Castor mapping file |
src/bugs/jdo/template/create.sql
| SQL schema to create database table(s) |
src/bugs/jdo/template/README
| Test instructions |
src/bugs/jdo/bug1820
| Your specific bug (as per BugZilla bug number) |
src/bugs/jdo/bug1820/TestCase.java
| JUnit test case. |
src/bugs/jdo/bug1820/Entity1.java
| Entity required |
src/bugs/jdo/bug1820/Entity2.java
| Entity required |
src/bugs/jdo/bug1820/jdo-conf.xml
| Castor JDO configuration |
src/bugs/jdo/bug1820/mapping.xml
| Castor mapping file |
src/bugs/jdo/bug1820/schema.sql
| SQL schema to create database table(s) |
src/bugs/jdo/bug1820/README
| Test instructions |
Once you have successfully executed your JUnit test case, please add
this test to the master test suite available in
src/bugs/AllTests.java as follows. To add
a test to this suite, please duplicate the line
suite.addTestSuite(template.TestTemplate.class);
and replace the term
'jdo.template.TestTemplate.class' with
'jdo.bug1820.TestCase'.
This will allow us to run all tests related to all open bugs in one go by executing just this test suite.
As explained in Guidelines For Code Contribution, we ask you to submit your code changes in the form of a unified patch by attaching it to the relevant bug report.
To create a unified patch for submission, you can either use the command line SVN client (which you find instructions to download for at http://subversion.tigris.org/ or any IDE that offers support or SVN (such as Eclipse with Subclipse plugin)
In any case, please note that we are trying to standardize on the use of unified patches only, and that you should always update your code (against the SVN repository) before creating the patch. If you have never used SVN before, there will be ways to convince us to accept e.g. a Zip file includig your changes.
Whilst we cannot assume that every Castor (JDO) user is an expert in the use of JUnit, we do believe that they are quite easy to get acquainted with. As a starting point, please find below some references:
A "patch" is the set of differences between two versions of the same file.
Patches are used to send someone the exact changes that you have made to
your version of a program or a document. They can then apply that patch
to their version to merge the changes and bring their version up-to-date
with your version.
As our example we use the contribution of a simple documentation patch for
the Castor project. The principles apply to any project and to any type of
file, e.g. *.xml,
*.java,
*.xsd, etc.
Anyone who wants to contribute to a project. This document addresses the basics, so as to get new people started.
Our example describes the use of command-line tools for a UNIX system.
Other tools can be used, as long as they produce a
"unified diff".
Contributers should have:
The source code of the documents as a local working copy of the SVN repository. If you are working with the current SVN HEAD then you will have already done a 'svn checkout castor'. However, see below for other ways of obtaining source for diff comparison.
The tools with which to prepare a patch. On UNIX the "svn" program has the svn diff command.
Here is how to proceed.
A "Patch" is the set of differences between two versions of the same file. A patch comprises one or more "diff" files. These diffs are produced by the program of the same name: diff.
Here is an example of a single diff for one of the Castor How-to pages, where we are suggesting a minor text change. Do not get frightened. These are just human-readable instructions to the "patch" program.
Index: contrib.xml
===================================================================
RCS file: /home/projects/castor/src/doc/jdo-howto.xml,v
retrieving revision 1.7
diff -u -r1.7 contrib.xml
--- jdo-howto.xml 30 Apr 2002 07:44:52 -0000 1.7
+++ jdo-howto.xml 26 May 2002 04:08:23 -0000
@@ -208,7 +208,7 @@
to create a patch. (The commands are for Linux.)
</p>
- <s2 title="How to Establish your Local Repository">
+ <s2 title="How to Establish your Local Working Copy">
<p>
This will checkout the current copy of the master cvs repository and
That is a "unified diff" ... there a some lines of context on each side of the changes. This patch is basically saying "Change the text on line 208".
lines to be deleted are preceded with -
lines to be added are preceded with +
contextual lines with no leader remain the same
Let us now go though the process of preparing that patch. Go ahead
and edit your local copy of the document at
$CASTOR_HOME/src/doc/jdo-howto.xml.
Ensure that it is valid XML using your favourite XML editor or an external validating parser. Please do not leave it up to the poor committer to fix broken XML.
Run the 'build doc' target to be sure that links are not broken and that the new document is presented as you intend it to be.
If you are using the HEAD of SVN then ensure that your working copy is up-to-date. Of course, if you are using a previous public release version of Castor, then it is already up-to-date.
Prepare the diff file. SVN will contact the remote repository, ensure that your working copy is up-to-date, then compare your local copy with the master repository.
cd src/doc
svn diff jdo-howto.xml > $TEMP/castor/patch/jdo-howto.xml.diff
Prepare a brief explanation of what your patch does. Get this ready in a text file before you go to Jira. See further hints about this in the "Description" section of the How-to Jira.
What revision of SVN did you patch against? Was it HEAD branch? Was it a nightly build? Was it a public release?
A patchfile can contain the differences to various individual documents. For example, the following command does that ...
cd src
svn diff > $WORK/castor/patch/src.dir.diff
However, be careful not to go overboard with this technique. When producing multiple diffs in one patchfile, try to limit it to one particular topic, i.e when fixing the same broken external link in various pages, then it would be fine to produce a single diff. Consider the committer - they will find it hard to apply your patch if it also attempts to fix other things.
Ideally you will prepare your patches against a SVN repository. There are other ways to do this. They do create more work for the committers, however it may be the only way that you can do it. We would certainly rather receive your patch however it comes. As a matter of fact, we would politely ask you first to send us a unified patch.
You could get the source document via the web interface to SVN. Here are the steps ...
get the relevant XML file via FishEye
save the file to your local disk:
./jdo-howto.xml.origcreate a copy of the file:
./jdo-howto.xmlmake your modifications and validate the XML
use the "diff" command (i.e. not 'cvs diff') as follows
diff -u jdo-howto.xml.orig jdo-howto.xml > $WORK/castor/patch/jdo-howto.xml.diffproceed as for Step 5.
The UNIX manual pages 'man diff' and 'man patch'.
SVN Home - many useful SVN related items
Anyone who wants to execute an OQL statement and limit the result size.
The example given describes the addition of LIMIT/OFFEST clauses to an existing OQL statement.
You should have a valid class mapping for two Java classes
Product and ProductGroup,
similar to the following one:
package myapp;
public class Product
{
private int _id;
private String _name;
private float _price;
private ProductGroup _group;
public int getId() { ... }
public void setId( int anId ) { ... }
public String getName() { ... }
public void setName( String aName ) { ... }
public float getPrice() { ... }
public void setPrice( float aPrice ) { ... }
public ProductGroup getProductGroup() { ... }
public void setProductGroup( ProductGroup aProductGroup ) { ... }
}
The following fragment shows the Java class declaration for the
ProductGroup class:
public class ProductGroup { private int _id; private String _name; public int getId() { ... } public void setId( int id ) { ... } public String getName() { ... } public void setName( String name ) { ... } }
Here is how to proceed.
The following code fragment shows an OQL query to select the all
ProductGroup instances.
OQLQuery query = db.getOQLQuery("select product from ProductGroup product");
query.bind(10);
OQLResults results = query.execute();
The following code fragment shows the same OQL query as above, to
this time the LIMIT keyword is added to select the first 10
instances only.
OQLQuery query = db.getOQLQuery(
"select product from ProductGroup product LIMIT $1");
query.bind(10);
OQLResults results = query.execute();
Below is the same OQL query again, restricting the number of
ProductGroup instances returned to 10, though
this time it is specified that the ProductGroup
instances 101 to 110 should be returned.
OQLQuery query = db.getOQLQuery(
"select product from ProductGroup as product LIMIT $1 OFFSET $2");
query.bind(10);
query.bind(100);
OQLResults results = query.execute();
The following RDBMS fully/partially support LIMIT/OFFSET clauses.
Table 3.9. Support for LIMIT in RDBMS
| RDBMS | LIMIT | OFFSET |
|---|---|---|
| postgreSQL | Yes | Yes |
| mySQL | Yes | Yes |
| Oracle 1) 2) | Yes | Yes |
| HSQL | Yes | Yes |
| MS SQL | Yes | - |
| DB2 | Yes | - |
1) Caster has full support for LIMIT/OFFSET clauses for Oracle Releases 8.1.6 and later.
2) For the LIMIT/OFFSET clauses to work properly the OQL query is required to include an ORDER BY clause.
In the case a RDBMS does not support LIMIT/OFFSET clauses, a
SyntaxNotSupportedExceptionwill be thrown.
Anyone who wants to enable caching for classes already mapped with Castor JDO.
This document addresses the basics to get people familiar with the basic concepts and discusses some implementation details.
The example given describes the addition of a
<cache-type> element to an existing class mapping.
You should have a valid class mapping for a Java class, similar to the following one:
<mapping>
<class name="com.xyz.MyOtherObject" identity="id">
<field name="id" type="integer">
...
</field>
<field name="description" type="string">
...
</field>
</class>
</mapping>
Here is how to proceed.
Add a <cache-type> element as shown below, specifying the cache provider to use in the 'type' attribute.
<mapping>
<class name="com.xyz.MyOtherObject" identity="id">
<cache-type type="time-limited"/>
<field name="id" type="integer">
...
</field>
<field name="description" type="string">
...
</field>
</class>
</mapping>
This, for example, defines the 'time-limited' cache provider to be
used for the com.xyz.MyOtherObject. This cache
provider applies internally a time-limited least-recently-used
algorithm for com.xyz.MyObject instances.
With the current release, performance caches also serve a dual purpose as dirty checking caches for long-transactions. This limitation implies that the object's duration in the performance cache determines the allowed time span of a long transaction. This might become an issue when performance caches of type '
count-limited' or 'time-limited' are being used, as objects will eventually be disposed. If an application tries to update an object that has been disposed from the dirty checking cache, an ObjectModifedException will be thrown.
Anyone who wants to persist object that refer to a typesafe enumeration.
This document addresses the basics and shows an example how to map an object that has a typesafe enumeration property.
Enumerations are a common method for ensuring data integrity, both in software and in relational databases. As a platform for linking the two, we added support for persisting class fields whose type is a Java typesafe enumeration to Castor JDO.
To use this new feature your typesafe enumeration should follow the enum
pattern commonly used and provide a static
valueOf(String) method. An enum of
different kinds of computer equipment may look like:
public class KindEnum {
private static final Map KINDS = new HashMap();
public static final KindEnum MOUSE = new KindEnum("Mouse");
public static final KindEnum KEYBOARD = new KindEnum("Keyboard");
public static final KindEnum COMPUTER = new KindEnum("Computer");
public static final KindEnum PRINTER = new KindEnum("Printer");
public static final KindEnum MONITOR = new KindEnum("Monitor");
private final String _kind;
private KindEnum(final String kind) {
_kind = kind;
KINDS.put(kind, this);
}
public static KindEnum valueOf(final String kind) {
return (KindEnum) KINDS.get(kind);
}
public String toString() { return _kind; }
}
At your Product class you may want to have a
property that tells you what kind of computer equipment a product is of.
public class Product {
private int _id;
private String _name;
private KindEnum _kind;
public Product() { }
public int getId() { return _id; }
public void setId(int id) { _id = id; }
public String getName() { return _name; }
public void setName(String name) { _name = name; }
public KindEnum getKind() { return _kind; }
public void setKind(KindEnum kind) { _kind = kind; }
}
Your mapping for the Product class should be:
<class name="Product" identity="id">
<description>Product with kind enum</description>
<map-to table="enum_prod"/>
<field name="id" type="integer">
<sql name="id" type="integer"/>
</field>
<field name="name" type="string">
<sql name="name" type="char"/>
</field>
<field name="kind" type="KindEnum">
<sql name="kind" type="char"/>
</field>
</class>
To add this new feature we added an additional check when searching for field types. Like before Castor first searches for know types and thereafter for a mapping for the class you specified as type. If both of them do not match it now checks if the class specified as type is available at classpath and has a static
valueOf(String)method. Only if all of this conditions are met it will be viewed as a valid mapping.
Castor JDO uses the Jakarta Common's Logging package for output information relevant to the execution of a specific JDO operations to a log file. The information output historically included the SQL statements used by Castor to execute the various persistence operations such as loading or updating domain entities. Unfortunately, the SQL statements logged did not include any information about the parameters being bound to the prepared statements immediately before execution, and hence made it very hard for users of Castor JDO to analyze these in the case of an issue/problem.
To improve this situation, proxy classes for the java.sql.Connection and java.sql.PreparedStatement interfaces have been added, to allow for complete and better JDBC statements to be output to the log files. As this might impose a performance penalty at run-time, we have allowed for this to be turned off completely through the standard Castor property file.
A new property has been added to the Castor property file
(castor.properties) to allow configuration of this
feature.
Anyone who wants to use the new JDBC proxy classes with Castor JDO selectively, i.e. enabling and disabling their use.
The example given describes how to turn the use of the proxy classes on/off.
You should have a valid castor.properties file as
part of your application.
Here is how to proceed.
To enable the use of the JDBC proxy classes described above, please
add the following section to your
castor.properties file.
# True if JDBC proxy classes should be used to enable more detailed logging output of SQL
# statements; false otherwise (logging of SQL statements will be turned off completely).
#
org.exolab.castor.persist.useProxy=true
This instructs Castor JDO to use the JDBC proxy classes and to output full information about the SQL statements used at run-time. When disabled, no logging of SQL statements will occur at all.
Up to Castor 1.3.1, users of Castor JDO have been able to automatically store/update or delete objects across relations by issuing ...
Database.setAutostore(true)
before going starting a transaction. This feature was useful, indeed, but on a second look its limitation (global definition across all entities) became obvious, especially on big projects. You might want to have cascading operations activated selectively (activated for one object, but not for another). Or even more tricky, you might like to automatically track changes across one relation from a starting object, but but not across another relation from the very same object.
As of Castor 1.3.2, a new
cascading attribute has been introduced
to the <sql> tag of the JDO mapping file.
This and all other cascading documents address people familiar with the basic concepts of mapping domain entities to database tables and defining relations between objects (on database level as well as on object level). But in particular, this document applies to the following user groups:
Everyone who wants to cascade operations across (any type of) object relation(s).
Everyone who now uses
Database.setAutoStore(boolean)to have persistence operations cascaded across relations.
| Note |
|---|---|
Especially the second user group should change their approach towards
using cascading operations, and switch to using the new cascading
attribute. As of Castor 1.3.2, the current
|
You should have a valid mapping file, containing at least two objects, being in relation with each other. For the remainder of this document, we'll be using the following example mapping file as a starting point.
<mapping>
<class name="org.castor.cascading.Author" identity="id">
<cache-type type="none" />
<map-to table="OneToOne_Author" />
<field name="id" type="integer">
<sql name="id" type="integer" />
</field>
<field name="timestamp" type="long">
<sql name="time_stamp" type="numeric" />
</field>
<field name="name" type="string">
<sql name="name" type="char" />
</field>
</class>
<class name="org.castor.cascading.Book" identity="id">
<cache-type type="none" />
<map-to table="OneToOne_Book" />
<field name="id" type="integer">
<sql name="id" type="integer" />
</field>
<field name="timestamp" type="long">
<sql name="time_stamp" type="numeric" />
</field>
<field name="name" type="string">
<sql name="name" type="char" />
</field>
<field name="author" type="org.castor.cascading.Author">
<sql name="author_id"/>
</field>
</class>
</mapping>
In order to activate cascading for create operations for the
author relation defined in the mapping
file above, you have to add the following attribute to the field mapping
of the author property:
<class name="org.castor.cascading.one_to_one.Book" identity="id"> <cache-type type="none" /> ... <field name="author" type="org.castor.cascading.one_to_one.Author"> <sql name="author_id" cascading="create"/> </field> </class>
Remember that the code above adding a cascading attribute with a value
of create is only an example. You can define any
combination of cascading attributes, delimiting those values by spaces,
as shown in the following example:
<field name="author" type="org.castor.cascading.one_to_one.Author">
<sql name="author_id" cascading="create update"/>
</field>
In order to achieve an optimal granulation of activating and de-activating functionality, there are 5 possible values, out of which 3 can be activated separately or in any combination.
In general, what you have to keep in mind is that some cascading types do not only affect the the (coincidentally) identically named database operation, but also other persistence operations. For more details please read the following references carefully.
create: details on create operation
delete: details on delete operation
update: details on update operation
none: cascading operations are disabled.
all: Using the value
all, you are providing a shortcut specifying that all three basic operations should be defined at the same moment. This basically equals to a value of'create delete update'.
If no cascading attribute is defined, its default value will be
none.
Cascading creation allows you to transfer some of the responsibilities of creating objects to Castor JDO. To be more precise: if you enable cascading creation on a relation between two classes, all objects on one end of that relation that have not yet been created will be created when the other end gets persisted. This saves you from manually creating every single object, which is especially useful when dealing with large object graphs that have 1:M (one to many) relations or many objects in a single relationship.
To enable cascading creation on a relation, you simply set the cascading
attribute of the <sql> field describing the
relation to "create" (or "all"):
In other words, the field mapping for the Java property book ...
<field name="book" type="myapp.Book" > <sql name="book_id" /> </field>
becomes
<field name="book" type="myapp.Book" >
<sql name="book_id" cascading="create" />
</field>
In case of bidirectional relations, it does matters on which end you enable cascading creation. It is also possible to enable it on both ends.
The most intuitive case is when you explicitly call
db.create() on an object that has cascading
creation enabled on one or more of his relations. If the objects in
those relationships have not yet been created, they will be as part
of the create() execution.
Here is a simple example, where the objects Author and Book are in a one-to-one relation (i.e. every Book has exactly one Author):
db.begin(); Author author = new Author(); author.setId(1); author.setName("John Jackson"); Book book = new Book(); book.setId(1); book.setTitle("My Life"); book.setAuthor(author); db.create(book); db.commit();
Once the commit operation has successfully completed, both the
Author and the Book
instance will have been persisted to your data store. To highlight
this, lets's have a look at the corresponding database tables
before and after the
execution of above code fragment.
Before
After
Cascading creation also works implicitly: any objects that are on the receiving end of a cascaded relation will be created upon transaction commit, provided they do not exist yet and that the object on the primary end of that relation does. In other words: if you modify a relation property of a loaded object, any new objects that now need to be created will be created.
To demonstrate, let's continue the example from the previous section.
We, again, have a Book and an
Author, in a one-to-one relation,
both already persisted. If we now change the book's author to someone
new, any object that is not yet in the database will be persisted
automatically. Just call db.commit() after
setting the new author, and the new author will be persisted as well.
db.begin(); Author author = new Author(); author.setId(2); author.setName("Bruce Willis"); Book book = db.load(Book.class, 1); book.setAuthor(author); db.commit();
In terms of unit test assertions, the current state of the author and book instances can be expressed as follows:
db.begin();
Book book = db.load(Book.class, 1);
assertNotNull(book);
assertEquals(1, book.getId());
Author author = book.getAuthor();
assertNotNull(author);
assertEquals(2, book.getId());
db.commit();
As above, let's have a look at the corresponding database tables for
the entities Author and
Book:
Before
After
Please note that we now have two authors stored, and that the book with an id value of '1' now has a foreign key relationship to the author with the id value '2'.
The real benefit of using cascading for object creation shows when dealing with 1:M relations, usually expressed through Java collections in your entity classes.
For the remainder of this secction, we will use the Java classes
Department and Employee,
which have a 1:M relationship (in other words, every department has
one or more employees). On the Java side, this is expressed as the
Department having a collection of
Employee objects in form of a Java collection.
In the database, this will obviously be the other way around, with the
emp table referencing the
dept table. Every example in this
section will use the same database state as a starting point, as
shown here:
Example 1: Adding objects
db.begin(); Employee employee = new Employee(); employee.setId(4); employee.setName("George"); Department department = db.load(Department.class, 23); department.getEmployees().add(employee); db.commit();
After
Example 2: Removing objects
db.begin();
Department department = db.load(Department.class, 23);
department.getEmployees().remove(2);
db.commit();
After
| Note |
|---|---|
this of course only works if you allow the employee's foreign
key dept_id to be
|
Example 3: Adding & removing objects
db.begin(); Employee e4 = new Employee(); e4.setId(4); e4.setName("George"); Employee e5 = new Employee(); e5.setId(5); e5.setName("Joe"); Employee e6 = new Employee(); e6.setId(6); e6.setName("Jack"); Department dep = db.load(Department.class, 23); dep.setEmployees(Arrays.asList(e4, e5, e6)); db.commit();
Database after:
The note to example 2 also applies here.
If you enable cascading deletion on a relationship, deleting the object on one end of the relationship (i.e. calling db.remove() on the object) will also delete the object on the other end.
To enable cascading deletion on a relationship you simply set the cascading
attribute of the <sql> field describing the
relation to "delete" (or "all"):
<field name="book" type="myapp.Book" > <sql name="book_id" cascading="delete" /> </field>
In case of bidirectional relationships, be aware that it matters on which end you enable cascading deletion. It is also possible to enable it on both ends.
Let's say we have the objects Author and Book and they are in a
one-to-one relationship, with every Book
having exactly one Author. The database looks
like this:
Now, since we specified the relationship to cascade deletion, if we remove the book, the author gets removed too (after all, an author without a book isn't really an author).
db.begin();
Book b1 = db.load(Book.class, 1);
db.remove(db1);
db.commit();
Afterwards, the database predictably looks like this:
Cascading the deletion of objects in to-many relationships works in exactly the same way.
Note: You need to explicitly invoke db.remove() to delete an object. Simply setting a relational property to NULL or removing an item from a collection will not remove the corresponding entity from the database, even with cascading deletion enabled.
When working with long transactions, you can cascade the
db.update() operation, so that, for example,
updating the root of a large object graph causes all connected entities
to update as well (provided cascading update is enabled on the particular
relationships, of course).
To enable cascading update on a relationship you simply set the cascading
attribute of the <sql> field describing the
relation to "update" (or "all"):
<field name="book" type="myapp.Book" > <sql name="book_id" cascading="update" /> </field>
In case of bidirectional relationships, be aware that it matters on which end you enable cascading update. It is also possible to enable it on both ends.
Let's say we have the objects Author and Book and they are in a
one-to-one relationship, with every Book
having exactly one Author. The database looks
like this:
Now let's change the book's title. Note that we never directly load the book and that the change happens outside of any transaction:
db.begin(); Author a1 = db.load(Author.class, 1); db.commit(); a1.getBook().setName("My Fantastic Life"); db.begin(); db.update(a1); db.commit();
Afterwards, the database looks like this:
To-many relationships are currently not supported (except many-to-one).
As it is now, enabling cascading update will cause db.update() to also create any entities that have not yet been persisted. (In other words: setting cascading to "update" has the same effect as setting it to "update create", but only when invoking db.update().)
With release 0.9.9, several cache providers have been added that are distributed caches per se or can be configured to operate in such a mode. This effectively allows Castor JDO to be used in a clustered J2EE (multi-JVM) environment, where Castor JDO runs on each of the cluster instances, and where cache state is automatically synchronized between these instances.
In such an environment, Castor JDO will make use of the underlying cache provider to replicate/distribute the content of a specific cache between the various JDOManager instances. Through the distribution mechanism of the cache provider, a client of a Castor JDO instance on one JVM will see any updates made to domain objects performed against any other JVM/JDO instance.
Anyone who wants to use Castor JDO in a J2EE cluster.
The example given describes the use of the Coherence cache provider to enable distributed caching.
You should have a valid class mapping for a Java class, similar to the following one:
<mapping>
<class name="com.xyz.MyOtherObject" identity="id">
<field name="id" type="integer">
...
</field>
<field name="description" type="string">
...
</field>
</class>
</mapping>
Here is how to proceed.
Add a <cache-type> element as shown below,
specifying the cache provider to use in the 'type'
attribute.
<mapping>
<class name="com.xyz.MyOtherObject" identity="id">
<cache-type type="coherence"/>
<field name="id" type="integer">
...
</field>
<field name="description" type="string">
...
</field>
</class>
</mapping>
This instructs Castor JDO to use the
'coherence' cache provider for objects of type
com.xyz.MyOtherObject. It is the cache provider
that is responsible to distribute any changes to the cache state to
all other Castor JDO instances within the
same cluster.
This HOW-TO provide users with instructions on hot to configure Castor JDO so that Apache Jakarta's DBCP package is used as a connection pool.
Anyone who wants to use DBCP as connection pool mechanism with Castor JDO.
Below are defined the steps to configure
Castor JDO to use DBCP's
BasicDataSource for connection pooling.
To use a DBCP BasicDataSource with
Castor JDO, please provide the following
<data-source> entry in the
jdo-conf.xml file.
<data-source class-name="org.apache.commons.dbcp.BasicDataSource">
<param name="driver-class-name" value="com.mysql.jdbc.Driver" />
<param name="username" value="test" />
<param name="password" value="test" />
<param name="url" value="jdbc:mysql://localhost/test" />
<param name="min-active" value="10" />
<param name="max-active" value="40" />
</data-source>
Above example makes use of the mySQL JDBC driver to establish a connection pool to a mySQL instance named 'test' running on the same machine as Castor itself. The pool initially holds 10 connections, but is configured to allow a maximum of 40 active connections at the same time.
J2EE applications depend on the J2EE container (hosting Servlet, EJB, etc) to configure a database connection (as well as other resource managers) and use JNDI to look it up. This model allows the application deployer to configure the database properties from a central place, and gives the J2EE container the ability to manage distributed transactions across multiple data sources.
This HOW-TO shows how to seamlessly use Castor JDO in such a managed environment, and how to make Castor participate in a distributed transaction.
Anyone who wants to use Castor JDO with(in) distributed J2EE transactions.
The following sections highlight the steps necessary to use Castor JDO seamlessly in such a (managed) environment, and how to make Castor participate in a distributed transaction.
The following code fragment shows how to use JNDI to lookup a database
and how to use a JTA UserTransaction instance
to manage the J2EE (aka distributed) transaction:
// Lookup databse in JNDI Context ctx = new InitialContext(); Database db = (Database) ctx.lookup( "java:comp/env/jdo/mydb" ); // Begin a transaction UserTransaction ut = (UserTransaction) ctx.lookup( "java:comp/UserTransaction" ); ut.begin(); // Do something . . . // Commit the transaction, close database ut.commit(); db.close();
If the transaction is managed by the container, a common case with EJB beans and in particular entity beans, there is no need to begin/commit the transaction explicitly. Instead the application server takes care of enlisting the database used by Castor JDO to insert domain entities into a database in the ongoing transaction and commiting/rolling back at the relevant time.
The following code snippet relies on the container to manage the transaction.
InitialContext ctx; UserTransaction ut; Database db; // Lookup databse in JNDI ctx = new InitialContext(); db = (Database) ctx.lookup( "java:comp/env/jdo/mydb" ); // Do something . . . // Close the database db.close();
As transaction enregistration is dealt with at the J2EE container,
it is not necessary anymore to obtain a
UserTransaction and start/commit the transaction
manually.
Instead of constructing required resources directly, a typical J2EE
application uses the JNDI API to look up resources from centrally
managed place such as a naming and directory service. In such an
environment, Castor JDO takes on the role
of a managed resource as well. It follows that, instead of constructing
a org.exolab.castor.jdo.JDOManager directly,
a typical J2EE application should use JNDI
to look it up.
We thus recommend enlisting the JDOManager
object under the java:comp/env/jdo namespace,
compatible with the convention for listing JDBC resources.
When using Castor JDO in a J2EE environment, Castor allows you to enable a special Database instance pooling support. This option is configured via the
org.exolab.castor.jdo.JDOManager.setDatabasePooling(boolean)method; by default, it is turned off. This option only affectsJDOManagerif J2EE transactions are used and if a transaction is associated with the thread that calls {@link #getDatabase}.If database pooling is enabled,
JDOManagerwill first search in this special pool to see if there is already aorg.exolab.castor.jdo.Databaseinstance for the current transaction. If found, it returns thisorg.exolab.castor.jdo.Databaseinstance; if not, it creates a new one, associates it will the transaction and returns the newly createdorg.exolab.castor.jdo.Databaseinstance.Please make sure that you call this method before calling {@link #getDatabase}.
When developing using Castor, we recommend that you use the various
setLogWriter methods to get detailed information and error
messages.
Using a logger with org.exolab.castor.mapping.Mapping
will provide detailed information about mapping decisions made by Castor and
will show the SQL statements being used.
Using a logger with org.exolab.castor.jdo.JDO
will provide trace messages that show when Castor is loading, storing,
creating and deleting objects. All database operations will appear in
the log; if an object is retrieved from the cache or is not modified,
there will be no trace of load/store operations.
Using a logger with org.exolab.castor.xml.Unmarshaller
will provide trace messages that show conflicts between the XML document and
loaded objects.
A simple trace logger can be obtained from
org.exolab.castor.util.Logger. This logger uses the
standard output stream, but prefixes each line with a short message
that indicates who generated it. It can also print the time and date of
each message. Since logging is used for warning messages and simple
tracing, Castor does not require a sophisticated logging mechanism.
Interested in integratating Castor's logging with Log4J? Then see this question in the JDO FAQ.
If you are using JDO objects with the default access mode ('shared') and too many transactions abort when attempting to commit due to locks, you should consider upgrading to an 'exclusive' mode. When two transactions attempt to modify and store the same object at the same time, lock issues arise. Upgrading to an 'exclusive' mode will prevent concurrent transactions from modifying the same object at once.
If too many transactions abort when attempting to commit due to dirty checking, you should consider upgrading to a 'locked' mode. When external database access modifies the same objects being managed by Castor, Castor will complain that objects are dirty. Upgrading to a 'locked' mode will prevent concurrent update.
Be advised that 'exclusive' mode introduces lock contention in the Castor persistence engine, and 'locked' mode adds lock contention in the database. Lock contention has the effect of slowing down the application and consuming more CPU.
If too many transaction abort due to deadlock detection, consider modifying the application logic. Deadlock occurs when two transactions attempt to access the same objects but not in the same order.
There are two types of inheritence: Java inheritence and relational inheritence.
With Java inheritence, two objects extend the same base class and map to two different
tables. The mapping file requires two different mappings for each of the objects.
For example, if Employee and Customer both
extend Person, but Employee maps to the table
emp and Person to the table
person, the mapping file should map both of these objects
separately.
With relation inheritence, one table provides the base information and another table
provides additional information using the same primary keys in both. Use the extends
attribute to specify such inheritence in the mapping file. For example, if Computer
extends Product and the table comp provides computer-specific columns
in addition to product columns in prod, the mapping for Computer will
specify Product as the extended class.
When a class just extends a generic base class or implements an interface, this form of inheritence is not reflected in the mapping file.
It is possible to use different objects and mappings to the same tables. For example, it is possible to define a subset of a table and load only several of the columns, or load an object without its relations.
To determine the first and last names and e-mail address of an object without loading the entire person object, create a subset class and map that class to a portion of the table. Such a class cannot be used to create a new person, but can be used to delete or modify the person's details.
Use partial views with care. If you attempt to load the same record using a full object and a subset object, changes to one of these objects are allowed, but changes to both will result in a conflict and roll back the transaction. Locking will not work properly between full and subset objects. Also note, that each of the two objects will have its own cache, so if you update the first object and load the second, you may obtain old values. To avoid this situation you may turn off the cache for both objects:
<class ... >
<cache-type type="none">
...
</class>
When an object is loaded into memory in the default access mode ('shared'), a read lock is acquired on that object. When the transaction commits, if there are changes to the object a write lock will be required. There is no guarantee that a write lock can be acquired, e.g. if another transaction attempts to change the same object at the same time.
To assure concurrent access, you may upgrade the object's lock by calling the
org.exolab.castor.jdo.Database.lock(java.lang.Object)
method. This method will either acquire a write lock or return if a timeout
elapses and the lock could not be acquired. Once a lock has been acquired,
no other transaction can attempt to read the object until the current
transaction completes.
Object locking is recommended only if concurrent access results in conflicts and aborted transactions. Generally locks results in lock contention which has an effect on performance.
Castor requires that classes have a public, no-argument constructor in order to provide the ability to marshal & unmarshal objects of that type.
create-method is an optional attribute to the <field>
mapping element that can be used to overcome this restriction in cases where
you have an existing object model that consists of, say, singleton classes
where public, no-argument constructors must not be present by definition.
Assume for example that a class "A" that you want to be
able to unmarshal uses a singleton class as one of its properties. When
attempting to unmarshal class "A", you should get an
exception because the singleton property has no public no-arg constructor.
Assuming that a reference to the singleton can be obtained via a static
getInstance() method, you can add a "create method" to class
A like this:
public MySingleton getSingletonProperty()
{
return MySingleton.getInstance();
}
and in the mapping file for class A, you can define the singleton property like this:
<field name="mySingletonProperty"
type="com.u2d.MySingleton"
create-method="getSingletonProperty">
<bind-xml name="my-singleton-property" node="element" />
</field>
This illustrates how the create-method attribute is quite a useful mechanism for dealing with exceptional situations where you might want to take advantage of marshaling even when some classes do not have no-argument public constructors.
| Note |
|---|---|
As of this writing, the specified
create-method must exist as a method in the current class (i.e. the class
being described by the current |
As explained at the introduction to Castor JDO, Castor has support for many advanced features such as caching, depend relations, inheritance, polymorphism, etc. The below sections detail these features, as their understanding is required to use Castor JDO in a performant and secure way.
All information related to caching and related concepts supported by Castor has been consolidated into one place, and is available here.
Castor distinguishes the relationship of two objects as dependent or related, and maintains the life cycle independently for the two types of relationships. Starting from Castor 0.9, the developer can explicitly define a dependent relationship in the mapping file.
When using independent relations, related objects' life cycle is independent of each other, meaning that they have to be created, removed and updated (for long transaction) independently.
When using dependent relations, one data object class must be declared as
depends on one other data object class in
the mapping file, and such an object is called a dependent data object class.
A data object class without depends
declared in the mapping is called a master object. A master object can be
depended upon by zero or more dependent data object class.
As of Castor 0.9, a dependent object class can be related to other master data object classes including extended classes, but cannot depend on more than one master class.
If an object class declared as depends
on another class, it may not be created, removed or updated separately.
Attempting to create, remove or update a dependent object will result in
ObjectNotPersistcapableException. Note that Castor doesn't allow a
dependent object instance to change its master object instance during a
transaction. Each dependent object can have only one master object.
Both dependent and master objects must have identities, and may or may
not make use of key-generators.
Here is the DTD for declaring dependent object:
<!ATTLIST class name ID #REQUIRED
extends IDREF #IMPLIED
depends IDREF #IMPLIED
identity CDATA #IMPLIED
access ( read-only | shared | exclusive | db-locked ) "shared"
key-generator IDREF #IMPLIED
For example,
<mapping> <class name="com.xyz.MyDependentObject" depends="com.xyz.MyObject"> ... </class> </mapping>
declares the data object class
com.xyz.MyDependentObject as a dependent
upon class com.xyz.MyObject.
Castor supports different cardinalities of relationship, namely one-to-one, one-to-many, and many-to-many. Many-to-many relationship must be related rather than dependent, because each dependent object can have only one master object.
Many-to-many requires a separate table for storing the relations between
two types of objects. Many-to-many introduces two attributes, namely
many-key and many-table that reside in the <sql>
element which is a sub-element of the <field>
element. For all many-to-many relations, a many-table must be specified.
If the column name of the primary key of the class is different from the
foreign keys columns of the class in the relation tables, then the relation
table columns can be specified using the many-key attributes. Similarly,
if the column name of the primary key of the related class is different
from the foreign key columns of the related class, then the relation table
columns can be specified using the name attribute.
The many-table is used to store relations in a separate table
<mapping> <class> <field> <sql many-key="#OPTIONAL" name="#OPTIONAL" many-table="#REQURIED"> </field> </class> </mapping>
So, for example, if the SQL table is the following,
Table 3.34. employee_table
| id | name | salary |
|---|---|---|
| 1482 | Smith, Bob | $123,456 |
| 628 | Lee, John | $43,210 |
| 1926 | Arnold, Pascal | $24,680 |
Then, the mapping for employee data object would look like this
<mapping> <class name="com.xyz.Employee" identity="id"> <map-to table="employee_table"/> <field name="id" type="integer"> <sql name="id"/> </field> <field> <sql many-table="employee_department" many-key="e_id" name="d_id"/> </field> <field name="salary"> <sql name="salary" type="integer"> </field> </class> </mapping>
As of release 0.9.6, Castor has full support for lazy loading object instances referenced as part of all relation types currently supported:
1:1 relations
1:m relations
M:N relations.
As of release 0.9.6, Castor supports lazy-loading of 1:1 relations. Imagine the following class mapping:
<mapping> <class name="com.xzy.Department"> ... <field "employee" type="com.xyz.Employee" lazy="true" /> ... </class> </mapping>
Per definition, when an instance of Department is loaded through e.g. Database.load(), Castor will not (pre-)load the Employee instance referenced (as such reducing the size of the initial query as well as the size of the result set returned). Only when the Emplyoee instance is accessed through Department.getEmployee(), Castor will load the actual object into memory from the persistence store.
This means that if the Employee instance is not accessed at all, not only will the initial query to load the Department object have had its complexity reduced, but no performance penalty will be incurred for the additional access to the persistence store either.
The elements in the collection are only loaded when the application asks for the object from the collection, using, for example, iterator.next(). The iterator in Castor's lazy collection is optimized to return a loaded object first.
In the mapping file, lazy loading is specified in the element of the
collection's <field>, for example,
<mapping> <class name="com.xzy.Department"> ... <field name="employee" type="com.xyz.Employee" lazy="true" collection="collection"/> </class> </mapping>
declares that the collection of type Employee in a Department is lazy loaded.
If lazy loading is specified for a field of a class, Castor will set the field with a special collection which contains only the identities of the objects. Because of that, it requires the data object to have the method setDepartment( Collection department) in the data object class which was not required in previous versions.
| Note |
|---|---|
Please note that currently only the java.util.Collection type is supported. |
The support of multiple column primary keys (also called compound primary keys) was another major enhancement added into Castor 0.9. Specifying multiple column primary keys is simple and straightforward, in the mapping file,
<mapping> <class name="com.xyz.MyObject" identity="firstName lastName"> <field name="firstName" type="string"> <sql name="fname"/> </field> <field name="lastName" type="string"> <sql name="lname"/> </field> ... </class> </mapping>
Multiple column primary keys work with both master and dependent objects, all cardinalities of relationship, including one-to-one, one-to-many and many-to-many, as well as lazy loading.
However, multiple column primary keys should only be used to adhere to an existing database design, not when designing a new database. In general, it is not a good idea to use an identity or identities which can be modified by the user, or which contain application-visible data. For example, if the system allows the user name to be changed, using user name as identity is highly discouraged, as this practice can require a major data migration to a new schema to update all foreign keys to adhere to a new primary key structure, should the user name no longer be adequate as a primary key. It should be noted that Castor doesn't support identity change, as specified in the ODMG 3.0 specification. So, primary keys changes are almost certainly a large trade off between data integrity and performance. Well chosen primary keys are usually single (not multiple) column numeric or character fields for the reasons outlined above, as well as performance, as joining operations are faster for single column primary keys.
For the various persistence operations as available through the org.exolab.castor.jdo.Database interface, Castor JDO provides a callback interface that informs the implementing class on events taking place related to selected persistence operations.
Once your entity class implements the org.exolab.castor.jdo.Persistence interface, you'll have to provide implementations for the following methods (with their respective semantics described next to them):
Table 3.37. Interface methods
| Method | Description |
|---|---|
| jdoAfterCreate() | Indicates that an object has been created in persistent storage. |
| jdoAfterRemove() | Indicates that an object has been removed from persistent storage. |
| jdoBeforeCreate() | Indicates that an object is to be created in persistent storage. |
| jdoBeforeRemove() | Indicates that an object is to be removed from persistent storage. |
| jdoLoad() | Indicates that the object has been loaded from persistent storage. |
| jdoPersistent(Database) | Sets the database to which this object belongs when this object becomes persistent. |
| jdoStore() | Indicates that an object is to be stored in persistent storage. |
| jdoTransient() | Indicates the object is now transient. |
| jdoUpdate() | Indicates that an object has been included to the current transaction by means of db.update() method (in other words, at the end of a "long" transaction). |
As of release 1.0M3, the Castor JDO examples have been packaged in a new way and are available for download at the download page. In the following sections, we explain the steps required to unpack this new archive, and how to execute the tests.
In order to be able to run the new Castor JDO examples, please download
the new castor-${RELEASE}-examples.zip from the
download page and put it into
some location on your computer.
To unpack the ZIP file downloaded, issue one of the following commands:
unzip castor-1.1M2-examples.zip
or
jar xvf castor-1.1M2-examples.zip
You can now run the examples using the directions provided in the next section.
In the directory where you have unpacked the ZIP file you'll find a
castor-1.1M2-examples.jar. In addition, you'll find a directory named
lib where you'll find several JAR files required to
run the samples.
To execute the samples, issue the following command:
java -jar castor-1.1M2-examples.jar
... et voila ! You'll see various lines of logging output flashing by whilst the Castor JDO samples are executing against a database.
The Castor JDO sample will test persistence between a set of Java classes (Product, ProductGroup, ProductDetail, etc.) and perform this code against an Apache Derby instance as RDBMS. For this purpose, the sample code will start an embedded Derby instance on the fly, create the required tables, and then continue to execute several code fragments using various Castor JDO artifacts (JDOManager, Database, etc.) against this embedded database.
In other words, everything is self-contained and there is no need to install a database, create a database schema, or create database tables. Everything required for the tests is initiated and set up from within the sample code.
As explained at the introduction to Castor JDO, Castor has support for many advanced features such as caching. The below sections detail the features related to caching in Castor JDO, as their understanding is required to use Castor JDO in a performant and secure way.
In general, performance caches enhance the application performance by reducing the number of read operations against the persistence storage, by storing and reusing the last read or committed values of the object. Performance caches do not affect the behavior of short transactions or locking. It only affects persistence objects that have been released from any transactional context.
Starting from Castor 0.8.6, a performance cache implementation has been added. At a technical level, Castor maintains separate (performance) caches for each object type specified in the JDO mapping provided, allowing users to specify - for each object type individually - the type and capacity of the cache.
By default, the following cache types are available:
Table 4.1. Available cache types
| name | Vendor | Version | Distributable? | Open source/commercial | high volume/performance | Added in release |
|---|---|---|---|---|---|---|
| none | Built-in | - | No | Open Source | No | |
| unlimited | Built-in | - | No | Open Source | No | |
| count-limited | Built-in | - | No | Open Source | No | |
| time-limited | Built-in | - | No | Open Source | No | |
| coherence | Tangosol Coherence | 2.5 | Yes | Commercial | Yes | 0.9.9 |
| jcs | JCS | 1.2.5 | Yes | Open source | Yes | 0.9.9 |
| fkcache | FKCache | 1.0-beta6 | No | Open Source | No | 0.9.9 |
| oscache | OSCache | 2.5 | Yes | Open Source | No | 1.0 |
| fifo | Built-in | - | No | Open Source | Yes | 1.0 |
| lru | Built-in | - | No | Open Source | Yes | 1.0 |
| ehcache | Built-in | - | Yes | Open Source | ? | 1.0.1 |
| gigaspaces | JCS | 5.0 | Yes | Commercial | Yes | 1.0.1 |
As some of these cache providers allow for allow you to use it in a distributed mode, this allows Castor JDO to be used in a clustered (multi-JVM) environment. Please see the section below for short summary of this feature.
Per definition, all build-in performance caches are write-through, because all changes to objects as part of a transaction should be persisted into the cache at commit time without delay.
For problems related to the use of performance caches, please consult with the relevant entries in the JDO F.A.Q..
As it stands currently, performance caches also serve a dual purpose as dirty checking caches for long-transactions. This limitation implies that the object's availability in the performance cache determines the allowed time span of a long transaction.
This might become an issue when performance caches of type 'count-limited' or 'time-limited' are being used, where objects will eventually be disposed. If an application tries to update an object that has been disposed from the dirty checking cache, an ObjectModifedException will be thrown.
The DTD declaration is as follows:
<!ELEMENT cache-type ( param* )> <!ATTLIST cache-type type ( none | count-limited | time-limited | unlimited | coherence | fkcache | jcache | jcs | oscache | fifo | lru | ehcache | gigaspaces ) "count-limited" debug (true|false) "false" capacity NMTOKEN #IMPLIED> <!ELEMENT param EMPTY> <!ATTLIST param name NMTOKEN #REQUIRED value NMTOKEN #REQUIRED>
With release 1.0 of Castor the DTD has changed but it is backward compatible to the old one and allows to enable debugging of cache access for a specific class as well as passing individual configuration parameters to each cache instance. Only count-limited and time-limited of the current build-in cache types support parameters. Parameter names are case sensitive and are silently ignored if they are unknown to a cache type.
It need to be noted that there are 3 parameter names that are reserved for internal use. If you specify a parameter with one of the names: type, name or debug their value will silently be overwritten with another one used internally.
Example 4.1. Configuration sample - count-limited
A count-limited least-recently-used cache (LRU) for 500 objects can be specified by:
<cache-type type="count-limited" capacity="500"/>
or
<cache-type type="count-limited"/> <param name="capacity" value="500"/> </cache-type>
If both, the capacity attribute and parameter with name="capacity" is specified, the parameter value takes precedence over the attribute value.
Example 4.2. Configuration sample - time-limited
A time-limited first-in-first-out cache (FIFO) that expires objects after 15 minutes can be specified by:
<cache-type type="time-limited" capacity="900"/>
or
<cache-type type="time-limited"/> <param name="ttl" value="900"/> </cache-type>
If both, the capacity attribute and parameter with name="ttl" is specified, the parameter value takes precedence over the attribute value.
The debug attribute can be used to enable debugging for objects of a single class. In addition to setting this attribut to true you also need to set logging level of org.castor.cache.Cache to debug.
| Note |
|---|---|
The default cache-type is |
The cache types fifo and lru are based on a set of articles in the O'Reilly Network by William Grosso, to implement a simplified and 1.3-compatible implementation of a Hashbelt algorithm.
Hashbelts are simple, in principle. Instead of walking all objects and finding out when they're supposed to expire, use a "conveyor belt" approach. At any particular point in time, objects going into the cache go into the front of the conveyor belt. After a certain amount of time or when the size limit of a container has been reached, move the conveyor belt - put a new, empty container at the front of the conveyor belt to catch new objects, and the one that drops off of the end of the conveyor belt is, by definition, ready for garbage collection.
As seen in his system, you can use a set of pluggable strategies to implement the actual hashbelt bits. A container strategy allows you to change out the implementation of the container itself - from simple hashtable-based implementations, up through more complex uses of soft referenced or hashset-based implementations, depending on what you need and what you want it to be used for. A pluggable "expire behavior" handler allows you to determine what action is taken on something which drops off of the bottom of the conveyor belt.
In difference to all other cache types the fifo and lru cache types offer various configuration options. Both of them have 6 parameters to configure their behaviour.
Table 4.2. cache types parameters
| parameter | description |
|---|---|
| containers | The number of containers in the conveyor belt. For example: If a box will drop off of the conveyor belt every 30 seconds, and you want a cache that lasts for 5 minutes, you want 5 / 30 = 6 containers on the belt. Every 30 seconds, another, clean container goes on the front of the conveyor belt, and everything in the last belt gets discarded. If not specified 10 containers are used by default. For systems with fine granularity, you are free to use a large number of containers; but the system is most efficient when the user decides on a "sweet spot" determining both the number of containers to be managed on the whole and the optimal number of buckets in those containers for managing. This is ultimately a performance/accuracy tradeoff with the actual discard-from-cache time being further from the mark as the rotation time goes up. Also the number of objects discarded at once when capacity limit is reached depends upon the number of containers. |
| capacity | Maximum capacity of the whole cache. If there are, for example, ten containers on the belt and the capacity has been set to 1000, each container will hold a maximum of 1000/10 objects. Therefore if the capacity limit is reached and the last container gets droped from the belt there are up to 100 objects discarted at once. By default the capacity is set to 0 which causes capacity limit to be ignored so the cache can hold an undefined number of objects. |
| ttl | The maximum time an object lifes in cache. If the are, for example, ten containers and ttl is set to 300 seconds (5 minutes), a new container will be put in front of the belt every 300/10 = 30 seconds while another is dropped at the end at the same time. Due to the granularity of 30 seconds, everything just until 5 minutes 30 seconds will also end up in this box. The default value for ttl is 60 seconds. If ttl is set to 0 which means that objects life in cache for unlimited time and may only discarded by a capacity limit. |
| monitor | The monitor intervall in minutes when hashbelt cache rports the current number of containers used and objects cached. If set to 0 (default) monitoring is disabled. |
| container-class |
The implementation of
org.castor.cache.hashbelt.container.Container
interface to be used for all containers of the cache.
Castor provides the following 3 implementations of the Container
interface.
|
| reaper-class |
Specific reapers yield different behaviors. The GC reaper,
the default, just dumps the contents to the garbage collector.
However, custom implementations may want to actually do something
when a bucket drops off the end; see the javadocs on other available
reapers to find a reaper strategy that meets your behavior
requirements. Apart of the default
org.castor.cache.hashbelt.reaper.NullReaper we provide
3 abstract implementations of
org.castor.cache.hashbelt.reaper.Reaper interface:
|
Example 4.3. Configuration sample - fifo
A fifo cache with default values explained above is specified by:
<mapping> ... <class name="com.xyz.MyOtherObject"> ... <cache-type type="fifo"/> ... </class> ... </mapping>
Example 4.4. Configuration sample - lru
A lru cache with capacity=300 and ttl=300 is defined by:
<mapping> ... <class name="com.xyz.MyOtherObject"> ... <cache-type type="lru" capacity="300"/> ... </class> ... </mapping>
or better by:
<mapping> ... <class name="com.xyz.MyOtherObject"> ... <cache-type type="lru"> <param name="capacity" value="300"/> <param name="ttl" value="300"/> </cache-type> ... </class> ... </mapping>
Example 4.5. Configuration sample - fifo (custommized)
An example of a customized configuration of a fifo cache is:
<mapping> ... <class name="com.xyz.MyOtherObject"> ... <cache-type type="fifo"/> <param name="container" value="10"/> <param name="capacity" value="1000"/> <param name="ttl" value="600"/> <param name="monitor" value="5"/> <param name="container-class" value="org.castor.cache.hashbelt.container.WeakReferenceContainer"/> <param name="reaper-class" value="org.castor.cache.hashbelt.reaper.NullReaper"/> </cache-type> ... </class> ... </mapping>
All of the cache providers added with release 0.9.9 are distributed caches per se or can be configured to operate in such a mode. This effectively allows Castor JDO to be used in a clustered J2EE (multi-JVM) environment, where Castor JDO runs on each of the cluster instances, and where cache state is automatically snychronized between these instances.
In such an environment, Castor JDO wil make use of the underlying cache provider to replicate/distribute the content of a specific cache between the various JDOManager instances. Through the distribution mechanism of the cache provider, a client of a Castor JDO instance on one JVM will see any updates made to domain objects performed against any other JVM/JDO instance.
Example 4.6. Configuration sample - Coherence
The following class mapping, for example, ...
<mapping> ... <class name="com.xyz.MyOtherObject"> ... <cache-type type="coherence" /> ... </class> ... </mapping>
defines that for all objects of type
com.xyz.MyOtherObject Tangosol's
Coherence cache provider should
be used.
Example 4.7. Configuration sample - Gigaspaces
The following class mapping, for example, ...
<mapping> ... <class name="com.xyz.MyOtherObject"> ... <cache-type type="gigaspaces" /> ... </class> ... </mapping>
defines that for all objects of type
com.xyz.MyOtherObject the
Gigaspaces cache provider should
be used. As Gigspaces supports various cache and clsuer modes, this
cache provider allows product-specific configuration as shown below:
<mapping> ... <class name="com.xyz.MyOtherObject"> ... <cache-type type="gigaspaces" > <param name="spaceURL" value="/./" /> <param name="spaceProperties" value="useLocalCache" /> </cache-type> ... </class> ... </mapping>
As of release 0.9.6, Castor allows for the addition of user-defined cache implementations. Whilst Castor provides a set of pre-built cache providers, offering a variety of different cache algorithms, special needs still might require the application developer to implement a custom cache algorithm. Castor facilitates such need by making available standardized interfaces and an easy to understand recipe for integrating a custom cache provider with Castor.
As explained in org.exolab.castor.jdo.persist
(API docs for the persists package),
org.exolab.castor.persist.LockEngine implements
a persistence engine that caches objects in memory for performance reasons
and thus reduces the number of operations against the persistence storage.
The main component of this package is the interface org.castor.cache.Cache, which declares the external functionality of a (performance) cache. Existing (and future) cache implementations (have to) implement this interface, which is closely modelled after the java.util.Map interface.
Below is a summary of the steps required to build a custom cache provider and register it with Castor JDO:
Create a class that implements org.exolab.castor.persist.cache.Cache.
Create a class that implements org.exolab.castor.persist.cache.CacheFacto
Register your custom cache implementation with Castor JDO in the
castor.propertiesfile.
Please create a class that implements the interface org.exolab.castor.persist.cache.Cache">Cache.
To assist users in this task, a
org.castor.cache.AbstractBaseCache
class has been supplied, which users should derive their custom
org.castor.cache.Cache instances
from, if they wish so. Please consult existing
org.castor.cache.Cache implementations such as
org.castor.cache.simple.TimeLimited} or
org.castor.cache.simple.CountLimited
for code samples.
/** * My own cache implementation */ public class CustomCache extends AbstractBaseCache { ... }
Please add a class that imnplements the
org.castor.cache.CacheFactory interface
and make sure that you provide valid values for the two
properties name and className.
To assist users in this task, a
org.castor.cache.AbstractCacheFactory
class has been supplied, which users should derive their custom
org.castor.cache.CacheFactory instances
from, if they wish so. Please consult existing
org.castor.cache.CacheFactory implementations
such as org.castor.cache.simple.TimeLimitedFactory} or
org.castor.cache.simple.CountLimitedFactory
for code samples.
/** * My own cache factory implementation */ public class CustomCacheFactory extends AbstractCacheFactory { /** * The name of the factory */ private static final String NAME = "custom"; /** * Full class name of the underlying cache implementation. */ private static final String CLASS_NAME = "my.company.project.CustomCache"; /** * Returns the short alias for this factory instance. * @return The short alias name. */ public String getName() { return NAME; } /** * Returns the full class name of the underlying cache implementation. * @return The full cache class name. */ public String getCacheClassName() { return CLASS_NAME; } }
The file castor.properties holds a property
org.castor.cache.Factories that enlists the available
cache types through their related CacheFactory instances.
# # Cache implementations # org.castor.cache.Factories=\ org.castor.cache.simple.NoCacheFactory,\ org.castor.cache.simple.TimeLimitedFactory,\ org.castor.cache.simple.CountLimitedFactory,\ org.castor.cache.simple.UnlimitedFactory,\ org.castor.cache.distributed.FKCacheFactory,\ org.castor.cache.distributed.JcsCacheFactory,\ org.castor.cache.distributed.JCacheFactory,\ org.castor.cache.distributed.CoherenceCacheFactory,\ org.castor.cache.distributed.OsCacheFactory,\ org.castor.cache.hashbelt.FIFOHashbeltFactory,\ org.castor.cache.hashbelt.LRUHashbeltFactory
To add your custom cache implementation, please append the fully-qualified class name to this list as shown below:
#
# Cache implementations
#
org.castor.cache.Factories=\
org.castor.cache.simple.NoCacheFactory,\
org.castor.cache.simple.TimeLimitedFactory,\
org.castor.cache.simple.CountLimitedFactory,\
org.castor.cache.simple.UnlimitedFactory,\
org.castor.cache.distributed.FKCacheFactory,\
org.castor.cache.distributed.JcsCacheFactory,\
org.castor.cache.distributed.JCacheFactory,\
org.castor.cache.distributed.CoherenceCacheFactory,\
org.castor.cache.distributed.OsCacheFactory,\
org.castor.cache.hashbelt.FIFOHashbeltFactory,\
org.castor.cache.hashbelt.LRUHashbeltFactory,\
org.whatever.somewhere.nevermind.CustomCacheSometimes it is necessary to interact with Castor's (performance) caches to e.g. (selectively) clear a Castor cache of its content, or inquire about whether a particular object instance (as identified by its identity) is cached already.
For this purpose a
org.exolab.castor.jdo.CacheManager can
be obtained from a org.exolab.castor.jdo.Database
instance by issuing the following code:
JDO jdo = ....; Database db = jdo.getDatabase(); CacheManager manager = db.getCacheManager();
This instance can subsequently be used to selectively clear the Castor performance cache using one of the following methods:
org.exolab.castor.jdo.CacheManager.expireCache()org.exolab.castor.jdo.CacheManager.expireCache(Class,Object)org.exolab.castor.jdo.CacheManager.expireCache(Class,Object[])org.exolab.castor.jdo.CacheManager.expireCache(Class[])
To inquire whether an object has already been cached, please use the following method:
org.exolab.castor.jdo.CacheManager.isCached (Class, Object);
Please note that once you have closed the Database instance from which you
have obtained the CacheManager, the CacheManager cannot be used anymore and
will throw a
org.exolab.castor.jdo.PersistenceException.
Release 0.9.6:
Added support for LIMIT clause for MS SQL Server.
In the case a RDBMS does not support LIMIT/OFFSET clauses, a SyntaxNotSupportedException is thrown.
Added support for a limit clause and an offset clause. Currently, only HSQL, mySQL and postgreSQL are supported.
Added an example section.
The Castor OQL implementation is currently in phase 3 of development.
| Note |
|---|---|
This documentation is not yet finished |
This document describes an OQL to SQL translator to be added to the Castor JDO Java object Persistence API. The translator will accept OQL queries passed as strings, and generate a parse tree of the OQL. It will then traverse the tree creating the appropriate SQL. The user will then be able to bind parameters to parameterized queries. Type checking will be performed on the bound parameters. When the user executes the query, the system will submit the query to the SQL database, and then postprocess the SQL resultset to create the appropriate result as a Java Object or literal. The current org.exolab.castor.mapping and org.exolab.castor.persist packages will be used for metadata and RDBMS communication.
Four of the (now defunct) SourceXchange milestones for this project call for java source code. These milestones will be referred to here as phase 1, 2, 3, and 4. There are many possible OQL features that can be supported, but weren't discussed in the proposal or RFP. Many of these are probably unwanted. These additional features are specified as phase 5, which is out of the scope of this SourceXChange project.
The parser will construct a parse tree as output from an OQL query string given as input. The OQL syntax is a subset of the syntax described in the ODMG 3.0 specification section 4.12, with some additional constructs. Following is a description of the supported OQL syntax, and its SQL equivalent.
Certain features of OQL may not be directly translatable to SQL, but may still be supported, by post processing the query. For example, the first() and last() collection functions supported in OQL are not directly translatable to standard SQL, but a resultset can be post-processed to return the appropriate values. Features requiring post-processing of SQL resultsets will be documented as such below.
Currently the OQLQuery checks for correct syntax at the same time as it does type checking and other types of error checking. The new code will involve a multiple pass strategy, with the following passes:
Parse the String query checking for syntax errors, and return a parse tree.
Traverse the parse tree checking for correct types, valid member and method identifiers, and use of features which are unsupported. This pass may also generate some data necessary for creating the SQL.
Traverse the tree one final time, creating the equivalent SQL statement to the OQL Query originally passed.
This section describes the first pass which will be done by the parser. The parser will create a StringTokenizer like this:
StringTokenizer tokenizer
= new StringTokenizer(oql,
"\n\r\t,.()[]+-*/<>=:|$", true);This will create a StringTokenizer with the delimiter characters listed in the second argument, and it will return delimeters as well as tokens. The parser will also create a Vector to be used as a token buffer. As tokens are returned from the StringTokenizer they will be added to the Vector. Older tokens will be removed from the Vector when it reaches a certain size. The Vector will also be modified when the StringTokenizer returns multi character operators as seperate tokens, for example the -> method invocation operator.
The parser will consume tokens from the StringTokenizer, generating a ParseTree. Each ParseTree node will have a nodeType corresponding to its symbol in the OQL syntax. After each node is created it will look at the next token and act acordingly, either modifying its properties (i.e. for DISTINCT property of selectExpr), creating a new child node or returning an error. If the error travels up to the root node of the ParseTree, there is a syntax error in the OQL submitted. At the end of this pass, the ParseTree will contain an apropriate representation of the query, which will be analyzed, and used to create SQL. Below is the modified EBNF which will be the Castor OQL syntax.
query ::= selectExpr
| expr
selectExpr ::= select [distinct]
projectionAttributes
fromClause
[whereClause]
[groupClause]
[orderClause]
[limitClause [offsetClause]]
projectionAttributes ::= projectionList
| *
projectionList ::= projection {, projection }
projection ::= field
| expr [as identifier]
fromClause ::= from iteratorDef {, iteratorDef}
iteratorDef ::= identifier [ [as ] identifier ]
| identifier in identifier
whereClause ::= where expr
groupClause ::= group by fieldList {havingClause}
havingClause ::= having expr
orderClause ::= order by sortCriteria
limitClause ::= limit queryParam
offsetClause ::= offset queryParam
sortCriteria ::= sortCriterion {, sortCriterion }
sortCriterion ::= expr [ (asc | desc) ]
expr ::= castExpr
castExpr ::= orExpr
| ( type ) castExpr
orExpr ::= andExpr {or andExpr}
andExpr ::= quantifierExpr {and quantifierExpr}
quantifierExpr ::= equalityExpr
| for all inClause : equalityExpr
| exists inClause : equalityExpr
inClause ::= identifier in expr
equalityExpr ::= relationalExpr
{(= | !=)
[compositePredicate] relationalexpr }
| relationalExpr {like relationalExpr}
relationalExpr ::= additiveExpr
{(< | <=
| > | >= )
[ compositePredicate ] additiveExpr }
| additiveExpr between
additiveExpr and additiveExpr
compositePredicate ::= some | any | all
additiveExpr ::= multiplicativeExpr
{+ multiplicativeExpr}
| multiplicativeExpr
{- multiplicativeExpr}
| multiplicativeExpr
{union multiplicativeExpr}
| multiplicativeExpr
{except multiplicativeExpr}
| multiplicativeExpr
{|| multiplicativeExpr}
multiplicativeExpr ::= inExpr {* inExpr}
| inExpr {/ inExpr}
| inExpr {mod inExpr}
| inExpr {intersect inExpr}
inExpr ::= unaryExpr {in unaryExpr}
unaryExpr ::= + unaryExpr
| - unaryExpr
| abs unaryExpr
| not unaryExpr
| postfixExpr
postfixExpr ::= primaryExpr{[ index ]}
| primaryExpr
{(. | ->)identifier[arglist]}
index ::= expr {, expr}
| expr : expr
argList ::= ([ valueList ])
primaryExpr ::= conversionExpr
| collectionExpr
| aggregateExpr
| undefinedExpr
| collectionConstruction
| identifier[ arglist ]
| queryParam
| literal
| ( query )
conversionExpr ::= listtoset( query )
| element( query )
| distinct( query )
| flatten( query )
collectionExpr ::= first( query )
| last( query )
| unique( query )
| exists( query )
aggregateExpr ::= sum( query )
| min( query )
| max( query )
| avg( query )
| count(( query | * ))
undefinedExpr ::= is_undefined( query )
| is_defined( query )
fieldList ::= field {, field}
field ::= identifier: expr
collectionConstruction ::= array([valueList])
| set([valueList])
| bag([valueList])
| list([valueList])
| list(listRange)
valueList ::= expr {, expr}
listRange ::= expr..expr
queryParam ::= $[(type)]longLiteral
type ::= [unsigned] short
| [unsigned] long
| long long
| float
| double
| char
| string
| boolean
| octet
| enum [identifier.]identifier
| date
| time
| interval
| timestamp
| set <type>
| bag <type>
| list <type>
| array <type>
| dictionary <type, type>
| identifier
identifier ::= letter{letter| digit| _}
literal ::= booleanLiteral
| longLiteral
| doubleLiteral
| charLiteral
| stringLiteral
| dateLiteral
| timeLiteral
| timestampLiteral
| nil
| undefined
booleanLiteral ::= true
| false
longLiteral ::= digit{digit}
doubleLiteral ::= digit{digit}.digit{digit}
[(E | e)[+|-]digit{digit}]
charLiteral ::= 'character'
stringLiteral ::= "{character}"
dateLiteral ::= date
'longliteral-longliteral-longliteral'
timeLiteral ::= time
'longliteral:longLiteral:floatLiteral'
timestampLiteral ::= timestamp
'longLiteral-longLiteral-longLiteral
longliteral:longLiteral:floatLiteral'
floatLiteral ::= digit{digit}.digit{digit}
character ::= letter
| digit
| special-character
letter ::= A|B|...|Z|
a|b|...|z
digit ::= 0|1|...|9
special-character ::= ?|_|*|%|\
The following symbols were removed from the standard OQL Syntax for the following reasons:
andthen: Cannot be implemented in a single SQL query.
orelse: Same as above.
import: This is advanced functionality which may be added later. This phase will use the castor mapping mechanism to define the namespace.
Defined Queries: This is another feature which can be added later. It is unclear where the queries would be stored, and what their scope would be seeing as how this project is an OQL to SQL translator, and not an ODBMS.
iteratorDef was changed so that all instances of expr were replaced by identifier. This means that the from clause can only contain extent names (class names), rather than any expression. This is the most common case and others could create complicated SQL sub-queries or post-processing requirements.
objectConstruction and structConstruction were removed. What is the scope of the constructed object or struct, and how is a struct defined in Java?
The following symbols were added or modified.
between added to relationalExpr.
Optional type specification added to queryParam.
The rest of the standard OQL syntax remains unchanged. Certain syntactically correct queries may not be supported in Castor. For example, top level expressions which do not contain a selectExpr anywhere in the query may not be supported. This will be discussed further in the next section.
The first pass over the ParseTree will do type checking, and create some structures used in the SQL generation pass. It will also check whether the identifiers used are valid, and whether the query uses unsupported features. The following table describes each type of node in the ParseTree, and how it will be processed in the first pass.
Table 4.3. The first pass
| expr |
| Phase 5 |
| projectionAttributes |
| Phase 5 |
| projectionList |
| Phase 5 |
| projection |
| Phase 1 |
| projection |
| Phase 2 |
| fromClause |
| Phase 1 |
| whereClause |
| Phase 1 |
| whereClause |
| Phase 2 |
| whereClause |
| Phase 3 |
| whereClause |
| Phase 4 |
| groupClause, havingClause |
| Phase 4 |
| orderClause |
| Phase 3 |
After the first pass, the ParseTree is free of errors, and ready for the SQL generation step. The existing implementation of the OQLParser uses the persistence API for SQL generation. This API lacks the necessary features to generate SQL from any OQL. The SQLEngine class which implements Persistence is used to create a JDBCQueryExpression. The SQL is derived from the finder, which is a JDBCQueryExpression produced by the SQLEngine. The problem is that the SQLEngine only supports single objects. It cannot generate SQL for path expressions like this:
select p.address from Person p
This query requires a SQL statement like this:
select address.* from person, address
where person.address_id = address.address_idThe buildFinder method should not be used to generate a queryExpression. The SQLEngine should be used to get a ClassDescriptor, and to create a new QueryExpression. The OQLParser should use the methods in the QueryExpression to generate the SQL. The JDBCQueryExpression which is an implementation of QueryExpression is also lacking in necessary features. This class should continue to be used, but the following features will need to be added:
- addColumn(String)
For adding something to select without specifying the tablename, for use with functions (i.e. select count(*))
- addTable(String)
For when the table has to be added manually.
- addCondition(String)
Add a condition created outside the class, for nested expressions, and other expressions that are not of the form table.column op table.column.
- setDistinct(boolean)
Used for select distinct.
- addOrderColumn(String tableName, String columnName, boolean desc)
Used for order by
- addGroupExpr(String)
Used for group by
- addHavingExpr(String)
Used for having.
The following table lists each type of tree node, and how it will be processed in the SQL generation pass.
Table 4.4. SQL generation pass
| selectExpr |
| Phase 2 |
| projection |
| Phase 1 |
| projection |
| Phase 2 |
| whereClause |
| Phase 1 |
| whereClause |
| Phase 2 |
| whereClause |
| Phase 4 |
Please see the OQL section of the JDO FAQ.
The Parser and ParseTree classes will be improved through the phases of this project. The top level of OQL to SQL translation will look very simple, like this:
OQLParser parser = new OQLParser(query); ParseTree pt = parser.getParseTree(); pt.checkPass(); //the SQL generation pass _expr = pt.getQueryExpr();
These methods will have some additional parameters passed for storing and retrieving data relevant to the query. Following is a table containing a list of what will be introduced in each coding phase of the project.
Table 4.5. Coding phases
| Phase 1 |
|
| Phase 2 |
|
| Phase 3 |
|
| Phase 4 |
|
| Phase 5: |
|
Please find below various examples of OQL queries using the Java class files as outlined below.
The following fragment shows the Java class declaration for the
Product class:
package myapp; public class Product { private int _id; private String _name; private float _price; private ProductGroup _group; public int getId() { ... } public void setId( int anId ) { ... } public String getName() { ... } public void setName( String aName ) { ... } public float getPrice() { ... } public void setPrice( float aPrice ) { ... } public ProductGroup getProductGroup() { ... } public void setProductGroup( ProductGroup aProductGroup ) { ... } }
The following fragment shows the Java class declaration for the
ProductGroup class:
public class ProductGroup { private int _id; private String _name; public int getId() { ... } public void setId( int id ) { ... } public String getName() { ... } public void setName( String name ) { ... } }
On a selected number of RDBMS, Castor JDO now supports the use of LIMIT/OFFSET clauses.
As per this release, the following RDBMS have full/partial support for this feature.
Table 4.6. Limit support
| RDBMS | LIMIT | OFFSET |
|---|---|---|
| postgreSQL | Yes | Yes |
| mySQL | Yes | Yes |
| Oracle - 1)2) | Yes | Yes |
| HSQL | Yes | Yes |
| MS SQL | Yes | - |
| DB2 | Yes | - |
1) Oracle has full support for LIMIT/OFFSET clauses for release 8.1.6 and later.
2) For the LIMIT/OFFSET clauses to work properly the OQL query is required to include a ORDER BY clause.
The following code fragment shows an OQL query that uses the LIMIT keyword to select the first 10 ProductGroup instances.
query = db.getOQLQuery("select p from ProductGroup as p LIMIT $1");
query.bind(10);
Below is the same OQL query again, restricting the number of ProductGroup instances returned to 10, though this time it is specified that the ProductGroup instances 11 to 20 should be returned.
query = db.getOQLQuery ("select p from ProductGroup as p LIMIT $1 OFFSET $2");
query.bind(10);
In the case a RDBMS does not support LIMIT/OFFSET clauses, a SyntaxNotSupportedException will be thrown.
In order to understand how the JDO transaction model affects applications performance and transactional integrity, you must first understand the semantics of the Java Data Objects. Java Data Objects are objects loaded from and stored to the database, but are disassociated from the database itself. That is, once an object has been loaded into memory, changes to the object in memory are not reflect in the database until the transaction commits.
The following table shows a sample code and the state of the JDO object and the relevant database field:
Table 4.7. JDO objects
| Code | Object value | Record value |
|---|---|---|
results = oql.execute(); | N/A | X |
obj = results.next(); | X | X |
obj.setValue( Y ); | Y | X |
db.commit(); | Y | Y |
Concurrency conflicts do not occur when an object is changed in memory, but rather when the transaction commits and changes are saved back to the database. No changes are saved if the transaction rolls back.
Conflicts could occur if two threads attempted to modify the same object, or the same thread receives two objects associated with the same database record and performs different changes to each object. Castor solves these issues through a transaction-object-identity association.
When the same transaction attempts to query the same database record twice, (e.g. as the result of two different queries) the same object is returned, assuring that different changes will be synchronized through the same object.
When two transactions attempt to query the same database record, each transaction receives a different object mapping to the same record, assuring that changes done in one transaction are not visible to the other transactions. Changes should only become visible when the transaction commits and all its changes are made durable.
This approach places the responsibility of synchronization and deadlock detection on the Castor persistence engine, easing the life of the developer.
Concurrent access requires use of locking to synchronize two transactions attempting to work with the same object. The locking mechanism has to take into account several possible use of objects, as well as help minimize database access through caching and is-modified checking.
Locking modes are declared in the class element of the XML mapping on a per class basis.
The shared mode is the default for all objects, unless otherwise specified in the mapping file. Shared mode allows two transactions to read the same record at the same time. Each transaction will get it's own view of the record as a separate object, to prevent in-memory changes from conflicting with each other. However, the values loaded from the database are the same for both transactions.
When transactions query different objects or query the same objects but for read-only purposes, shared access provides the most efficient means of access in terms of performance, utilizing record caching and eliminating lock contention. For example, when each transaction retrieves a different Customer record and all transactions retrieved the same set of Department records but hardly ever change them, both Customer and Department should be declared as having a shared lock.
However, when two transactions attempt to access the same object, modify it, and commit the changes, a concurrency conflict will occur. Some concurrency conflicts can lead to one of the transactions aborting. For example, if two transactions happen to load the same Account object with a balance of X, one adds 50 and the other adds 60, if both were allowed to commit the changes the new account balance will be either X+50 or X+60, but not X+110.
In the above case either exclusive or db-locked modes should be used to reduce potential conflicts. However exclusive and db-locked modes may cause the application to perform slower due to lock contention and should not be used as the general case. In rare cases conflicts may occur where shared locks are the preferred choice, e.g. when two transactions attempt to modify the same Department object, or somehow get hold of the same Customer records.
Castor detects such conflicts as they occur and uses two mechanisms to deal with them: write locks and deadlock detection. When a transaction commits Castor first tries to determine whether the object has been modified from it's known state (i.e. during query). If the object has not been modified, Castor will not attempt to store the object to the database. If the object has been modified, Castor acquires a write lock on the object preventing other transactions from accessing the object until the current transaction completes storing all changes to the database. A write lock prevents other transactions from acquiring either a write or read lock, preventing them from accidentally loading a dirty image of the object.
If the second transaction has a read lock on the object, the current transaction will block until the second transaction releases the lock, either by rolling back or by not modifying its object. If the other transaction modifies the object and attempts to store it, a deadlock occurs. If both transactions have a read lock, both require a write lock in order to proceed and neither can proceed until the other terminates.
Castor detects such deadlock occurences and causes the second transaction to rollback, allowing the first transaction to commit properly. Such conflicts do not happen often, but when they happen some transactions will fail. The application developer should either be aware of the possibility of failing, or choose to use a more severe lock type.
Conflicts occur not just from other Castor transactions, but also from direct database access. Consider another application modifying the exact same record through direct JDBC access, or a remote server connecting to the same database. To detect such conflicts Castor uses a dirty checking mechanism.
When an object is about to be stored, Castor compares the current values in the database records with those known when the object was originally loaded from the database. Any changes are regarded as dirty fields and cause the transaction to rollback with the proper error message.
Not all fields are necessarily sensitive to dirty checking. The balance in a bank account is a sensitive field, but the date of the last transaction might not be. Since the date does not depend on the original value of the account, but on the last modification to it, dirty checking can be avoided.
A field marked with dirty="ignore" will not take part in dirty checking. Furthermore, modifications to such a field will not require a write lock on the object, further improving throughput. Marking fields as non-dirty should be done with extreme care.
The exclusive mode assures that no two transactions can use the same record at the same time. Exclusive mode works by acquiring a write lock in memory and synchronizing transactions through a lock mechanism with configured timeout.
Using in-memory locks, exclusive access provides some transaction synchronization that is efficient in terms of performance and increases the chance of a commit being successful. It does not, however, guarantee commit. Since the lock is acquired by Castor, it can be used to synchronize Castor access, but other forms of direct database access may still modify the database record.
When a transaction obtains an object that was specified as exclusive access in the mapping file or when performing a query, Castor will always obtain a write lock on that object. The write lock will prevent a second transaction from being able to access the object either for read or write, until the current transaction commits. If the object is already being accessed by another transaction, the current transaction will block until the other transaction commits and release the lock.
It is possible to upgrade from a shared to an exclusive lock by calling the
org.exolab.castor.jdo.Database.lock(java.lang.Object)
method. This method can be used with shared objects when the application
wants to assure that other transactions will be blocked and changes can be
made to the current object.
Because direct database access can modify the same record as represented by an exclusive locked object, Castor uses dirty checking when updating the database. Dirty checking does not have a severe affect on performance, and can be disabled by marking all the fields of the object with dirty="ignore".
To reduce the possibility of dirty reads, Castor will always synchronize
exclusive locked objects with the database at the beginning of a transaction.
That is, when an object is loaded the first time in a transaction with an
exclusive lock, Castor will retrieve a fresh copy of the object from the
database. Castor will not, however, refresh the object if the lock is upgraded
in the middle of a transaction using the lock method.
Exclusive mode does cause lock contention and can have an affect on application performance when multiple transactions attempt to access the same record. However, when used smartly with on a small set of objects it can help reduce the possibility of concurrency conflicts. It can also be used to force an object to be loaded from the database and the cache refreshed.
The locked mode performs optimistic locking using the underlying database engine to assure that only one transaction has access to the record. In addition to acquiring a write lock in memory, Castor performs a query with a special SQL construct (FOR UPDATE in Oracle, HOLDLOCK in Sybase) to guarantee access by one transaction.
In the event that the same database record will be accessed directly through JDBC, stored procedure, or a second machine using Castor, the only way to achieve object locking is through the database layer. However, such write locks should be cooperative, that is, other forms of database access should attempt to use the same locking mechanism.
In some isolation levels, when Castor acquires a write lock on the database it will prevent other applications from accessing the same record until the Castor transaction commits. However, certain isolation levels allow other applications to obtain a dirty image of the record.
Write locks on the database have a severe impact on application performance. They incur overhead in the database manager, and increase lock contention. It is recommended to use database locks with care, pay extra attention to the isolation level being used, and follow good practices recommended by the database vendor with regards to such locks.
In the future long transaction will be supported. Long transactions rely on the dirty checking mechanism and only hold connections open for as long as they are required for queries. Long transactions cannot be used with database locking.
Locked mode must be specified for the object in the mapping file or when conducting the query. It is not possible to upgrade to a locked lock in the middle of a transaction.
Objects loaded in this mode are always synchronized with the database, that is, they will never be obtained from the cache and always re-loaded for each new transaction.
When a query is performed in read-only mode or no mode is specified and the object is marked as read-only in the database, Castor will return a transient object. The returned object will not be locked and will not participate in the transaction commit/rollback.
When the same object is queried twice in a transaction as read-only, Castor will return two separate objects, allowing the caller to modify one object without altering the other. Castor will utilize the cache and only perform one load from the database to the cache.
Read-only access is recommended only when the object is intentionally queried as read-only and changes to the object should not be reflected in the database. If the object will not be modified, or modifications will be stored in the database, it is recommended to use the shared mode. Shared mode allows the same object to be returned twice in the same transaction.
The visibility of changes occuring in one transaction to other transactions depends upon the transaction isolation level specified for the database connection. Whether or not the changes are visible in the current transaction depends upon the operation being done.
There are four types of changes, the following table summarizes the affect of each change in one transaction on other queries in that transaction as well as other transactions.
Table 4.8. Changes
| Type of change | Same transaction | Other transaction |
|---|---|---|
| Create new object | New object is visible and will be returned from a query | New object might be visible, depending on isolation level, but access is blocked until the first transaction completes |
| Delete existing object | Object is no longer visible and will not be returned from a query | Object might not be visible, depending on isolation level, but access is blocked until the first transaction completes |
| setXXX() | Change is visible in object itself | Change is not visible, object is accessible depending on lock |
| update() | Change is visible in object itself | Change might be visible, depending on isolation level, object might be accessible depending on lock |
The Castor persistence engine is based on a layer architecture allowing different APIs to be plugged on top of the system, and different persistence engines to be combined in a single environment.
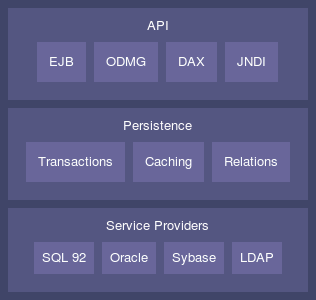
At the top level are the application level APIs. These are industry standard APIs that allow an application to be ported in and to other environments. These APIs consist of interfaces as well as semantics that make them suitable for a particular type of applications.
At the medium level is the Castor persistence mechanism. The persistence mechanism exposes itself to the application through the application level APIs. These typically have a one to one mapping with the persistence mechanism API. The persistence mechanism takes care of object caching and rollback, locking and deadlock detection, transactional integrity, and two phase commit.
At the bottom level are the Castor service providers. SPIs provide the persistence and query support into a variety of persistence mechanism. This version of Castor is bundled with an SQL 92 and LDAP persistence SPIs. Additional SPIs can be added, for example, alternative engines streamlined for Oracle, Sybase, DB2 and other databases.
This document will describe the persistence mechanism API and SPI to allow for those interested in adding new top level APIs or service providers.
The persistence mechanism is responsible for object caching and rollback, locking and deadlock detection, transaction integrity and two phase commit. All data access goes through the persistence mechanism. All operations are performed in the context of a transaction, even if the underlying SPI does not support transactions (e.g. LDAP).
The persistence API is defined in the package
org.exolab.castor.persist.
The persistence mechanism implements the
org.exolab.castor.persist.PersistenceEngine
interface, which allows objects to be loaded, created, deleted and locked
in the context of a transaction. The actual implementation is obtained from
org.exolab.castor.persist.PersistenceEngineFactory.
All operations are performed through the context of a transaction. A transaction is required in order to properly manage locking and caching, and to automatically commit or rollback objects at transaction termination (write-at-commit). Persistence operations are performed through the org.exolab.castor.persist.TransactionContext interface.
The actual implementation of a transaction context is specific to each
application API and set of SPIs. One is created from an
org.exolab.castor.persist.XAResourceSource
which abstracts the data source for the purpose of connection pooling and
XA transaction enlistment. A default implementation of
XAResource is available from
org.exolab.castor.persist.XAResourceImpl.
Every persistence operation is performed within the context of a transaction. This allows changes to objects to be saved when the transaction commits and to be rolled back when the transaction aborts. Using a transactional API relieves the application developer from worrying about the commit/rollback phase. In addition it allows distributed transactions to be managed by a transactional environment, such as an EJB server.
Each time an object is retrieved or created the operation is performed in the context of a transaction and the object is recorded with the transaction and locked. When the transaction completes, the modified object is persisted automatically. If not all objects can be persisted, the transaction rolls back. The transaction context implements full two phase commit.
Each transaction sees it's own view of the objects it retrieves from persistent storage. Until the transaction commit, these changes are viewable only within that transaction. If the transaction rolled back, the objects are automatically reverted to their state in persistent storage.
The transaction context
(org.exolab.castor.persist.TransactionContext)
is the only mechanism by which the top level APIs can interact with the
persistence engine. A new transaction must be opened in order to perform
any operation.
A transaction context is not created directly, but through a derived class that implements the proper mechanism for obtaining a new connection, committing and rolling back the connection. Note that commit and rollback operations are only required in a non-JTA environment. When running inside a JTA environment (e.g. an EJB server), the container is responsible to commit/rollback the underlying connection.
Application level APIs implement data sources that can be enlisted directly
with the transaction monitor through the JTA
XAResource
interface. A data source can be implemented using
org.exolab.castor.persist.XAResourceSource
which serves as a factory for new transaction contexts and
org.exolab.castor.persist.XAResourceImpl
which provides an XAResource implementation.
Each object participating in a transaction is associated with an object
identifier, or OID
(org.exolab.castor.persist.OID).
The OID identifies the object through its type and identity value.
The identity object must be unique across all OIDs for the same object type
in the same persistence engine.
Each object is also associated with a lock
(org.exolab.castor.persist.ObjectLock).
An object lock supports read and write
locks with deadlock detection. Any number of transactions may acquire a
read lock on the object. Read lock allows the transaction to retrieve the
object, but not to delete or store it. Prior to deleting or storing the
object, the transaction must acquire a write lock. Only one transaction
may acquire a write lock, and a write lock will not be granted if there
is any read lock on the object.
If an object is loaded read-only, a read lock is acquired at the begin of the load operation and realeased when the load is finished. Someone now could ask why do you acquire a read lock at all if it only lasts during the load operation. For an explanation we have to take a look on what happens if an object is loaded. Loading one object from database may cause castor to load a whole tree of objects with relations to each other. In the background castor may performs various queries to load all related objects. For this object tree to be consistent and reflect the persistent state of all the objects in the database at one point in time we need to lock all objects involved in all load operations to prevent any involved object to be write locked and changed by another transaction. If the load operation is finished these read locks are not required anymore. On the other hand, read locks are acquired to prevent an object already locked in the write mode from getting the read lock.
Write locks are acquired at the begin of the load operation similar then read locks. But in contrast to read locks, write locks are hold until the transaction is commited or rolled back. Holding the write lock until the end of the transaction is required as the changes to the objects, that could happen anytime between begin and end of the transaction, are only persisted if the transaction successfully commits.
If a transaction requires a read lock on an object which is write locked
by another transaction, or requires a write lock on an object which is read
or write locked by another transaction, the transaction will block until the
lock is released, or the lock timeout has elapsed. The lock timeout is a
property of the transaction and is specified in seconds. A
org.exolab.castor.persist.LockNotGrantedException
is thrown if the lock could not be acquired within the specified timeout.
This locking mechanism can lead to the possibility of a deadlock. The object lock mechanism provides automatic deadlock detection by tracking blocked transactions, without depending on a lock wait to timeout.
Write locks and exclusive locks are always delegated down to the persistence storage. In a distributed environment the database server itself provides the distributed locking mechanism. This approach assures proper concurrency control in a distributed environments where multiple application servers access the same database server.
The concurrency engine includes a layer that acts as a cache engine.
This layer is particularly useful for implementing optimistic locking and
reducing synchronization with the database layer. It is also used to perform
dirty checks and object rollback. The cache engine is implemented in
org.exolab.castor.persist.CacheEngine and
exposed to the application through the
org.exolab.castor.persist.PersistenceEngine.
When an object is retrieved from persistent storage it is placed in the cache engine. Subsequent requests to retrieve the same object will return the cached copy (with the exception of pessimistic locking, more below). When the transaction commits, the cached copy will be updated with the modified object. When the transaction rolls back, the object will be reverted to its previous state from the cache engine.
In the event of any error or doubt, the cached copy will be dumped from the cache engine. The least recently used objects will be cleared from the cache periodically.
The cache engine is associated with a single persistence mechanism, e.g. a database source, and LDAP directory. Proper configuration is the only way to assure that all access to persistent storage goes through the same cache engine.
The concurrency engine works in two locking modes, based on the type of access requested by the application (typically through the API). Pessimistic locking are used in read-write access mode, optimistic locking are used in exclusive access mode.
In optimistic locking mode it is assumed that concurrent access to the same object is rare, or that objects are seldom modified. Therefore objects are retrieved with a read lock and are cached in memory across transactions.
When an object is retrieved for read/write access, if a copy of the object exists in the cache, that copy will be used. A read lock will be acquired in the cache engine, preventing other Castor transactions from deleting or modifying the object. However, no lock is acquired in persistent storage, allowing other applications to delete or modify the object while the Castor transaction is in progress.
To prevent inconsistency, Castor will perform dirty checking prior to storing the object, detecting whether the object has been modified in persistent storage. If the object has been modified outside the transaction, the transaction will rollback. The application must be ready for that possibility, or resort to using pessimistic locking.
In pessimistic locking mode it is assumed
that concurrent access to the same object is the general case and that
objects are often modified. Therefore objects are retrieved with a write
lock and are always synchronized against the persistence storage. When
talking to a database server, a request to load an object in exclusive mode
will always load the object (unless already loaded in the same transaction)
using a SELECT .. FOR UPDATE which assures no other application
can change the object through direct access to the database server.
The locking mode is a property of the chosen access mode. The two access modes as well as read-only access can be combined in a single transaction, as a property of the query or object lookup. However, it is not possible to combine access modes for the same object, in certain cases this will lead to a conflict.
The pessimistic locking mode is not supported in LDAP and similar non-transactional servers. LDAP does not provide a mechanism to lock records and prevent concurrent access while they are being used in a transaction. Although all Castor access to the LDAP server is properly synchronized, it is possible that an external application will modify or delete a record while that record is being used in a Castor transaction.
Castor supports a service provider architecture that allows different persistence storage providers to be plugged in. The default implementation includes an SQL 92 provider and an and an LDAP provider. Additional providers will be available optimized for a particular database server or other storage mechanisms.
The service provider is defined through two interfaces, org.exolab.castor.persist.spi.Persistence and org.exolab.castor.persist.spi.PersistenceQuery. The first provides creation, deletion, update and lock services, the second is used to process queries and result sets. Service providers are obtained through the org.exolab.castor.persist.spi.PersistenceFactory interface.
The interface org.exolab.castor.persist.spi.Persistence defines the contract between the persistence mechanism and a persistence service provider. Each persistence storage (i.e. database server, directory server) is associated with a single persistence engine, which in turn contains a number of service providers, one per object type. Service providers are acquired through a org.exolab.castor.persist.spi.PersistenceFactory interface, which is asked by each persistence engine to return implementations for all the object types supported by that persistence engine.
The object's identity is an object that unique identifies the object within persistent storage. Typically this would be the primary key on a table, or an RDN for LDAP. The identity object may be a simple type (e.g. integer, string) or a complex type.
The service provider may support the stamp mechanism for efficiently tracking dirty objects. The stamp mechanism is a unique identifier of the persistent object that changes when the object is modified in persistent storage. For example, a RAWID in Oracle or TIMESTAMP in Sybase. If a stamp is return by certain operations it will be stored with the object's OID and passed along to the store method.
The create method is called to create a new object
in persistent storage. This method is called when the created object's
identity is known. If the object's identity is not know when the object is
made persistent, this method will be called only when the transaction
commits. This method must check for duplicate identity with an already
persistent object, create the object in persistent storage, such that
successful completion of the transaction will result in durable storage,
and retain a write lock on that object for the duration of the transaction.
The load method is called to load an object from
persistent storage. An object is passed with the requested identity. If the
object is found in persistent storage, it's values should be copied into the
object passed as argument. If the lock flag is set, this method must create
a write lock on the object at the same time it loads it.
The load method is called in two cases, when an
object is first loaded or when an object is synchronized with the database
(reloaded) in exclusive access mode. In the second case this method will
be called with an object that is already set with values that are not
considered valued, and must reset these values.
The store method is called to store an object into
persistent storage. The store method is called for an object that was loaded
and modified during a transaction when the transaction commits, as well as
for an object that was created during the transaction. This method must
update the object in persistent storage and retain a write lock on that
object.
This method might be given two views of an object, one that is being saved and one that was originally loaded. If the original view is provided as well, this method should attempt to perform dirty check prior to storing the object. Dirty check entails a comparison of the original object against the copy in persistent storage, to determine whether the object has changed in persistent storage since it was originally loaded. The class descriptor will indicate whether the object is interested in dirty checking and which of its fields should be checked.
The delete method is called to delete an object
from persistent storage. The delete method is called when the transaction
commits and expects the object to deleted, if it exists. This method is not
called when the transaction rolls back, objects created during the
transaction with the create method are automatically rolled back by the
persistent storage mechanism.
The writeLock method is called to obtain a write
lock on an object for which only a read lock was previously obtained.
The changeIdentity method is called to change
the identity of the object after it has been stored with the old identity.
The key generator gives a possibility to generate identity field
values automatically. During create the value of the
identity field is set to the value obtained from the key generator.
Different algorithms may be used here, both generic and specific
for database server.
The key generator for the given class is set in the mapping specification
file (mapping.xml), in the
key-generator attribute of the
class element, for example:
<class name="myapp.ProductGroup" identity="id" key-generator="MAX"> <field name="id"> </field> </class>
The following key generator names are supported in Castor 1.0:
Table 4.9. Supported key generator names
| MAX | "MAX( pk ) + 1" generic algorithm |
| HIGH-LOW | HIGH-LOW generic algorithm |
| UUID | UUID generic algorithm |
| IDENTITY | Supports autoincrement identity fields in Sybase ASE/ASA, MS SQL Server, MySQL and Hypersonic SQL |
| SEQUENCE | Supports SEQUENCEs in Oracle, PostgreSQL, Interbase and SAP DB |
Some of these algorithms have parameters, which can be specified
in the key-generator element of the mapping
specification file, for example:
<key-generator name="HIGH-LOW"> <param name="table" value="SEQ"/> <param name="key-column" value="SEQ_TableName"/> <param name="value-column" value="SEQ_MaxPKValue"/> <param name="grab-size" value="1000"/> </key-generator> <class name="myapp.ProductGroup" identity="id" key-generator="HIGH-LOW"> <field name="id"> </field> </class>
It is possible to create several key generators with the same
algorithms but different parameters.
In this case you have to specify the alias attribute
in the key-generator element, for example:
<key-generator name="SEQUENCE" alias="A"> <param name="sequence" value="a_seq"/> </key-generator> <key-generator name="SEQUENCE" alias="RETURNING"> <param name="sequence" value="b_seq"/> <param name="returning" value="true"/> </key-generator> <class name="myapp.ProductGroup" identity="id" key-generator="RETURNING"> <field name="id"> </field> </class>
Below all supported key generators a described in details.
MAX key generator fetches the maximum value of the primary key and lock the record having this value until the end of transaction. Then the generated value is set to (MAX + 1). Due to the lock concurrent transactions which perform insert to the same table using the same key generator algorithm will wait until the end of the transaction and then will fetch new MAX value. Thus, duplicate key exception is almost impossible (see below). Note, that it is still possible to perform multiple inserts during the same transaction.
There is one "singular" case of this algorithm: the case when the table is empty. In this case there is nothing to lock, so duplicate key exception is possible. The generated value in this case is 1.
This algorithm has no parameters. Primary key must have type integer, bigint or numeric.
This key generator uses one of the variants of the generic HIGH-LOW algorithm. It is needed a special auxiliary table ("sequence table") which has the unique column which contains table names (of the type char or varchar) and the column which is used to reserve values of the primary keys (of the type integer, bigint or numeric). The key generator seeks for the given table name, reads the last reserved value and increases it by some number N, which is called "grab size". Then the lock on the auxiliary table is released, so that concurrent transactions can perform insert to the same table. The key generator generates the first value from the grabbed interval. During the next (N - 1) invocations it generates the other grabbed values without database access, and then grabs the next portion. Note, that the auxiliary table must be in the same database as the table for which key is generated. So, if you work with multiple databases, you must have one auxiliary table in each database.
If the grab size is set to 1, the key generator each time stores the true maximum value of the primary key to the auxiliary table. In this case the HIGH-LOW key generator is basically equivalent to the MAX key generator. On you want to have LOW part of the key consisting of 3 decimal digits, set the grab size to 1000. If you want to have 2 LOW bytes in the key, set the grab size to 65536. When you increase the grab size, the speed of key generation also increases because the average number of SQL commands that are needed to generate one key is (2 / N). But that average number of key values that will be skipped (N / 2) also increases.
The HIGH-LOW key generator has the following parameters:
Table 4.10. parameters of the HIGH-LOW key generator
| table | The name of the special sequencetable. | Mandatory |
| key-column | The name of the column which contains table names | Mandatory |
| value-column | The name of the column which is used to reserve primary key values | Mandatory |
| grab-size | The number of new keys the key generator should grab from the sequence table at a time. | Optional, default="10" |
| same-connection | To use the same Connection for writing to the sequence table, values: "true"/"false". This is needed when working in EJB environment, though less efficient. | Optional, default="false" |
| global | To generate globally unique keys, values: "true"/"false". | Optional, default="false" |
| global-key | The name of key, which is used when globally unique keys are generated. | Optional, default="<GLOBAL>" |
If the parameter global is set to true,
the sequence table contains only one row with the value set in parameter
global-key (or "<GLOBAL>" if "global-key was not set")
instead of the table name. This row serves for all tables.
Don't forget to set same-connection="true" if you are working in EJB environment!
Note, that the class HighLowKeyGenerator is not final,
so you can extend it in order to implement other variants of HIGH-LOW
algorithm (for example, HIGH/MID/LOW or char key values).
This key generator generates global unique primary keys. The generated key is a combination of the IP address, the current time in milliseconds since 1970 and a static counter. The complete key consists of a 30 character fixed length string.
This algorithm has no parameters. Primary key must have type char, varchar or longvarchar.
IDENTITY key generator can be used only with autoincrement primary key columns (identities) with Sybase ASE/ASA, MS SQL Server, MySQL and Hypersonic SQL.
After the insert the key generator selects system variable
@@identity which contains the last identity value for
the current database connection.
In the case of MySQL and Hypersonic SQL the system functions
LAST_INSERT_ID() and IDENTITY()
are called, respectively.
This algorithm has no parameters.
The SEQUENCE key generator type is supported in conjunction with the following DBMS: Derby, Interbase, Oracle, PostgreSQL, and SAP DB.
It generates keys using database sequence objects.
The key generator has the following parameters:
Table 4.11. parameters of the SEQUENCE key generator
| sequence | The name of the sequence | Optional, default="{0}_seq" |
| returning | RETURNING mode for Oracle8i, values: "true"/"false" | Optional, default="false" |
| increment | Increment for Interbase | Optional, default="1" |
| trigger | Assume that there is a trigger that already generates key. Values: "true"/"false" | Optional, default="false" |
Usually one sequence is used for one table, so in general you have to define one key generator per table.
But if you use some naming pattern for sequences, you can use one key generator for all tables.
For example, if you always obtain sequence name by adding "_seq" to the name of the correspondent table, you can set "sequence" parameter of the key generator to "{0}_seq" (the default value).
In this case the key generator will use sequence "a_seq" for table "a", "b_seq" for table "b", etc. Castor also allows for inserting the primary key into the sequence name as well. This is accomplished by including the {1} tag into the "sequence" parameter. Example: "{0}_{1}_seq"
Actually the SEQUENCE key generator is "4 in 1". With PostgreSQL it performs "SELECT nextval(sequenceName)" before INSERT and produces identity value that is then used in INSERT. Similarly, with Interbase it performs "select gen_id(sequenceName, increment) from rdb$database" before INSERT.
With Oracle by default (returning=false) and with SAP DB it transforms the Castor-generated INSERT statement into the form "INSERT INTO tableName (pkName,...) VALUES (sequenceName.nextval,...)" and after INSERT it performs "SELECT seqName.currval FROM tableName" to obtain the identity value. With Oracle8i it is possible to use more efficient RETURNING mode: to the above INSERT statement is appened "RETURNING primKeyName INTO ?" and the identity value is fetched by Castor during INSERT, so that only one SQL query is needed.
In case when your table has an on_Insert trigger which already generates values for your key, like the following Oracle example:
create or replace trigger "trigger_name" before insert on "table_name" for each row begin select "seq_name".nextval into :new."pk_name" from dual; end;
you may set the "trigger" parameter to "true". This will prevent the "Sequence_name".nexval from being pulled twice (first time in the insert statement (see above), then in the trigger). Also usefull in combination with the "returning" parameter set to "true" for Oracle (in this case you may not specify the sequence name).
The usual Castor transactions are called here short transactions: an object is read, modified and written within the bounds of one transaction. Long transactions consist of two Castor transactions: an object is read in the first and written in the second. Between them the object is sent "outwards" and modified there. For example, the object may be send to a client application and dispayed to a user, or it may be sent to a servlet engine and is displayed on a web page. After that the modified object returns back and is written to the database in the second transaction. At this point the object is usually not the same physical instance as one that was read in the first transaction. The example code for writing the object in the second Castor transaction follows:
// a customer go to a webpage to review her personal information.
// The servlet then call this server side function: getCustomerInfo
public CustomerInfo getCustomerInfo( Integer customNum ) {
// in most case, users simply review information and
// make no change. Even if they make changes, it often
// takes time for them to decide. We don't want to
// lock the database row, so commit right after we load.
db.begin();
CustomerInfo info = (CustomerInfo)
db.load( CustomerInfo.class, customNum );
// we also want to keep track of customers patterns
// well...it helps us provide better service.
info.setLastVisit( today );
db.commit();
return info;
}
// Three days passed, the indecisive customer finally agrees to
// marry Joe. She changes her last name in the webpage and
// clicked the "Submit" button on the webpage.
// The servlet then calls updateCustomerInfo to update the
// last name for the indecisive customer.
public void updateCustomerInfo( CustomerInfo info ) {
db.begin();
db.update(info);
db.commit();
}
Note, that it is natural to read the object in the first transaction in the read-only mode.
Since the time interval between the first and the second
transaction is relatively big, it is desirable to perform dirty
checking, i.e. to check that the object has not been modified
in the database during the long transaction.
For that the object must hold a timestamp: it is set by
Castor during the first Castor transaction and is checked during
the second one.
In order to enable the dirty checking for long transactions,
the object should implement the interface
org.exolab.castor.jdo.TimeStampable
having two methods: long jdoGetTimeStamp() and
void jdoSetTimeStamp(long timeStamp)
The advantage of the bounded dirty checking is that it doesn't require any changes to the database schema. It uses the Castor cache to store object timestamps. The disadvantage of this algorithm is that it is bounded by a lifetime of the cached copy of the object. After the cached copy has been purged, db.update() causes ObjectModifiedException.
Thus, parameters of the cache define dirty checking capabilities. The cache-type attribute is part of the <class> element in the XML mapping. Consider the existing cache types:
none - the bounded dirty checking is impossible
count-limited - the count limit for the cache is a count limit for the objects of this class that can participate in long and short transactions simultaneously.
time-limited - the time limit for the cache is a time limit for the long transaction.
unlimited - the bounded dirty checking gives correct results while the cache exists, i.e. until the crash of the server.
For long transactions (detached objects) it was required that the entity has been kept in cache from being loaded until its update. If the entity was expired from cache before the update an ObjectModifiedException had been thrown. While this is no problem if all entities of an application can be kept in cache all the time, it is one for large scale applications with millions of entities.
With release 1.3 we have changed the handling of timestamps. While it is still possible to rely on cache only it is now also possible to persist the timestamp together with the other properties of the entity. Doing so will ensure that the timestamp do not change even if the entity got expired from cache from being loaded until it gets updated. If this happens the entity gets reloaded during update which also loads the previous timestamp. Having said that it still is possible that an ObjectModifiedException is thrown when another user has changed the same entity in the meantime.
See an example entity and its mapping below:
public class Entity implements TimeStampable { private Integer _id; private String _name; private long _timeStamp; public Integer getId() { return _id; } public void setId(final Integer id) { _id = id; } public String getName() { return _name; } public void setName(final String name) { _name = name; } public long getTimeStamp() { return _timeStamp; } public void setTimeStamp(final long timeStamp) { _timeStamp = timeStamp; } public long jdoGetTimeStamp() { return _timeStamp; } public void jdoSetTimeStamp(final long timestamp) { _timeStamp = timestamp; } }
<class name="Entity"> <cache-type type="time-limited" capacity="300"/> <map-to table="entity"/> <field name="id" type="integer" identity="true"> <sql name="id" type="integer"/> </field> <field name="name" type="string"> <sql name="name" type="char"/> </field> <field name="timeStamp" type="long"> <sql name="timestamp" type="numeric" /> </field> </class>
In some cases it is desirable to map a plain sequence of fields in a database record to more complicated structure of attributes in a Java object, where the target attributes are contained (nested) in other attributes. In brief, you can specify a path to the target attribute as a name of the field in a configuration file, and Castor is able to handle such nested attributes. For example:
<field name="address.country.code"...> <sql name="person_country"/> </field>
The first case is an attribute of an application type that is a container for some value of a Java type supported by Castor. Usually the application type also has some business methods. Examples are: class Balance that contains a BigDecimal value and has some accounting-specific methods; class CountryCode that contains a String value and has methods validate(), getDisplayName(), etc.; class Signature that contains a byte[] value and has some security-specific methods. In order to use such type with Castor you should provide a pair of methods to get/set the value of the Castor-supported type, e.g. getBigDecimal/setBigDecimal, getCode/setCode, getBytes/setBytes.
Assume that you have the class Address
public class Address { private CountryCode _country; private String _city; private String _street; public CountryCode getCountry() { return _country; } public void setCountry(CountryCode country) { _country = country; } ... }
where the class CountryCode is like this
public class CountryCode { private String _code; private static String[] _allCodes; private static String[] _allDisplayNames; public String getCode() { return _code; } public void setCode(String code) { _code = code; } public void getDisplayName() { ... }
then write in the configuration file:
<class name="Address"...> <field name="country.code"...> <sql name="addr_country"/> </field> ... </class>
When reading the object from the database Castor will use
object.getCountry().setCode(value);
to set the nested attribute value. Moreover, if object.getCountry() is null, Castor will create the intermediate object of the application type:
country = new CountryCode();
country.setCode(value);
object.setCountry(country);
When writing the object to the database Castor will use
value = object.getCountry().getCode();
to get the value of the correspondent database field.
The second case is an attribute that is a part of a compound
attribute, which contains several database fields.
For example, database fields person_country, person_city,
person_street of the table PERSON
correspond to one compound attribute "address" of the class
Person:
public class Person { private String _firstName; private String _lastName; private Address _address; public Address getAddress() { return _address; } public void setAddress(Address address) { _address = address; } ... }
where the class Address is the same as in the
previous section. Then write in the configuration file:
<class name="Person"...> <field name="address.country.code"...> <sql name="person_country"/> </field> <field name="address.city"...> <sql name="person_city"/> </field> <field name="address.street"...> <sql name="person_street"/> </field> ... </class>
Similarly to the previous section, Castor will use a proper sequence of get/set methods to access the nested attributes and will create the intermediate objects when necessary. Don't forget to provide parameterless constructors for the container classes.
10/22/2004: Added JDBC Datasource configuration for mySQL.
9/14/2004: Added section about using Jakarta's DBCP with Castor.
There is no mechanism within Castor JDO to provide pooling of JDBC drivers. Rather, Castor JDO relies on the drivers or external driver wrappers to implement a pooling mechanism. Some drivers, such as Oracle, provides a pooling mechanism in the driver. For those that do not, there are tools such as Proxool and Jakarta's DBCP project.
Here, I'll go over the various usage of the PostgreSQL driver
with Castor. We start with the most basic configurations
that do not use any pooling, to those with pooling via DBCP.
I'll include how to configure the pooling version of the
PostgreSQL JDBC driver ths will be usable with PostgreSQL 7.3 and
later, how to setup a Tomcat JNDI context that Castor can use to get
a pooled JDBC connection. Finally, I'll explain how to configure a
BasicDataSource from the DBCP package using the
<data-source> element.
A standard jdo-conf.xml entry for using PostgreSQL without pooling looks like this:
<driver class-name="org.postgresql.Driver" url="jdbc:postgresql://localhost/app"> <param name="user" value="smith"/> <param name="password" value="secret" /> </driver>
On the other hand, if you wanted to use the PostgresqlDataSource, you would use the data-source tag instead, and the connection entry would look like this:
<data-source class-name="org.postgresql.PostgresqlDataSource"> <param name="server-name" value="localhost" /> <param name="database-name" value="app" /> <param name="user" value="smith" /> <param name="password" value="secret" /> </data-source>
(Note that only versions before 7.3 of the PostgreSQL JDBC driver include this class)
In the 7.3 release of PostgreSQL, they will start providing a pooling mechanism with their driver. The Castor SVN repository includes a beta version of the driver with this functionality. Here is the 'current' configuration needed for the upcoming 7.3 release of PostgreSQL. (Unless they change it.) Note that in this pooling mechanism currently lacks some features of standrd pooling packages such as DBCP, such as timing out idle connections and removing failed connections from the pool. In this case, we can create the following data-source entry in the jdo-conf.xml file to provide for our connections with Castor.
<data-source class-name="org.postgresql.jdbc2.optional.PoolingDataSource"> <param name="server-name" value="localhost" /> <param name="database-name" value="app" /> <param name="initial-connections" value="2" /> <param name="max-connections" value="10" /> <param name="user" value="smith" /> <param name="password" value="secret" /> </data-source>
Here is the configuration needed for using a connection pool with the Oracle JDBC DataSource implementations.
<data-source class-name="oracle.jdbc.pool.OracleConnectionCacheImpl"> <param name="URL" value="jdbc:oracle:thin:@localhost:1521:TEST" /> <param name="user" value="scott" /> <param name="password" value="tiger" /> </data-source>
Here is the configuration needed for using a connection pool with the mySQL JDBC DataSource implementations.
<data-source class-name="com.mysql.jdbc.jdbc2.optional.MysqlConnectionPoolDataSource"> <param name="server-name" value="localhost" /> <param name="port" value="3306" /> <param name="user" value="scott" /> <param name="password" value="tiger" /> <param name="database-name" value="test" /> </data-source>
Finally, I want to show the configuration for using a pooling data-source for Castor which is retrieved from a JNDI context that Apache fills. The first example is using the PostgreSQL pooling data-source, and the second is using Castor. The information to gain here is that we did not need to change the jdo-conf.xml file or the webapp's web.xml file to achieve this.
First, we modify the deployment context for the webapp in Tomcat >= 4.0 for our
webapp in the conf/server.xml directory. (With Tomcat/Catalina releases 4.0 and higher
there's more than one way of adding a
<Resource> entry. Please consult with the
manuals for more and more detailed information).
We add the following information (using the PostgreSQL JDBC DataSource implementations as introduced above.):
<Context path="/webapp" docBase="test" debug="10"> <Resource name="jdbc/appDb" auth="Container" type="org.postgresql.jdbc2.optional.PoolingDataSource"/> <ResourceParams name="jdbc/appDb"> <parameter> <name>factory</name> <value>org.postgresql.jdbc2.optional.PGObjectFactory</value> </parameter> <parameter> <name>dataSourceName</name> <value>appDb</value> </parameter> <parameter> <name>initialConnections</name> <value>2</value> </parameter> <parameter> <name>maxConnections</name> <value>5</value> </parameter> <parameter> <name>databaseName</name> <value>app</value> </parameter> <parameter> <name>user</name> <value>smith</value> </parameter> <parameter> <name>password</name> <value>secret</value> </parameter> <parameter> <name>serverName</name> <value>localhost</value> </parameter> </ResourceParams> </Context>
Here, we are using the PostgreSQL PGObjectFactory which provides the JNDI server (Tomcat) the ability to create the correct data source. Now, the web.xml file for the webapp needs to be updated too.
<resource-env-ref> <description>PostgreSQL pooling check</description> <resource-env-ref-name>jdbc/appDb</resource-env-ref-name> <resource-env-ref-type>javax.sql.DataSource</resource-env-ref-type> </resource-env-ref>
Note that we are only calling the ref type a DataSource object, not using the PostgreSQL class name. This will enable us to make changes easily. Now, in the jdo-conf.xml file that Castor uses, we no longer list the driver or data-source tag, but use the JNDI one, and it is simply this:
<jndi name="java:comp/env/jdbc/appDb"/>
Commons-DBCP provides database connection pooling services, and together with Commons-Pool it is the default JNDI datasource provider for Tomcat.
With release 1.1 of the Jakarta Commons DBCP component, one of the major new features of the JDBC 3.0 API has (finally) been added to BasicDataSource, support for prepared statement pooling.
To configure Castor for the use of DBCP, please provide the following <data-source> entry in the jdo-conf.xml file.
<data-source class-name="org.apache.commons.dbcp.BasicDataSource">
<param name="driver-class-name" value="com.mysql.jdbc.Driver" />
<param name="username" value="test" />
<param name="password" value="test" />
<param name="url" value="jdbc:mysql://localhost/test" />
<param name="max-active" value="10" />
</data-source>
As mentioened above, please note that with DBCP 1.1 and later releases, support for prepared statement pooling has been added to DBCP. As Castor JDO does not implement prepared statement pooling itself, you will to configure DBCP explicitely to enable this feature.
To configure Castor for the use of DBCP, and to turn prepared statement
pooling on, please provide the following
<data-source> entry in the
jdo-conf.xml file.
<data-source class-name="org.apache.commons.dbcp.BasicDataSource">
<param name="driver-class-name" value="com.mysql.jdbc.Driver" />
<param name="username" value="test" />
<param name="password" value="test" />
<param name="url" value="jdbc:mysql://localhost/test" />
<param name="max-active" value="10" />
<param name="pool-prepared-statements" value="true" />
</data-source>
There's plenty of information on configuration of BasicDataSource.
PostgreSQL's blob support has evolved over the years. Today PostgreSQL fields can be of unlimited length. And there are specific data types for character and binary large objects. The current Castor support for blobs, however, uses an earlier PostgreSQL blob support. This support places the blob data in the pg_largeobject table and a object id in the referring table. For most practical purposes using this earlier support does not matter.
Database version and the JDBC driver version matter greatly. To get everything to work I eventually built and installed PostgreSQL 7.2.2 and used the JDBC driver from this build (i.e. not the one from http://jdbc.postgresql.org.
Since Castor is using the earlier blob support the JDBC has to be placed in PostgreSQL 7.1 comparability mode. To do this use the following JDBC URL
jdbc:postgresql://host:port/database?compatible=7.1
Once you have resolved the PostgreSQL version issues Castor works as documented.
Here are the details of an example configuration.
Client Windows 2000, Sun Java Standard Edition 1.3.1_03, Castor 0.9.3.21 Server RedHat 7.2, PostgreSQL 7.2.2
The interface I am using is
public interface Document { String getTitle(); void setTitle( String title ); Date getCreatedOn(); void setCreatedOn( Date createdOn ); String getContentType(); void setContentType( String contentType ); InputStream getContent(); void setContent( InputStream content ); }
and this is implemented by the class DocumentImpl.
The mapping file is
<?xml version="1.0"?> <mapping> <class name="com.ingenta.DocumentImpl" identity="id" key-generator="SEQUENCE" > <description /> <cache-type type="none" /> <map-to table="documents" /> <field name="id" type="integer" > <sql name="id" type="integer" dirty="check" required="true"/> </field> <field name="title" type="string"> <sql name="title" type="longvarchar" dirty="check" /> </field> <field name="createdOn" type="date"> <sql name="createdon" type="date" dirty="check" /> </field> <field name="contentType" type="string"> <sql name="contenttype" type="longvarchar" dirty="check" /> </field> <field name="content" type="stream"> <sql name="content" type="blob" dirty="ignore" /> </field> </class> </mapping>
Note that the blob is not dirty checked.
And the SQL is
create table documents (
id serial not null,
title text null,
createdon timestamp null,
contenttype text null,
content oid null,
primary key ( id )
);
Castor caches objects between transactions for performance. With a blob however the cached object's InputStream is not reusable. To workaround this I have told the cache to not cache any objects of this class by adding to the class mapping, as noted above.
There's many users of Castor JDO out there, who (want to) use Castor JDO in in high-volume applications. To fine-tune Castor for such environment, it is necessary to understand many of the product features in detail and to be able to balance their use according to the application needs. Even though many of these features are detailed in various places, people have frequently been asking for a 'best practise' document, a document that brings together these technical topics (in one place) and presents them as a set of easy-to-use recipes.
Please be aware that this document is under construction, but still we believe that - even when in its conception phase - it provides valuable information to users of Castor JDO.
Let's start with some general suggestions that you should have a look at. Please don't feel upset if some are really primitive but there may be users reading this document that are not aware of them.
Switch to version 0.9.9 of Castor as we have fixed some 100+ bugs that may causesome of your problems.
Sidenote: Performance has, generally, improved recently. If you're not seeing performance improvements, then it's worth spending some time thinking about why.
Initialize your JDOManager instance once and reuse it all over your application. Don't reuse the Database instances. Creating them is inexpensive, and JDBC rules state that one thread <-> one JDBC connection is the rule. Do not multithread inside of a Database instance; as a corrolary, do not multithread on a single JDBC connection.
Use a Datasource instead of a Driver configuration as they enable connection pooling which gives you a great performance improvement.
We highly suggest DBCP, here, with the beneficial use of prepared statement caching.
Should you be running on a system where read performance is critical, feel free to take the SQL code generated by castor, and dumped to logs during the DB mapping load in debug output, and turn those into stored procedures that you then invoke via SQL CALL to perform those loads; however, I find personally that stored procedures would be a minimal improvement over the DBCP prepared statement cache; your mileage may vary.
db.load()has performance benefits that are worth keeping, IMO, and the pleasure of having pretty stored procedures in your database is far outweighed by the nightmare of change management.Have a look at the HTML docs for Jakarta DBCP, which has details about how to use and configure DBCP with Castor and Tomcat.
Note 'prepared statement caches' refer to the fact that DBCP is a JDBC 3.0-compliant product, and as such has to support caching of prepared statements. This basically allows the JDBC driver to maintain a pool of prepared statements across all connections, a feature that has been added to the JDBC specification with release 3.0 only.
DBCP setup is generally outside of the scope of this list, but basically, here's my two cent description:
Use tomcat 5.5, because mucking about in server.xml sucks. For those of you working with Tomcat 4.1.x, there's no need to muck about in server.xml, either. Afaik, a web app can be deployed using a web app descriptor copied into $TOMCAT_HOME/webapps, which is the place top define anything specific to a web app context. Details can vary, of course.
Create a META-INF directory in your WAR deploy scripts, and put a context.xml in it.
In that context.xml, describe all of the things you want to be made available via JNDI to your application. These include things like UserTransaction and TransactionManager (for those of us using JOTM), all your database connection pools as datasources, etc. You can also add your JDO factory here, should you choose to do so.
Configure Castor to load those JNDI names to retrieve connections.
Hit the deploy button, and bob's your uncle.
Always commit or rollback your transactions and close your Database instances properly; also in fail situations.
Note Just the obvious general rule on Java objects that hold resources: Don't wait for the VM to finalize to have something happen to your objects when you could have released critical resources at the appropriate point in the codebase.
Keep your transactions as short as possible. If you have an open transaction that holds a write lock on an object no other transaction can get a write lock on the same object which will lead to a LockNotGrantedException.
execute() { Database db = jdo.getDatabase(); db.begin(); // query objects from database with read only db.commit(); db.close(); // do some time consuming processing with the data Database db = jdo.getDatabase(); db.begin(); // use db.load() to load the objects you need to change again // create, update or delete some objects db.commit(); db.close(); }It doesn't make sense to make a own transaction for every change you want to do to an object as this will slow down your application. On the other hand if you have transactions with lots of objects involved taking an valuable amonth of time you may consider to split this transactions to reduce the time an object is locked.
Also keep in mind that folks using lockmode of DBLocked do
FOR UPDATEcalls on things they read while the transaction is open; if you're using dblocked mode, be aware of how your application does things. If you're in one of the other modes, locks happen inside castor, and it's your responsibility to always use the right access mode when accessing content.If you can, for example, decide at the API layer whether or not an operation is going to ever need to modify an object, and know that you will only ever use an instance in read only mode, load objects with access mode read only, and not shared.
Limit use of read-write objects to situations in which it is likely you will need to perform updates.
Imagine, for a moment, that these transactions were in DBLocked mode - transactions which translate directly into locks on the database.
If you're opening something up for modification on the DB - marking it as select
FOR UPDATE- then that row will be locked until you commit. The database would prevent any other transaction that wants to touch that row from doing anything to it, and it would block on your transaction - deadlock at the SQL level.Castor does the same things internally for its own access modes - Shared and Exclusive. Each has different locking semantics; having good performance means understanding those locking semantics.
For example - read only transactions (should be) cheap. So there's no issue with holding those transactions open a long time; because they only translate, for an instant, into a lock. The lock is released the moment the load is completed and the object is dropped into read-only state within your transaction; read only operations therefore operate, pretty much, without locking.
The lock is of course acquired because you might also have it in SHARED or EXCLUSIVE mode on another thread - and that read-only operation isn't safe until those transactions close.
Once the lock is released, you're lock-free again, so the transaction basically has nothing in it that needs anything doing.
That's not to say that holding transactions open is good practice - but transactions should always be thought of as cheap to create and destroy and expensive to hold on to - never do heavy computation inside of one, unless you're willing to live with the consequences that arise from holding transactions on object sets that others might need to access.
Query or load your objects read only whenever possible. Even if castor creates a lock on them this does not prevent other threads from reading or writing them. Read only queries are also about 7 times faster compared with default shared mode.
for queries:
String oql = "select o from FooBar o"; Query query = db.getOQLQuery(oql); QueryResults results = query.execute(Database.ReadOnly);
to load an object by its identity:
Integer id = new Integer(7); Foo foo = (Foo) db.load(Foo.class, id, Database.ReadOnly);
Default accessmode is evaluated as follows:
if specified castor uses access mode from db.load() or query.execute(),
if this is not available it takes access mode specified in class mapping,
if nothing is specified in mapping it defaults to shared.
One cannot stress how important this is: If 99% of your application never writes an object, and you as a programmer know it won't, then do something about it. If you're in a situation where you want the object to be read-only most of the time, and only want a writable every now and then, do so just-in-time by performing a load-modify-store operation in a single transaction for the shareable you want.
In other words: Don't use read-write objects unless you know you're likely to want to write them.
If there is a possibility you should prefer
Database.load(Class, object)overQuery.execute(String). I suggest that asload()first tries to load the requested object from cache and only retrieves it from database when it is not available there. When executing queries withQuery.execute()the object will always be loaded from database without looking at the cache. You may gain a improvement by a factor of 10 and more when changing fromQuery.execute()toDatabase.load().
We hope above suggestions help you to resolve the problems you have. If you still need more performance there are areas of improvement that are more difficult to resolve. For further ideas to improve your applications performance you should take a loock at out performance test suite (PTF) which you can find in Castor's source distribution under: src/tests/ptf/jdo.
Now, there's lots left to do - there is still the issue, for example, of dependent objects being slightly sub-optimal in performance both in terms of the SQL that gets generated and the way it gets managed - but there will be improvements over time to the way that this and other operations are performed.
But performance should be good right now. If it isn't, you'll need to think about whether you are using the optimal set of operations. No environment can predict your requirements - hinting to the system when objects can be safely assumed to be read-only is vital to a high-performance implementation.
In order to start using the Spring ORM module for Castor JDO, you will have to have Maven 2 installed:
Download and install Maven 2
As this project uses Maven 2 for build and deployment, all required compile-time and run-time dependencies will automatically be resolved by Maven 2 and deployed into your local Maven 2 repository.
Please add the following Maven dependency to your POM to include the Spring ORM package for Castor JDO with your project:
<dependency> <groupId>org.codehaus.castor</groupId> <artifactId>spring-orm</artifactId> <version>1.3</version> </dependency>
If you create a dependency against a SNAPSHOT release, you will
have to add the following <repository> element
to your POM as well, so that Maven 2 knows about the
Codehaus Snapshot repository when
trying to resolve and download dependencies.
<repository> <id>codehaus-snapshots</id> <name>Maven Codehaus Snapshots</name> <url>http://snapshots.maven.codehaus.org/maven2/</url> </repository>>
This guide assumes that you are an experienced Castor JDO users that knows how to use Castor's interfaces and classes to interact with a database. If this is not the case, please familiarize yourself with Castor JDO first.
The sample domain objects used in here basically define a Catalogue,
which is a collection of Products. A possible castor JDO mapping could look
as follows:
<class name="org.castor.sample.Catalogue"> <map-to table="catalogue"/> <field name="id" type="long"> <sql name="id" type="integer" /> </field> <field name="products" type="org.castor.sample.Product" collection="arraylist"> <sql many-key="c_id" /> </field> </class> <class name="org.castor.sample.Product"> <map-to table="product"/> <field name="id" type="long"> <sql name="id" type="integer" /> </field> <field name="description" type="string"> <sql name="desc" type="varchar" /> </field> </class>
To e.g. load a given Catalogue instance as defined by its identity,
and all its associated Product instances, the following code could be used,
based upon the Castor-specific interfaces JDOManager and Database.
JDOManager.loadConfiguration("jdo-conf.xml"); JDOManager jdoManager = JDOmanager.createInstance("sample"); Database database = jdoManager.getDatabase(); database.begin(); Catalogue catalogue = database.load(catalogue.class, new Long(1)); database.commit(); database.close();
For brevity, exception handling has been omitted completely. But is is quite obvious that - when using such code fragments to implement various methods of a DAO - there's a lot of redundant code that needed to be written again and again - and exception handling is adding some additional complexity here as well.
Enters Spring ORM for Castor JDO, a small layer that allows usage of Castor JDO through Spring ORM, with all the known benefits (exception conversion, templates, tx handling).
Let's see how one might implement the loadProduct(int) of a
ProductDAO class with the help of Spring ORM using Castor
JDO:
public class ProductDaoImpl implements ProductDao { private JDOManager jdoManager; public void setJDOManager(JDOManager jdoManager) { this.jdoManager = jdoManager; } public Product loadProduct(final int id) { CastorTemplate tempate = new CastorTemplate(this.jdoManager); return (Product) template.execute( new CastorCallback() { public Object doInJdo(Database database) throws PersistenceException { return (Product) database.load(Product.class, new Integer (id)); } }); } }
Still a lot of code to write, but compared to the above section, the DAO gets
passed a fully configured JDOManager instance through Spring's dependency
injection mechanism. All that's required is configuration of Castor's JDOManager
as a Spring bean definition in an Spring application context as
follows.
<bean id="jdoManager" class="org.castor.spring.orm.LocalCastorFactoryBean"> <property name="databaseName" value="test" /> <property name="configLocation" value="classpath:jdo-conf.xml" /> </bean> <bean id="myProductDao" class="product.ProductDaoImpl"> <property name="JDOManager"> <ref bean="jdoManager"/> </property> </bean>
Above code is still quite verbose, as it requires you to write short
(though complex) callback functions. To ease life of the Castor JDO
user even more, a range of template methods have been added to
CastorTemplate, allowing the implementation of
above ProductDAO to be shortened considerably.
public class ProductDaoImplUsingTemplate extends CastorTemplate implements ProductDao {
private JDOManager jdoManager;
public void setJDOManager(JDOManager jdoManager) {
this.jdoManager = jdoManager;
}
public Product loadProduct(final int id) {
return (Product) load(Integer.valueOf(id));
}
...
}
Changing the bean definition for myProductDAO to ...
<bean id="myProductDao" class="product.ProductDaoImplUsingTemplate"> <property name="JDOManager"> <ref bean="myJdoManager"/> </property> </bean>
loading an instance of Product by its identifier
is reduced to ...
ProductDao dao = (ProductDAO) context.getBean ("myProductDAO");
Product product = dao.load(1);
Alternatively to extending CastorTemplate, one could extend the
CastorDaoSupport class and implement the
ProductDAO as
follows.
public class ProductDaoImplUsingDaoSupport extends CastorDaoSupport implements ProductDao { private JDOManager jdoManager; public void setJDOManager(JDOManager jdoManager) { this.jdoManager = jdoManager; } public Product loadProduct(final int id) { return (Product) getCastorTemplate().load(Integer.valueOf(id)); } ... }
Changing the bean definition for myProductDAO to ...
<bean id="myProductDao" class="product.ProductDaoImplUsingDaoSupport"> <property name="JDOManager"> <ref bean="myJdoManager"/> </property> </bean>
the code to load an instance of Product still
is as shown above.
We will start with a coverage of Hibernate in a Spring environment, using it to demonstrate the approach that Spring takes towards integrating O/R mappers. This section will cover many issues in detail and show different variations of DAO implementations and transaction demarcations.
Typical business applications are often cluttered with repetitive resource management code. Many projects try to invent their own solutions for this issue, sometimes sacrificing proper handling of failures for programming convenience. Spring advocates strikingly simple solutions for proper resource handling, namely IoC via templating; for example infrastructure classes with callback interfaces, or applying AOP interceptors. The infrastructure cares for proper resource handling, and for appropriate conversion of specific API exceptions to an unchecked infrastructure exception hierarchy. Spring introduces a DAO exception hierarchy, applicable to any data access strategy. For direct JDBC, the JdbcTemplate class mentioned in a previous section cares for connection handling, and for proper conversion of SQLException to the DataAccessException hierarchy, including translation of database-specific SQL error codes to meaningful exception classes. It supports both JTA and JDBC transactions, via respective Spring transaction managers.
This module implements Spring ORM/DAO support for Castor JDO, consisting of a CastorTemplate analogous to JdbcTemplate, a CastorInterceptor, and a Castor transaction manager. The major goal is to allow for clear application layering, with any data access and transaction technology, and for loose coupling of application objects. No more business service dependencies on the data access or transaction strategy, no more hard-coded resource lookups, no more hard-to-replace singletons, no more custom service registries. One simple and consistent approach to wiring up application objects, keeping them as reusable and free from container dependencies as possible. All the individual data access features are usable on their own but integrate nicely with Spring's application context concept, providing XML-based configuration and cross-referencing of plain JavaBean instances that don't need to be Spring-aware. In a typical Spring app, many important objects are JavaBeans: data access templates, data access objects (that use the templates), transaction managers, business services (that use the data access objects and transaction managers), web view resolvers, web controllers (that use the business services), and so on.
To avoid tying application objects to hard-coded resource lookups, Spring allows you to define resources like a JDBC DataSource or a Castor JDOManager as beans in an application context. Application objects that need to access resources just receive references to such pre-defined instances via bean references (the DAO definition in the next section illustrates this). The following excerpt from an XML application context definition shows how to set up a JDBC DataSource and a Castor JDOManager on top of it:
<beans> <bean id="myDataSource" class="org.apache.commons.dbcp.BasicDataSource" destroy-method="close"> <property name="driverClassName" value="org.hsqldb.jdbcDriver" /> <property name="url" value="jdbc:hsqldb:hsql://localhost:9001" /> <property name="username" value="sa" /> <property name="password" value="" /> </bean> <bean id="myJDOManager" class="org.castor.spring.orm.LocalCastorFactoryBean"> <property name="databaseName" value="test" /> <property name="configLocation" value="classpath:jdo-conf.xml" /> </bean> </beans>
Note that switching from a local Jakarta Commons DBCP BasicDataSource to a JNDI-located DataSource (usually managed by an application server) is just a matter of configuration:
<beans> <bean id="myDataSource" class="org.springframework.jndi.JndiObjectFactoryBean"> <property name="jndiName" value="java:comp/env/jdbc/myds" /> </bean> </beans>
You can also access a JNDI-located SessionFactory, using Spring's JndiObjectFactoryBean to retrieve and expose it. However, that is typically not common outside of an EJB context.
The basic programming model for templating looks as follows, for methods that can be part of any custom data access object or business service. There are no restrictions on the implementation of the surrounding object at all, it just needs to provide a Castor JDOManager. It can get the latter from anywhere, but preferably as bean reference from a Spring application context - via a simple setJDOManager(..) bean property setter. The following snippets show a DAO definition in a Spring container, referencing the above defined JDOManager, and an example for a DAO method implementation.
<beans> <bean id="myProductDao" class="org.exolab.castor.dao.ProductDaoImpl"> <property name="JDOManager"><ref bean="jdoManager"/></property> </bean> </beans>
public class ProductDaoImpl implements ProductDao { private Castor castorTemplate; public void setJDOManager(JDOManager jdoManager) { this.castorTemplate = new CastorTemplate(jdoManager); } public Collection loadProductsByCategory(final String category) throws DataAccessException { return (Collection) this.castorTemplate.execute( new CastorCallback() { public Object doInCastor(Database database) throws PersistenceException { database.begin(); OQLQuery query = database.getOQL("select p from org.exolab.castor.dao.ProductDao p " + " where p.category = ?"); query.bind(category); QueryResults results = query.execute(); database.commit(); return Collections.list(); } ); } }
A callback implementation can effectively be used for any Castor data access. CastorTemplate will ensure that Database instances are properly opened and closed, and automatically participate in transactions. The template instances are thread-safe and reusable, they can thus be kept as instance variables of the surrounding class.
For simple single step actions like a single find, load, saveOrUpdate, or delete call, CastorTemplate offers alternative convenience methods that can replace such one line callback implementations. Furthermore, Spring provides a convenient CastorDaoSupport base class that provides a setJDOManager(..) method for receiving a JDOManager, and getJDOManager() and getCastorTemplate()for use by subclasses.
In combination, this allows for very simple DAO implementations for typical requirements:
public class ProductDaoImpl extends HibernateDaoSupport implements ProductDao { public Collection loadProductsByCategory(String category) throws DataAccessException { return this.getCastorTemplate().find("select p from test.Product product where p.category=?", category); } }
As alternative to using Spring's CastorTemplate to implement DAOs, data access code can also be written in a more traditional fashion, without wrapping the Hibernate access code in a callback, while still complying to Spring's generic DataAccessException hierarchy. Spring's CastorDaoSupport base class offers methods to access the current transactional Database and to convert exceptions in such a scenario; similar methods are also available as static helpers on the JDOManagerUtils class. Note that such code will usually pass "false" into the getDatabased(..) method's "allowCreate" argument, to enforce running within a transaction (which avoids the need to close the returned Database, as it's lifecycle is managed by the transaction).
public class ProductDaoImpl extends HibernateDaoSupport implements ProductDao { public Collection loadProductsByCategory(String category) throws DataAccessException, MyException { Database database = getDatabase(getJDOManager(), false); try { List result = database.find( "select p from test.Product p where " + " product.category=?", category, Castor.STRING); if (result == null) { throw new MyException("invalid search result"); } return result; } catch (PersistenceException ex) { throw convertCastorAccessException(ex); } } }
The major advantage of such direct Castor JDO access code is that it allows any checked application exception to be thrown within the data access code, while CastorTemplate is restricted to unchecked exceptions within the callback. Note that one can often defer the corresponding checks and the throwing of application exceptions to after the callback, which still allows working with CastorTemplate. In general, the CastorTemplate class' convenience methods are simpler and more convenient for many scenarios.
Transactions can be demarcated in a higher level of the application, on top of such lower-level data access services spanning any number of operations. There are no restrictions on the implementation of the surrounding business service here as well, it just needs a Spring PlatformTransactionManager. Again, the latter can come from anywhere, but preferably as bean reference via a setTransactionManager(..) method - just like the productDAO should be set via a setProductDao(..) method.
The following snippets show a transaction manager and a business service definition in a Spring application context, and an example for a business method implementation.
<beans> <bean id="myTxManager" class="org.castor.spring.orm.CastorTransactionManager"> <property name="jdoManager" ref="myJDOManager" /> </bean> <bean id="myProductService" class="product.ProductServiceImpl"> <property name="transactionManager" ref="myTxManager" /> <property name="productDao" ref="myProductDao" /> </bean> </beans>
public class ProductServiceImpl implements ProductService { private TransactionTemplate transactionTemplate; private ProductDao productDao; public void setTransactionManager(PlatformTransactionManager transactionManager) { this.transactionTemplate = new TransactionTemplate(transactionManager); } public void setProductDao(ProductDao productDao) { this.productDao = productDao; } public void increasePriceOfAllProductsInCategory(final String category) { this.transactionTemplate.execute( new TransactionCallbackWithoutResult() { public void doInTransactionWithoutResult(TransactionStatus status) { List productsToChange = productDAO.loadProductsByCategory(category); // do the price increase... } } ); } }
Alternatively, one can use Spring's declarative transaction support, which essentially enables you to replace explicit transaction demarcation API calls in your Java code with an AOP transaction interceptor configured in a Spring container. This allows you to keep business services free of repetitive transaction demarcation code, and allows you to focus on adding business logic which is where the real value of your application lies. Furthermore, transaction semantics like propagation behavior and isolation level can be changed in a configuration file and do not affect the business service implementations.
<beans> <bean id="myTxManager" class="org.castor.spring.orm.CastorTransactionManager"> <property name="jdoManager" ref="myJDOManager" /> </bean> <bean id="myProductService" class="org.springframework.aop.framework.ProxyFactoryBean"> <property name="proxyInterfaces" value="product.ProductService" /> <property name="target"> <bean class="product.DefaultProductService"> <property name="productDao" ref="myProductDao" /> </bean> </property> <property name="interceptorNames"> <list> <value>myTxInterceptor</value><!-- the transaction interceptor (configured elsewhere) --> </list> </property> </bean> </beans>
public class ProductServiceImpl implements ProductService { private ProductDao productDao; public void setProductDao(ProductDao productDao) { this.productDao = productDao; } // notice the absence of transaction demarcation code in this method // Spring's declarative transaction infrastructure will be demarcating //transactions on your behalf public void increasePriceOfAllProductsInCategory(final String category) { List productsToChange = this.productDAO.loadProductsByCategory(category); // ... } }
Spring's TransactionInterceptor allows any checked application exception to be thrown with the callback code, while TransactionTemplate is restricted to unchecked exceptions within the callback. TransactionTemplate will trigger a rollback in case of an unchecked application exception, or if the transaction has been marked rollback-only by the application (via TransactionStatus). TransactionInterceptor behaves the same way by default but allows configurable rollback policies per method.
The following higher level approach to declarative transactions doesn't use the ProxyFactoryBean, and as such may be easier to use if you have a large number of service objects that you wish to make transactional.
| Note |
|---|---|
You are strongly encouraged to read the section entitled Section 9.5, “Declarative transaction management” if you have not done so already prior to continuing. |
<?xml version="1.0" encoding="UTF-8"?>
<beans xmlns="http://www.springframework.org/schema/beans"
xmlns:xsi="http://www.w3.org/2001/XMLSchema-instance"
xmlns:aop="http://www.springframework.org/schema/aop"
xmlns:tx="http://www.springframework.org/schema/tx"
xsi:schemaLocation="
http://www.springframework.org/schema/beans http://www.springframework.org/schema/beans/spring-beans-2.0.xsd
http://www.springframework.org/schema/tx http://www.springframework.org/schema/tx/spring-tx-2.0.xsd
http://www.springframework.org/schema/aop http://www.springframework.org/schema/aop/spring-aop-2.0.xsd">
<!-- JDOManager, DataSource, etc. omitted -->
<bean id="myTxManager"
class="org.castor.spring.orm.CastorTransactionManager">
<property name="jdoManager" ref="myJDOManager" />
</bean>
<aop:config>
<aop:pointcut id="productServiceMethods"
expression="execution(* product.ProductService.*(..))" />
<aop:advisor advice-ref="txAdvice"
pointcut-ref="productServiceMethods" />
</aop:config>
<tx:advice id="txAdvice" transaction-manager="myTxManager">
<tx:attributes>
<tx:method name="increasePrice*" propagation="REQUIRED" />
<tx:method name="someOtherBusinessMethod"
propagation="REQUIRES_NEW" />
<tx:method name="*" propagation="SUPPORTS" read-only="true" />
</tx:attributes>
</tx:advice>
<bean id="myProductService" class="product.SimpleProductService">
<property name="productDao" ref="myProductDao" />
</bean>
</beans>Both TransactionTemplate and TransactionInterceptor delegate the actual transaction handling to a PlatformTransactionManager instance, which can be a CastorTransactionManager (for a single Castor JDOManager, using a ThreadLocal Database under the hood) or a JtaTransactionManager (delegating to the JTA subsystem of the container) for Castor applications. You could even use a custom PlatformTransactionManager implementation. So switching from native Castor transaction management to JTA, such as when facing distributed transaction requirements for certain deployments of your application, is just a matter of configuration. Simply replace the Castor transaction manager with Spring's JTA transaction implementation. Both transaction demarcation and data access code will work without changes, as they just use the generic transaction management APIs.
For distributed transactions across multiple Castor JDOManager instances, simply combine JtaTransactionManager as a transaction strategy with multiple LocalCastorFactoryBean definitions. Each of your DAOs then gets one specific JDOManager reference passed into it's respective bean property. If all underlying JDBC data sources are transactional container ones, a business service can demarcate transactions across any number of DAOs and any number of session factories without special regard, as long as it is using JtaTransactionManager as the strategy.
<beans>
<bean id="myDataSource1"
class="org.springframework.jndi.JndiObjectFactoryBean">
<property name="jndiName value=" java:comp/env/jdbc/myds1" />
</bean>
<bean id="myDataSource2"
class="org.springframework.jndi.JndiObjectFactoryBean">
<property name="jndiName" value="java:comp/env/jdbc/myds2" />
</bean>
<bean id="myJDOManager1"
class="org.castor.spring.orm.LocalCastorFactoryBean">
<property name="databaseName" value="test1" />
<property name="configLocation" value="classpath:jdo-conf-1.xml" />
</bean>
<bean id="myJDOManager2"
class="org.castor.spring.orm.LocalCastorFactoryBean">
<property name="databaseName" value="test2" />
<property name="configLocation" value="classpath:jdo-conf-2.xml" />
</bean>
<bean id="myTxManager"
class="org.springframework.transaction.jta.JtaTransactionManager" />
<bean id="myProductDao" class="product.ProductDaoImpl">
<property name="jdoManager" ref="myJDOManager1" />
</bean>
<bean id="myInventoryDao" class="product.InventoryDaoImpl">
<property name="jdoManager" ref="myJDOManager2" />
</bean>
<!-- this shows the Spring 1.x style of declarative transaction configuration -->
<!-- it is totally supported, 100% legal in Spring 2.x, but see also above for the sleeker, Spring 2.0 style -->
<bean id="myProductService"
class="org.springframework.transaction.interceptor.TransactionProxyFactoryBean">
<property name="transactionManager" ref="myTxManager" />
<property name="target">
<bean class="product.ProductServiceImpl">
<property name="productDao" ref="myProductDao" />
<property name="inventoryDao" ref="myInventoryDao" />
</bean>
</property>
<property name="transactionAttributes">
<props>
<prop key="increasePrice*">PROPAGATION_REQUIRED</prop>
<prop key="someOtherBusinessMethod">
PROPAGATION_REQUIRES_NEW
</prop>
<prop key="*">PROPAGATION_SUPPORTS,readOnly</prop>
</props>
</property>
</bean>
</beans>
Both CastorTransactionManager and JtaTransactionManager allow for proper JVM-level cache handling with Castor - without container-specific transaction manager lookup or JCA connector (as long as not using EJB to initiate transactions).
CastorTransactionManager can export the JDBC Connection used by Castor to plain JDBC access code, for a specific DataSource. This allows for high-level transaction demarcation with mixed Castor/JDBC data access completely without JTA, as long as you are just accessing one database! CastorTransactionManager will automatically expose the Castor transaction as JDBC transaction if the passed-in JDOManager has been set up with a DataSource (through the "dataSource" property of the LocalCastorFactoryBean class).
Alternatively, the DataSource that the transactions are supposed to be exposed for can also be specified explicitly, through the "dataSource" property of the CastorTransactionManager class.
In order to build the Sping ORM module for Castor JDO, you will have the following requirements met on your system:
Download and install Maven 2
Download and install a Subversion client.
As this project uses Maven 2 for build and deployment, all required compile-time dependencies will automatically be resolved by Maven 2 and deployed into your local Maven 2 repository.
This section describes how to build the Spring module from a command line using Maven 2. Whilst there is support for Maven 2 in various IDEs (including e.g. Eclipse, IDEA, etc.), using the Maven command line seems to be the most adequate least common denominator.
This section assumes that you have ckecked out the latest sources from the SVN repsitory for the Spring ORM module for Castor JDO. Instructions for doing so are provided here.
Open a command line (shell) on your system, and issue the following commands:
> mvn jar
Above command will compile the sources and create the distribution JAR
in the target directory of the project root.
To install the newly created distribution JAR into your local Maven 2 repository, please issue the following command:
> mvn install
To create the complete project documentation - in addition to the distribution assembly, please issue ...
> mvn site
It has always been a goal of the Castor JDO project to eventually fully support the JPA specification and become a first class JPA provider that can e.g. be easily integrated with Spring ORM. Whilst full compliance is still work in progress, there are several small areas where sufficient progress has been made, and where partial support will be made available to the user community.
One such area is (partial) support for JPA annotations. This chapter highlights how JPA-annotated Java classes can be used with Castor JDO to persist such classes through the existing persistence framework part of Castor, without little additional requirements.
The following sections describe ...
The prerequisites.
The current limitations.
The supported JPA annotations.
How to use Castor JDO to persist JPA-annotated classes.
How to use Castor JDO as Spring ORM provider to persist JPA-annotated classes.
The following sections assume that you have a (set of) JPA-annotated domain classes which you would like to persist using Castor JDO.
As such, we explain how to enlist those classes with
Castor JDO (through the JDOClassDescriptorResolver
interface, so that Castor JDO will be able to find and work with your
JPA-annotated classes. In addition, we explain how to achieve the same
with Spring ORM and the Spring ORM provider for Castor JDO.
By the end of this chapter is should become obvious that Castor JDO is well-prepared to integrate with the annotation part of the JPA specification, although support for JPA annotations is currently limited.
In Castor JPA there is no use or support for a JPA
persistence.xml configuration file for
now. All required configuration needs to be supplied by one
of the following means:
Castor JDO configuration file.
JDOClassDescriptorResolverconfiguration.Spring configuration file for the Spring ORM provider for Castor JDO.
Because Castor does not support direct field access, this feature is not supported by Castor JPA. Thus all annotations have to be defined on the getter methods of the fields. If JPA related annotations are found on fields, Castor will throw an exception.
Primary keys made of single fields are supported by Castor as defined
in the JPA specification (through the use of the @Id annotation). If
you need to define composite primary keys, please note that that
Castor does not support relations
with composite primary keys.
If you still want to persist single classes with the use of
composite primary keys, none of the available JPA annotations
(@EmbeddedId or @IdClass) is supported as such. Instead Castor
uses a kind of ad-hoc IdClass mechanism. Simply
define multiple @Id annotations on the fields that make up your
composite primary key, and Castor JDO will internally create the
relevant constructs.
These JPA annotations are currently not supported by Castor JDO. For now, you can only define entities.
| S ... Supported |
| PS ... Partially Supported |
| NS ... Not Supported |
Table 6.1. JPA-Annotations
| Annotation | Supported | Comment |
|---|---|---|
| AssociationOverride | NS | |
| AssociationOverrides | NS | |
| AttributeOverride | NS | |
| AttributeOverrides | NS | |
| Basic | S | See information on Castor fetch types! |
| Column | PS | Supported: column name, nullable |
| ColumnResult | NS | |
| DiscriminatorColumn | NS | Castor does not support Joined Table Class Hierachy. |
| DiscriminatorValue | NS | Castor does not support Joined Table Class Hierachy. |
| Embeddable | NS | |
| Embedded | NS | |
| EmbeddedId | NS | Castor does not support composed primary keys embedded in classes of their own. |
| Entity | S | This annotation is needed to tell Castor that this Class is an entity. |
| EntityListeners | S | |
| EntityResult | NS | |
| Enumerated | S | |
| ExcludeDefaultListeners | S | |
| ExcludeSuperclassListeners | S | |
| FieldResult | NS | |
| GeneratedValue | NS | |
| Id | S | Use this annotation to make a field a primary key (or part of it). |
| IdClass | NS | Castor creates IdClass-like behaviour implicity when you define multiple Id fields. Castor does not support composed primary keys in relations! |
| Inheritance | NS | |
| JoinColumn | PS | Supported: name |
| JoinColumns | NS | This is not supported because Castor does not support composed keys in relations. |
| JoinTable | PS | Supported: name, joincolumns, inverseJoincolumns |
| Lob | S | |
| ManyToMany | PS | this is not tested properly yet. |
| ManyToOne | PS | Supported: targetEntity, fetch, optional, cascade - Relations MUST BE optional! Required relations are not supported. |
| MapKey | NS | |
| MappedSuperclass | NS | |
| NamedQuery | S | This annotation is used to specify a named query in OQL. |
| NamedQueries | S | This annotation specifies an array of named queries |
| NamedNativeQuery | S | This annotation is used to specify a native SQL named query. |
| NamedNativeQueries | S | This annotation specifies an array of named native queries. |
| OneToMany | PS | Supported: targetEntity, fetch, mappedBy, cascade |
| OneToOne | PS | Supported: targetEntity, fetch, optional, cascade - Relations MUST BE optional! Required relations are not supported. |
| OrderBy | NS | |
| PersistenceContext | NS | |
| PersistenceContexts | NS | |
| PersistenceProperty | NS | |
| PersistenceUnit | NS | |
| PersistenceUnits | NS | |
| PostLoad | S | |
| PostPersist | S | |
| PostRemove | S | |
| PostUpdate | S | |
| PrePersist | S | |
| PreRemove | S | |
| PreUpdate | S | |
| PrimaryKeyJoinColumn | NS | |
| PrimaryKeyJoinColumns | NS | |
| QueryHint | NS | |
| SecondaryTable | NS | |
| SecondaryTables | NS | |
| SequenceGenerator | NS | |
| SqlResultSetMapping | NS | |
| SqlResultSetMappings | NS | |
| Table | PS | Supported: name |
| TableGenerator | NS | |
| Temporal | S | |
| Transient | S | |
| UniqueConstraint | NS | |
| Version | NS |
This selection of HOW-TOs will show you how to persist JPA-annotated classes with Castor JDO, and will outline the required steps for each of the following cases:
Singular (stand-alone) entities
1:1 relations
1:M relations
M:N relations
The goal is to take an existing JPA-annotated class
Single and persist it with
Castor JDO. Let's first have a look at the domain class
itself, first without JPA annotattions.
public class Single { private int id; private String name; public int getId() { ... } public void setId(int id ) { ... } public String getName() { ... } public void setName(String name) { ... } }
Here's the same class again, this time with JPA annotations.
@Entity @Table(name="mySingleTable") public class Single { private int id; private String name; @Id @Column(name="id") public int getId() { ... } public void setId(int id) { ... } public String getName() { ... } public void setName(String name) { ... } }
As shown, the class Single is
mapped against the table mySingleTable,
and its fields id and name
are mapped to the columns id and
name, where the column name for the
id property is supplied explicitly and
where the column name for the name
property is derived from the property itself.
Next point is to create an DAO interface and
its implementation where we will be using
CastorDaoSupport from Castor's
support for Spring ORM to implement the required methods.
public interface SingleDao { void save(Single single); Single get(int id); void delete(Single single); } public class SingleCastorDao extends CastorDaoSupport implements SingleDao { public void delete(Single single) { this.getCastorTemplate().remove(single); } public Single get(int id) { return (Single) this.getCastorTemplate().load(Single.class, new Integer(id)); } public void save(Single single) { this.getCastorTemplate().create(single); } }
There's one small final code change needed: For Castor to be able to work
with JPA-annotated classes, you have to configure an instance of
JDOClassDescriptorResolver and pass
it to your JDOManager, else Castor
won't be able to see those class files. Simply add
the individual classes one by one or the package(s)
as shown below:
JDOClassDescriptorResolver resolver = new JDOClassDescriptorResolverImpl(); resolver.addClass(org.castor.jpa.Single.class); // or alternatively you can add the package: resolver.addPackage("org.castor.jpa"); InputSource jdoConfiguration = ...; JDOManager.loadConfiguration(jdoConfiguration, null, null, resolver); JDOManager jdoManager = JDOManager.createInstance("jpa-extensions"); ...
The goal is to take the existing JPA-annotated classes
OneToOne_A and OneToOne_B
and persist them with Castor JDO. Let's first have a look
at the domain classes themselves, this time with JPA
annotations already in place.
@Entity public class OneToOne_A { private int id; private String title; @Id @Column(name = "id") public int getId() { ... } public void setId(int id) { ... } @Column(name = "name") public String getTitle() { ... } public void setTitle(String title) { ... } } @Entity @Table(name="OneToOne_B") public class B { private int id; private String name; private OneToOne_A objA; @Id @Column(name = "id") public int getId() { ... } public void setId(int id) { ... } @Column(name = "name") public String getName() { ... } public void setName(String name) { ... } @OneToOne(optional=false) public OneToOne_A getOneToOne_A() { ... } public void setOneToOne_a(OneToOne_A objA) { ... } }
As shown, the class OneToOne_A is
mapped against the table OneToOne_A
(implicit mapping), and the B
against the table OneToOne-B (explicit
mapping). Please note the @OneToOne annotation
that specifies the 1:1 relation from class
B to class
OneToOne_A.
As with the example shown further above, do not forget to
register all classes involved with the
JDOClassDescriptorResolver
as shown below:
JDOClassDescriptorResolver fragment:
resolver.addClass(org.castor.jpa.OneToOne_A.class); resolver.addClass(org.castor.jpa.B.class);
or with the addPackage method:
resolver.addPackage("org.castor.jpa");
First we have to annotate our java classes.
@Entity
@Table(name="OneToMany_actor")
public class Actor {
private int svnr;
private String lastname;
private String firstname;
@Id
public int getSvnr() { ... }
public void setSvnr(int svnr) { ... }
@Column(name="surname")
public String getLastname() { ... }
public void setLastname(String lastname) { ... }
@Column(name="firstname")
public String getFirstname() { ... }
public void setFirstname(String firstname) { ... }
}
@Entity
@Table(name="OneToMany_broadcast")
public class Broadcast {
private int id;
private String name;
private Collection<Actor> actors;
@Id
public int getId() { ... }
public void setId(int id) { ... }
public String getName() { ... }
public void setName(String name) { ... }
@OneToMany(targetEntity=Actor.class, mappedBy="actor_id")
public Collection<Actor> getActors() { ... }
public void setActors(Collection<Actor> actors) { ... }
}
What you see is that with the small modification you can persist one to many relations easily.
Last don't forget to change your JDOClassDescriptorResolver accordingly.
The @NamedQuery annotation is used to specify a
named query in castor's own query language (OQL) and it is expressed
in metadata. The annotation takes the name and
an OQL query as parameters.
To define a named query, we first need a persistence entity where we
can attach the @NamedQuery annotation.
package your.package; @Entity @NamedQuery(name = "findPersonByName", query = "SELECT p FROM your.package.Person p WHERE p.name = $1") public class Person { private long id; private String name; @Id public long getId() {...} public void setId(final long id) {...} public String getName() {...} public void setName(final String name) {...} }
As you can see, we defined a query using the name
findPersonByName. The query itself uses
$1 as a placeholder in its WHERE-clause,
which must be bound when executing the query.
The following code sample illustrates how to execute the named query defined above:
Database db = jdoManager.getDatabase(); db.begin(); final OQLQuery query = db.getNamedQuery("findPersonByName");query.bind("Max Mustermann");
final QueryResults queryResults = query.execute();
final Person queriedPerson = (Person) queryResults.next(); queryResults.close(); db.commit();
Let's have a closer look on some of the lines from this example.
| ... creates an OQL query using the above defined named query. |
| .. binds the placeholder |
| ... executes the query and handle the results. |
The @NamedQueries annotation is used to specifiy
multiple named queries.
package your.package; @Entity @NamedQueries({ @NamedQuery(name = "findPersonByName", query = "SELECT p FROM your.package.Person p WHERE p.name = $1"), @NamedQuery(name = "findPersonById", query = "SELECT p FROM you.package.Person p WHERE p.id = $1") }) public class Person { private long id; private String name; @Id public long getId() {...} public void setId(final long id) {...} public String getName() {...} public void setName(final String name) {...} }
In the obove example we defined two named queries, namly
findPersonByName and findPersonById.
The usage of each query is identical to the usasage of a single named query.
Database db = jdoManager.getDatabase(); db.begin(); final OQLQuery query = db.getNamedQuery("findPersonById"); query.bind(1000L); final QueryResults queryResults = query.execute(); final Person queriedPerson = (Person) queryResults.next(); queryResults.close(); db.commit();
A named native query is a named query using native SQL syntax instead of castor's own query language. The handling of the annotation is similar to named queries.
First we need a entity to attach a query.
@Entity @Table(name = personTable) @NamedNativeQuery(name = "selectAllPersons", query = "SELECT * FROM personTable") public class Person { private long id; private String name; @Id public long getId() {...} public void setId(final long id) {...} public String getName() {...} public void setName(final String name) {...} }
Although the query itself is written
in native SQL syntax, we - again - use a OQLQuery object
to execute the query.
Database db = jdoManager.getDatabase(); db.begin(); final OQLQuery query = db.getNamedQuery("selectAllPersons"); final QueryResults queryResults = query.execute(); ... //process the results queryResults.close(); db.commit();
The @NamedNativeQueries annotation is used to specifiy
multiple named native SQL queries.
package your.package; @Entity @Table(name = personTable) @NamedNativeQueries({ @NamedNativeQuery(name = "selectAllPersons", query = "SELECT * FROM personTable"), @NamedNativeQuery(name = "findMustermann", query = "SELECT * FROM personTable WHERE name='Max Mustermann' and id=1000") }) public class Person { private long id; private String name; @Id public long getId() {...} public void setId(final long id) {...} public String getName() {...} public void setName(final String name) {...} }
As we have already seen, the usage of the two above defined queries is equivalent to the usage of a single named native query.
Database db = jdoManager.getDatabase(); db.begin(); final OQLQuery query = db.getNamedQuery("findMustermann"); final QueryResults queryResults = query.execute(); final Person maxMustermann = (Person) queryResults.next(); queryResults.close(); db.commit();
The following annotations can be used for handling persistence callbacks via JPA:
- PostLoad
- PrePersist
- PostPersist
- PreUpdate
- PostUpdate
- PreRemove
- PostRemove
Additionally, there are the following listener-related annotations:
- EntityListeners
- ExcludeDefaultListeners
- ExcludeSuperclassListeners
So, here's a basic usage example:
@Entity
public class Person {
private final Log log = LogFactory.getLog(this.getClass());
private long id;
private String name;
@Id
public long getId() {
return id;
}
public void setId(final long id) {
this.id = id;
}
public String getName() {
return name;
}
public void setName(final String name) {
this.name = name;
}
@PostLoad
protected void testPostLoadCallbackHooking() {
log.debug(String.format("Hello from `PostLoad`. My name is %s.",
this.name));
}
@PrePersist
protected void validateCreation() {
if (this.name.equals("Max Mustermann")) {
throw new PersistenceException(String.format(
"Person mustn't be called %s.", this.name));
}
}
@PostPersist
protected void validatePersistence() {
if (this.name.equals("Manfred Mustermann")) {
throw new PersistenceException(String.format(
"Person shouldn't be called %s either.", this.name));
}
}
@PreRemove
protected void validateRemoval() {
if (this.name.equals("Max Musterfrau")) {
throw new PersistenceException(this.name + " mustn't be removed.");
}
}
@PostRemove
protected void validateDeletion() {
if (this.name.equals("Manfred Musterfrau")) {
throw new PersistenceException(this.name
+ " shouldn't be removed either.");
}
}
@PreUpdate
protected void validateModification() {
if (this.name.equals("Max Musterfrau")) {
throw new PersistenceException(String.format(
"Person mustn't be renamed to %s.", this.name));
}
}
@PostUpdate
protected void validateUpdating() {
if (this.name.equals("Hans Wurst")) {
throw new PersistenceException(String.format(
"Person shouldn't be renamed to %s either.", this.name));
}
}
}
As one can see from this example, such callbacks can e.g. be used for handling validation based on CRUD (create, retrieve, update, delete) operation events.
Furthermore, there are possibilites to define listeners which allow for decoupling callback handling from entities.
Here's an example for that:
@Entity
@EntityListeners(DogListener.class)
public class Dog extends Animal {
private long id;
@Id
public long getId() {
return id;
}
public void setId(final long id) {
this.id = id;
}
}
// Corresponding listener.
public class DogListener {
@PostPersist
protected void postPersistDogListener() {
// Do something.
}
}
Apart from that, ExcludeDefaultListeners and
ExcludeSuperclassListeners enable specifying
exclusion of listeners within an inheritance chain of entities.
Enumerated can be used to persist
Enum types.
Here's an example:
@Entity
public class EnumEntity {
private long id;
private StringEnum stringEnum;
private OrdinalEnum ordinalEnum;
@Id
public long getId() {
return id;
}
public void setId(final long id) {
this.id = id;
}
@Enumerated(STRING)
public StringEnum getStringEnum() {
return stringEnum;
}
public void setStringEnum(final StringEnum stringEnum) {
this.stringEnum = stringEnum;
}
public OrdinalEnum getOrdinalEnum() {
return ordinalEnum;
}
public void setOrdinalEnum(final OrdinalEnum ordinalEnum) {
this.ordinalEnum = ordinalEnum;
}
}
So, by default enums are serialized to their corresponding ordinal
value representations for persistence. In this case, it's also
sufficient to skip explicitly defining so via
Enumerated. If serialization to respective string
name representations is preferred annotating accordingly is required.
This annotation can be used to specify properties mapped to temporal data structures.
Example:
@Entity
public class Person {
private long id;
private Date birthDate;
private Date anotherDate;
private Date yetAnotherDate;
@Id
public long getId() {
return id;
}
public void setId(final long id) {
this.id = id;
}
@Temporal(TIMESTAMP)
public Date getBirthDate() {
return birthDate;
}
public void setBirthDate(final Date birthDate) {
this.birthDate = birthDate;
}
@Temporal(TIME)
public Date getAnotherDate() {
return anotherDate;
}
public void setAnotherDate(final Date anotherDate) {
this.anotherDate = anotherDate;
}
@Temporal(DATE)
public Date getYetAnotherDate() {
return yetAnotherDate;
}
public void setYetAnotherDate(final Date yetAnotherDate) {
this.yetAnotherDate = yetAnotherDate;
}
}
So, it's possible to say which underlying DB-based field data structure to use (datetime, date or time).
Here's an example for that:
@Entity
public class LobEntity {
private long id;
private String clob;
private byte[] blob;
@Id
public long getId() {
return id;
}
public void setId(final long id) {
this.id = id;
}
@Lob
public String getClob() {
return clob;
}
public void setClob(final String clob) {
this.clob = clob;
}
@Lob
public byte[] getBlob() {
return blob;
}
public void setBlob(final byte[] blob) {
this.blob = blob;
}
}
Consequently, default behavior here is to serialize to
CLOB for character-based data and to
BLOB for data based on byte arrays (i.e., files).
This guide will show you how to enable the use of JPA annotations with Castor JDO in the context of Spring, Spring ORM and the existing Spring ORM support for Castor JDO.
Let's look at a typical Spring configuration file that shows how to use Castor JDO with Spring as a Spring ORM provider.
spring-config.xml
<beans xmlns="http://www.springframework.org/schema/beans" xmlns:xsi="http://www.w3.org/2001/XMLSchema-instance" xmlns:tx="http://www.springframework.org/schema/tx" xsi:schemaLocation="http://www.springframework.org/schema/beans http://www.springframework.org/schema/beans/spring-beans-2.0.xsd http://www.springframework.org/schema/tx http://www.springframework.org/schema/tx/spring-tx-2.5.xsd"> <!-- Enable transaction support using Annotations --> <tx:annotation-driven transaction-manager="transactionManager" /> <bean id="transactionManager" class="org.castor.spring.orm.CastorTransactionManager"> <property name="JDOManager" ref="jdoManager" /> </bean> <bean id="jdoManager" class="org.castor.spring.orm.LocalCastorFactoryBean"> <property name="databaseName" value="dbName" /> <property name="configLocation" value="jdo-conf.xml" /> </bean> <bean id="singleDao" class="SingleCastorDao"> <property name="JDOManager"> <ref bean="jdoManager"/> </property> </bean> </beans>
Above Spring application context configures the following Spring beans:
A factory bean for JDOManager instantiation
A Castor-specific transaction manager.
The DAO implementation as shown above.
As shown above, the bean definition for the
JDOManager factory bean points to
a Castor JDO configuration file (jdo-conf.xml),
whose content is shown below:
jdo-conf.xml
<!DOCTYPE jdo-conf PUBLIC "-//EXOLAB/Castor JDO Configuration DTD Version 1.0//EN""http://castor.org/jdo-conf.dtd"> <jdo-conf> <database name="dbName" engine="mysql"> <driver url="jdbc:mysql://localhost:3306/single" class-name="com.mysql.jdbc.Driver"> <param name="user" value="user" /> <param name="password" value="password" /> </driver> <mapping href="mapping-empty.xml" /> </database> <transaction-demarcation mode="local" /> </jdo-conf>
More on how to configure the Spring ORM provider for Castor JDO can be found at TBD.
In order to use JPA-annotated classes with the Spring ORM provider
for Castor JDO, you will have to use and configure a
JDOClassDescriptorResolver through an
additional bean definition and link it to your
JDOManager bean factory definition.
<beans xmlns="http://www.springframework.org/schema/beans" xmlns:xsi="http://www.w3.org/2001/XMLSchema-instance" xmlns:tx="http://www.springframework.org/schema/tx" xsi:schemaLocation="http://www.springframework.org/schema/beans http://www.springframework.org/schema/beans/spring-beans-2.0.xsd http://www.springframework.org/schema/tx http://www.springframework.org/schema/tx/spring-tx-2.5.xsd"> ... <bean id="classDescriptorResolver"
where ....
|
Defines a |
|
links the |
If your domain classes share a set of packages, it is also
possible to enlist those packages with the
JDOClassDescriptorResolver bean, replacing
the bean definition shown above as follows:
<bean id="classDescriptorResolver"
class="org.castor.spring.orm.ClassDescriptorResolverFactoryBean">
<property name="packages">
<list>
<value>org.castor.jpa.test</value>
</list>
</property>
</bean>
In order to enable JPA callbacks handling via Spring ORM following exemplary config snippet is required:
<bean id="jdoManager" class="org.castor.spring.orm.LocalCastorFactoryBean">
<property name="databaseName" value="testSimple" />
<property name="configLocation"
value="classpath:org/castor/jpa/scenario/callbacks/derby-jdo-conf.xml" />
<property name="classDescriptorResolver" ref="classDescriptorResolver" />
<property name="callbackInterceptor" ref="jpaCallbackHandler" />
</bean>
<bean id="jpaCallbackHandler" class="org.castor.jdo.jpa.info.JPACallbackHandler" />
This section describes all JPA-extensions provided by Castor.
In order to get the maximum out of the chosen built-in or
external cache engine Castor provides a generic way to
specify properties in a vendor-independent way.
Castor allows for cache-tuning on a per-entity basis by
simply providing key-value pairs with the @CacheProperty
annotation in the @Cache container annnotation.
@Entity
@Cache({
@CacheProperty(key="type", value="ehcache"),
@CacheProperty(key="capacity", value="50")
})
@Table(name="Cache_limited")
public class LimitedCachingEntity implements CacheTestEntity {
private long id;
private String name;
@Id
public long getId() {
return id;
}
public void setId(final long id) {
this.id = id;
}
public String getName() {
return name;
}
public void setName(final String name) {
this.name = name;
}
}
@Cache is based on Castor JDO and uses its default settings: 'count-limited' as cache type with a capacity of 30 entries.
Describes how to use the DDL Generator, and what features and options are currently supported.
Castor DDL Generator creates SQL scripts to drop/create tables, unique keys, sequences and so on based on the input of a Castor JDO mapping file.
java org.castor.ddlgen.Main -m mapping.xml
This will generate the SQL script mapping.sql in the same directory
mapping.xml is located.
The DDL Generator has a number of different options which may be set. Some of
them are specified at the command line while others need to be configured through
a property file. Most of the options are located in global properties file
org/castor/ddlgen/ddlgen.properties, but there are also some
options that are specific for one database engine. These DB-specific properties can
be found at org/castor/ddlgen/engine/<database>/<database>.properties.
Table 7.1. Command line options
| Option | Args | Description | Optional? |
|---|---|---|---|
| m | filename | Castor JDO mapping file to generate DDL for. | Required |
| o | filename | Name of file the generated DDL will be written to. If not specified the generated DDL will be written to a file named similar as the Castor JDO mapping source file with xml extension being replaced by sql. | Optional |
| e | database engine | Name of database engine to generate DDL for. The engine used as default
can be specified with org.castor.ddlgen.DefaultEngine option of
global properties file. | Optional |
| c | filename | Alternative global properties file to be used when generating DDL. | Optional |
| d | filename | Alternative database specific properties file to be used when generating DDL. | Optional |
| h | Shows help/usage information. | Optional |
The DDL Generator supports generation of SQL scripts for the following database engines:
Table 7.2. Description of the attributes
| Name | Database engine | Property file |
|---|---|---|
| db2 | DB/2 | org/castor/ddlgen/engine/db2/db2.properties |
| derby | Apache Derby | org/castor/ddlgen/engine/derby/derby.properties |
| hsql | Hypersonic SQL | org/castor/ddlgen/engine/hsql/hsql.properties |
| mssql | Microsoft SQL Server | org/castor/ddlgen/engine/mssql/mssql.properties |
| mysql | MySQL | org/castor/ddlgen/engine/mysql/mysql.properties |
| oracle | Oracle | org/castor/ddlgen/engine/oracle/oracle.properties |
| pointbase | Borland Pointbase | org/castor/ddlgen/engine/pointbase/pointbase.properties |
| postgresql | PostgreSQL | org/castor/ddlgen/engine/postgresql/postgresql.properties |
| sapdb | SAP DB / MaxDB | org/castor/ddlgen/engine/sapdb/sapdb.properties |
| sybase | Sybase | org/castor/ddlgen/engine/sybase/sybase.properties |
Describes how to use the Ant task for the Castor DDL Generator and its features.
An alternative to using the command line as shown in the previous section, the Castor DDL Generator Ant Task can be used to call the DDL generator for class generation. The only requirement is that the castor-<version>-anttasks.jar must be made available to your Ant installation.
Please find below the complete list of parameters that can be set on the Castor source generator.
Table 7.3.
| Attribute | Description | Required? |
|---|---|---|
| file | The name of the Castor JDO mapping file to use as input for DDL generation. | Yes |
| ddlFileName | The name of the DDL file to be generated. | Yes |
| databaseEngine | The name of database engine to generate DDL for. | Yes |
| globalProperties | Name of a custom (global) properties file to be used during DDL generation. | No |
| databaseEngineProperties | Name of a custom database specific properties file to be used during DDL generation. | No |
Alternatively to specifying the file property, it is possible to work with a nested <FileSet> element or with the dir property.
Below is an example of how to use this task from within an Ant target definition named 'castor:ddl:src':
<target name="castor:ddl:src" depends="init" description="Generate a DDL script from a JDO mapping file."> <taskdef name="castor-ddlgen" classname="org.castor.anttask.CastorDDLGenTask" classpathref="castor.class.path" /> <mkdir dir="generated" /> <castor-ddlgen file="src/main/resources/mapping.xml" ddlFileName="target/generated/ddl/mapping.sql" databaseEngine="mysql"/> </target>
This section describes the mapping between Castor sql type java.sql.Types constant, java data type, sql type of supported database.
Table 7.4.
| Castor Type | JDBC Type | Java Object Type | MySQL | PostgreSQL | Oracle | Derby | MSSQL | SapDB | DB2 | Sybase | HSQL | PointBase |
|---|---|---|---|---|---|---|---|---|---|---|---|---|
| BIT | BIT | java.lang.Boolean | TINYINT(1) | BOOLEAN | BOOLEAN | CHAR FOR BIT DATA | BIT | BOOLEAN | BIT | BIT | BOOLEAN | |
| TINYINT | TINYINT | java.lang.Byte | TINYINT | SMALLINT | SMALLINT | SMALLINT | TINYINT | SMALLINT | SMALLINT | TINYINT | TINYINT | SMALLINT |
| SMALLINT | SMALLINT | java.lang.Short | SMALLINT | SMALLINT | SMALLINT | SMALLINT | SMALLINT | SMALLINT | SMALLINT | SMALLINT | SMALLINT | SMALLINT |
| INTEGER | INTEGER | java.lang.Integer | INTEGER | INTEGER | INTEGER | INTEGER | INTEGER | INTEGER | INTEGER | INTEGER | INTEGER | INTEGER |
| BIGINT | BIGINT | java.lang.Long | BIGINT | BIGINT | NUMERIC | BIGINT | BIGINT | INTEGER | BIGINT | INTEGER | BIGINT | NUMERIC |
| FLOAT | FLOAT | java.lang.Double | FLOAT | DOUBLE PRECISION | FLOAT | FLOAT | FLOAT | FLOAT | FLOAT | FLOAT | FLOAT | FLOAT |
| DOUBLE | DOUBLE | java.lang.Double | DOUBLE | DOUBLE PRECISION | DOUBLE PRECISION | DOUBLE | DOUBLE PRECISION | DOUBLE PRECISION | DOUBLE | DOUBLE PRECISION | DOUBLE PRECISION | DOUBLE PRECISION |
| REAL | REAL | java.lang.Float | REAL | REAL | REAL | REAL | REAL | DOUBLE PRECISION | REAL | REAL | REAL | REAL |
| NUMERIC | NUMERIC | java.math.BigDecimal | NUMERIC | NUMERIC | NUMERIC | NUMERIC | NUMERIC | NUMERIC | NUMERIC | NUMERIC | NUMERIC | NUMERIC |
| DECIMAL | DECIMAL | java.math.BigDecimal | DECIMAL | NUMERIC | DECIMAL | DECIMAL | DECIMAL | DECIMAL | DECIMAL | DECIMAL | DECIMAL | DECIMAL |
| CHAR | CHAR | java.lang.String | CHAR | CHAR | CHAR | CHAR | CHAR | CHAR | CHAR | CHAR | CHAR | CHAR |
| VARCHAR | VARCHAR | java.lang.String | VARCHAR | VARCHAR | VARCHAR2 | VARCHAR | VARCHAR | VARCHAR | VARCHAR | VARCHAR | VARCHAR | VARCHAR |
| DATE | DATE | java.sql.Date | DATE | DATE | DATE | DATE | DATETIME | DATE | DATE | DATETIME | DATE | DATE |
| TIME | TIME | java.sql.Time | TIME | TIME | DATE | TIME | DATETIME | TIME | TIME | DATETIME | TIME | TIME |
| TIMESTAMP | TIMESTAMP | java.sql.Timestamp | TIMESTAMP | TIMESTAMP | TIMESTAMP | TIMESTAMP | TIMESTAMP | TIMESTAMP | TIMESTAMP | TIMESTAMP | TIMESTAMP | TIMESTAMP |
| BINARY | BINARY | byte[] | BINARY | BYTEA | RAW | CHAR [n] FOR BIT DATA | BINARY | BLOB | CHAR [n] FOR BIT DATA | BINARY | BINARY | BLOB |
| VARBINARY | VARBINARY | byte[] | VARBINARY | BYTEA | LONG RAW | VARCHAR [] FOR BIT DATA | VARBINARY | BLOB | VARCHAR [] FOR BIT DATA | VARBINARY | VARBINARY | BLOB |
| LONGVARBINARY | LONGVARBINARY | byte[] | VARBINARY | BYTEA | LONG RAW | LONG VARCHAR FOR BIT DATA | IMAGE | BLOB | LONG VARCHAR FOR BIT DATA | VARBINARY | LONGVARBINARY | BLOB |
| OTHER | OTHER | java.lang.Object | BLOB | BYTEA | BLOB | BLOB | IMAGE | BLOB | BLOB | IMAGE | OTHER | BLOB |
| JAVA_OBJECT | JAVA_OBJECT | java.lang.Object | BLOB | BYTEA | BLOB | BLOB | IMAGE | BLOB | BLOB | IMAGE | OBJECT | BLOB |
| BLOB | BLOB | java.io.InputStream | BLOB | BYTEA | BLOB | BLOB | IMAGE | BLOB | BLOB | IMAGE | OBJECT | BLOB |
| CLOB | CLOB | java.sql.Clob | TEXT | TEXT | CLOB | CLOB | TEXT | CLOB | CLOB | TEXT | OBJECT | CLOB |
Describes the properties available on the Castor DDL Generator.
At startup, the DDL Generator first evaluates the command line options. Next it loads the global properties on the command line if specified, otherwise the default properties included with the DDL Generator. There are two important properties loaded at startup:
- org.castor.ddlgen.Generators
tells the DDL Generator about the supported database engines.
- org.castor.ddlgen.DefaultEngine
The database engine for which to generate a SQL script. Can be overridden on the command line
The last step at startup is to read the specific configuration of the database engine being used. A custom configuration can be provided on the command line to override the default.
Please find below a list of global properties to control various advanced options of the DDL Generator.
Table 7.5. Command line options
| Option | Description | Values | Default | Since |
|---|---|---|---|---|
| org.castor.ddlgen.Generators | Generator classes of supported database engines. | 1.1 | ||
| org.castor.ddlgen.DefaultEngine | Name of default database engine. Will be overwritten by engine specified on commandline. | db2, derby, hsql, mssql, mysql, oracle, pointbase, postgresql, sapdb or sybase | mysql | 1.1 |
| org.castor.ddlgen.SchemaName | Name of the database schema. | test | 1.1 | |
| org.castor.ddlgen.GroupStatements | How to group generated DDL statements? | TABLE or DDLTYPE | TABLE | 1.1 |
| org.castor.ddlgen.CharFormat | How to format characters of generated DDL statements? | SENSITIVE, UPPER or LOWER | SENSITIVE | 1.1 |
| org.castor.ddlgen.Newline | Character sequence to write for newline. | \n | 1.1 | |
| org.castor.ddlgen.Indention | Character sequence to write for indented lines. | \t | 1.1 | |
| org.castor.ddlgen.GenerateSchema | Generate SCHEMA statements. | true or false | true | 1.1 |
| org.castor.ddlgen.GenerateDrop | Generate DROP statements. | true or false | true | 1.1 |
| org.castor.ddlgen.GenerateCreate | Generate CREATE statements. | true or false | true | 1.1 |
| org.castor.ddlgen.GeneratePrimaryKey | Generate PRIMARYKEY statement. | true or false | true | 1.1 |
| org.castor.ddlgen.GenerateForeignKey | Generate FOREIGNKEY statement. | true or false | true | 1.1 |
| org.castor.ddlgen.GenerateIndex | Generate INDEX statements (Not supported yet). | true or false | false | 1.1 |
| org.castor.ddlgen.GenerateKeyGenerator | Generate KEYGENERATOR statements. | true or false | true | 1.1 |
| default_tinyint_precision | Default precision of tinyint values. | 1.1 | ||
| default_smallint_precision | Default precision of smallint values. | 1.1 | ||
| default_integer_precision | Default precision of integer values. | 1.1 | ||
| default_bigint_precision | Default precision of bigint values. | 19 | 1.1 | |
| default_bigint_decimals | Default decimals of bigint values. | 0 | 1.1 | |
| default_float_precision | Default precision of float values. | 38 | 1.1 | |
| Default precision of tinyint values. | 1.1 | |||
| default_float_decimals | Default decimals of float values. | 7 | 1.1 | |
| default_double_precision | Default precision of double values. | 53 | 1.1 | |
| default_double_decimals | Default decimals of double values. | 15 | 1.1 | |
| default_real_precision | Default precision of real values. | 38 | 1.1 | |
| default_real_decimals | Default decimals of real values. | 7 | 1.1 | |
| default_numeric_precision | Default precision of numeric values. | 65 | 1.1 | |
| default_numeric_decimals | Default decimals of numeric values. | 30 | 1.1 | |
| default_decimal_precision | Default precision of decimal values. | 65 | 1.1 | |
| default_decimal_decimals | Default decimals of decimal values. | 30 | 1.1 | |
| default_char_length | Default length of char values. | 256 | 1.1 | |
| default_varchar_length | Default length of varchar values. | 256 | 1.1 | |
| default_longvarchar_length | Default length of longvarchar values. | 1024 | 1.1 | |
| default_date_precision | Default precision of date values. | 1.1 | ||
| default_time_precision | Default precision of time values. | 1.1 | ||
| default_timestamp_precision | Default precision of timestamp values. | 19 | 1.1 | |
| default_binary_length | Default length of binary values. | 256 | 1.1 | |
| default_varbinary_length | Default length of varbinary values. | 256 | 1.1 | |
| default_longvarbinary_length | Default length of longvarbinary values. | 1024 | 1.1 | |
| default_other_length | Default length of other values. | 1024 | 1.1 | |
| default_javaobject_length | Default length of javaobject values. | 1024 | 1.1 | |
| default_blob_length | Default length of blob values. | 1024 | 1.1 | |
| default_clob_length | Default length of clob values. | 1024 | 1.1 |
The supported database engines are defined as follows:
# # generator classes of supported database engines # org.castor.ddlgen.Generators=\ org.castor.ddlgen.engine.db2.Db2Generator,\ org.castor.ddlgen.engine.derby.DerbyGenerator,\ org.castor.ddlgen.engine.hsql.HsqlGenerator,\ org.castor.ddlgen.engine.mssql.MssqlGenerator,\ org.castor.ddlgen.engine.mysql.MysqlGenerator,\ org.castor.ddlgen.engine.oracle.OracleGenerator,\ org.castor.ddlgen.engine.pointbase.PointBaseGenerator,\ org.castor.ddlgen.engine.postgresql.PostgresqlGenerator,\ org.castor.ddlgen.engine.sapdb.SapdbGenerator,\ org.castor.ddlgen.engine.sybase.SybaseGenerator
There are 2 supported modes to group DDL statements. For a simple example, the output of both modes is:
drop A if exist create A(IDA int); alter table A add primary key (IDA) drop B if exist create B(IDB int); alter table B add primary key (IDB)
Figure 7.1. org.castor.ddlgen.GroupStatements=TABLE
drop A if exist drop B if exist create A(IDA int); create B(IDB int); alter table A add primary key (IDA) alter table B add primary key (IDB)
Figure 7.2. org.castor.ddlgen.GroupStatements=DDLTYPE
Below you can find a list of specific properties to control various advanced options of the DDL Generator.
Table 7.6. Common properties for all databases
| Option | Description | Values | Default | Since |
|---|---|---|---|---|
| org.castor.ddlgen.KeyGeneratorFactories | Key generator factory classes supported by DB/2. | 1.1 | ||
| org.castor.ddlgen.HeaderComment | Comment to add to head of generated script. | 1.1 |
The key generators supported by a database engine are defined as follows (example taken from Oracle):
# # key generator factory classes of supported database engines # org.castor.ddlgen.KeyGeneratorFactories=\ org.castor.ddlgen.keygenerator.HighLowKeyGeneratorFactory,\ org.castor.ddlgen.keygenerator.MaxKeyGeneratorFactory,\ org.castor.ddlgen.keygenerator.UUIDKeyGeneratorFactory,\ org.castor.ddlgen.engine.oracle.OracleSequenceKeyGeneratorFactory
Table 7.7. Common properties for all databases
| Option | Description | Values | Default | Since |
|---|---|---|---|---|
| org.castor.ddlgen.TriggerTemplate | Template to create TRIGGER statements. | 1.1 |
Below you can take a look at the default trigger template defined for Oracle. The DDL Generator will replace the parameters in brackets with appropriate values (e.g. <table_name>).
#
# trigger template
#
org.castor.ddlgen.TriggerTemplate=\
CREATE TRIGGER <trigger_name>
BEFORE INSERT OR UPDATE ON <table_name>
FOR EACH ROW
DECLARE
iCounter <table_name>.<pk_name>%TYPE;
cannot_change_counter EXCEPTION;
BEGIN
IF INSERTING THEN
Select <sequence_name>.NEXTVAL INTO iCounter FROM Dual;
:new.<pk_name> := iCounter;
END IF;
IF UPDATING THEN
IF NOT (:new.<pk_name> = :old.<pk_name>) THEN
RAISE cannot_change_counter;
END IF;
END IF;
EXCEPTION
WHEN cannot_change_counter THEN
raise_application_error(-20000, 'Cannot Change Counter Value');
END;
Figure 7.3. Default trigegr template for Oracle
Table 7.8. Common properties for all databases
| Option | Description | Values | Default | Since |
|---|---|---|---|---|
| org.castor.ddlgen.engine.mysql.StorageEngine | Storage engine to be used. If left empty the default configured at the database server will be used. | MYISAM, InnoDB, MERGE, MEMORY, BDB or ISAM | 1.1 | |
| org.castor.ddlgen.engine.mysql.ForeignKeyOnDeleteStrategy | Delete strategy for foreign keys. If not specified NO ACTION will be used by default. | CASCADE, RESTRICT, SET NULL, NO ACTION | 1.1 | |
| org.castor.ddlgen.engine.mysql.ForeignKeyOnUpdateStrategy | Update strategy for foreign keys. If not specified NO ACTION will be used by default. | CASCADE, RESTRICT, SET NULL, NO ACTION | 1.1 |
With Castor 1.2 and earlier releases it has already been possible to generate Java classes from an XML schema and use these classes for XML data binding without having to write a mapping file.
This is possible because the Castor XML code generator generated - in addition to the domain classes - a set of XML descriptor classes as well, with one descriptor class generated per generated domain class. It's this XML descriptor class that holds all the information required to map Java classes and/or field members to XML artifacts, as set out in the original XML schema definitions. This includes ....
artefact names
XML namespace URIs
XML namespace prefix
validation code
Starting with Castor 1.3, a mechanism has been added to the XML code generator that allows extension of these core offerings so that either additional content is added to the generated domain classes additonal descriptor classes are gernated.
With Castor 1.2 and previous releases it was already possible to generate Java classes from an XML schema and use these classes for XML data binding without having to write a mapping file.
This is possible because the Castor XML code generator generated - in addition to the domain classes - a set of XML descriptor classes as well, with one descriptor class generated per generated domain class. It's this XML descriptor class that holds all the information required to map Java classes and/or field members to XML artifacts, as set out in the original XML schema definitions. This includes ....
artefact names
XML namespace URIs
XML namespace prefix
validation code
In addition, it was already possible to use the generated set of domain classes in Castor JDO for object-/relational mapping purpose by supplying a (manually written) JDO-specific mapping file. Whilst technically not very difficult, this was still an error-prone task, especially in a context where tens or hundreds of classes were generated from a set of XML schemas.
The JDO extensions for the Castor XML code generator extend the code generator in such a way that a second set of descriptor classes is generated: the JDO descriptor classes. These new descriptor classes define the mapping between Java (domain) objects and database tables/columns, and as such remove the requirement of having to write a JDO-specific mapping file.
| Note |
|---|---|
Please note that Castor JDO - upon startup - internally converts the information provided in the JDO mapping file to (JDO) descriptor classes. As such, the approach outlined above simply re-uses an existing code base and just automates the production of those descriptor classes. |
The following sections introduce the general principles, define the XML schema artifacts available to annotate an existing XML schema and highlight the usage of these artifacts by providing examples. At the same time, a limited set of current product limitations are spelled out.
With release 1.3 of Castor, the following limitations exist for the JDO extensions of the XML code generator:
The extensions currently can only be used in type mode of the XML code generator.
There's currently no support for key generators. There's work in progress to add this functionality, though.
There's currently no support for bidirectional relations, modelled through the use of <xs:id> and <xs:idref> constructs.
To facilitate the detailed explanations in the following sections, we now define a few <complexType> definitions that we want to map against an existing database schema, and the corresponding SQL statements to create the required tables.
<complexType name="bookType">
<sequence>
<element name="isbn" type="xs:string" />
<element name="pages" type="xs:integer" />
<element name="lector" type="lectorType" />
<element name="authors" type="authorType" maxOccurs="unbounded" />
</sequence>
</complexType>
<complexType name="lectorType">
<sequence>
<element name="siNumber" type="xs:integer" />
<element name="name" type="xs:string" />
</sequence>
</complexType>
<complexType name="authorType">
<sequence>
<element name="siNumber" type="xs:integer" />
<element name="name" type="xs:string" />
</sequence>
</complexType>
CREATE TABLE author_table ( sin INTEGER NOT NULL, name VARCHAR(20) NOT NULL ); CREATE TABLE lector_table ( sin INTEGER NOT NULL, name VARCHAR(20) NOT NULL ); CREATE TABLE book_table ( isbn VARCHAR(13) NOT NULL, pages INTEGER, lector_id INTEGER NOT NULL, author_id INTEGER NOT NULL );
To have the Castor XML code generator generate JDO class descriptors when processing a set of XML schemas, please use one of the following methods:
Table 8.1. Accessing options
| Usage | Method | Description |
|---|---|---|
SourceGenerator | setJdoDescriptorCreation(boolean) | Supply a value of true to enable this feature. |
SourceGeneratorMain | Flag -gen-jdo-desc | Set this optional flag to enable this feature. |
| Ant task for XML code generator | generateJdoDescriptors option | Set this to a value of true. |
This section enlists the XML artifacts available to annotate an existing XML schema
with JDO extension-specific information. These constructs are defined themselves
in an XML schema jdo-extensions.xsd that has a target
namespace of http://www.castor.org/binding/persistence.
To enable proper validation of your XML schemas when editing JDO
annotations, and to enable XML completion in your preferred XML
editor, please add schemaLocation information to
your XML schema definition as follows:
<xs:schema xmlns:xs="http://www.w3.org/2001/XMLSchema" targetNamespace="http://your/target/namespace" xmlns:jdo="http://www.castor.org/binding/persistence" xmlns="http://your/target/namespace"
where ...
|
The values supplied in the |
The <table> element allows you to map an <complexType>
definition to a database table within a database, and to specify the
identity (frequently referred to as primary key),
as follows:
<xs:complexType name="authorType"> <xs:annotation> <xs:appinfo> <jdo:table name="author_table">
where ...
|
The |
|
The |
Above example maps the complex type authorType to
the table author_table, and specifies that the
member siNumber be used as object identity.
The XML schema definition for the <table>
element is defined as follows:
<xs:element name="table"> <xs:complexType> <xs:sequence> <xs:element name="primaryKey" type="jdo:pkType"/> </xs:sequence> <xs:attribute name="name" type="xs:string" use="required"/> <xs:attribute name="accessMode" use="optional" default="shared"> <xs:simpleType> <xs:restriction base="xs:string"> <xs:enumeration value="read-only"/> <xs:enumeration value="shared"/> <xs:enumeration value="exclusive"/> <xs:enumeration value="db-locked"/> </xs:restriction> </xs:simpleType> </xs:attribute> <xs:attribute name="detachable" type="xs:boolean" default="false"/> </xs:complexType> </xs:element> <xs:complexType name="pkType"> <xs:sequence> <xs:element name="key" type="xs:string" maxOccurs="unbounded" /> </xs:sequence> </xs:complexType>
The <column> element allows you to map a member of content model of a <complexType> definition to a column within a database table.
<xs:complexType name="authorType"> <xs:annotation> <xs:appinfo> <jdo:table name="author_table"> <jdo:primary-key> <jdo:key>siNumber</jdo:key> </jdo:primary-key> </jdo:table> </xs:appinfo> </xs:annotation> <xs:sequence> <xs:element name="siNumber" type="xs:integer" > <xs:annotation> <xs:appinfo> <jdo:column name="sin" type="integer" />
where ....
|
Defines that the element definition |
Above example maps the element isNumber to
the database column sin, and specifies the database type
to be used for persistence (integer, in this case).
The XML schema definition for <column> is
defined as follows:
<xs:element name="column"> <xs:complexType> <xs:complexContent> <xs:extension base="jdo:readonlyDirtyType"> <xs:attribute name="name" type="xs:string" use="required" /> <xs:attribute name="type" type="xs:string" use="required" /> <xs:attribute name="acceptNull" type="xs:boolean" use="optional" default="true" /> </xs:extension> </xs:complexContent> </xs:complexType> </xs:element>
where the content is described as follows:
Table 8.2. <column> - Definitions
| Name | Description |
|---|---|
| name | Name of the column |
| type | JDO-type of the column |
| acceptNull | Whether this field accepts NULL values or not |
The <one-to-one> element allows you to map a member of content model of a <complexType> definition to a 1:1 relation to another <complexType>.
<xs:complexType name="bookType"> <xs:annotation> <xs:appinfo> <jdo:table name="book_type_table"> <jdo:primary-key> <jdo:key>isbn</jdo:key> </jdo:primary-key> </jdo:table> </xs:appinfo> </xs:annotation> <xs:sequence> <xs:element name="isbn" type="xs:string" > <xs:annotation> <xs:appinfo> <jdo:column name="isbn" type="varchar" /> </xs:appinfo> </xs:annotation> </xs:element> <xs:element name="pages" type="xs:integer" > <xs:annotation> <xs:appinfo> <jdo:column name="pages" type="integer" /> </xs:appinfo> </xs:annotation>
where ....
| Defines a 1:1 relation to another <complexType>, additionally providing the necessary foreign key column at the database level. |
Above example maps the element lector to a
1:1 relation to the complex type lectorType, and
specifies the (column name of the) foreign key to be used
(lector_id in this case).
The XML schema definition for <one-to-one>
is defined as follows:
<xs:element name="one-to-one"> <xs:complexType> <xs:complexContent> <xs:extension base="jdo:readonlyDirtyType"> <xs:attribute name="name" type="xs:string"/> </xs:extension> </xs:complexContent> </xs:complexType> </xs:element>
where the content is described as follows:
Table 8.3. <one-to-one> - Definitions
| Name | Description |
|---|---|
| name | Name of the column that represents the foreign key of this relation |
The <one-to-many> element allows you to map a member of the content model of a <complexType> definition as part of a 1:M relation to another <complexType>.
<xs:complexType name="bookType"> <xs:annotation> <xs:appinfo> <jdo:table name="book_type_table"> <jdo:primary-key> <jdo:key>isbn</jdo:key> </jdo:primary-key> </jdo:table> </xs:appinfo> </xs:annotation> <xs:sequence> <xs:element name="isbn" type="xs:string" > <xs:annotation> <xs:appinfo> <jdo:column name="isbn" type="varchar" /> </xs:appinfo> </xs:annotation> </xs:element> <xs:element name="pages" type="xs:integer" > <xs:annotation> <xs:appinfo> <jdo:column name="pages" type="integer" /> </xs:appinfo> </xs:annotation> </xs:element> <xs:element name="lector" type="lectorType" > <xs:annotation> <xs:appinfo> <jdo:one-to-one name="lector_id" /> </xs:appinfo> </xs:annotation> </xs:element> <xs:element name="authors" type="authorType" maxOccurs="unbounded" > <xs:annotation> <xs:appinfo> <jdo:one-to-many name="book_id" />
where ....
| Defines a 1:M relation to another <complexType>, additionally providing the necessary foreign key column for the many member at the database level. |
Above example maps the element authors as part of a
1:M relation to the complex type authorType, and
specifies the (column name of the) foreign key of the many member
to be used (book_id in this case).
The XML schema definition for <one-to-many>
is given as follows:
<xs:element name="one-to-many"> <xs:complexType> <xs:complexContent> <xs:extension base="jdo:readonlyDirtyType"> <xs:attribute name="name" type="xs:string" /> </xs:extension> </xs:complexContent> </xs:complexType> </xs:element>
with the following details applying:
Table 8.4. <one-to-many> - Definitions
| Name | Description |
|---|---|
| name | Name of the column that represents the (many) foreign key of this relation |
Once you have generated domain classes and descriptor classes (both XML and JDO) from your set of XML schemas, you'll be able to use them as are. There's a few minor changes, which we are going to highlight below, but the main benefit is that you not have to write a JDO mapping file.
As you have already generated JDO descriptor classes for each of your domain objects, you won't have to supply mappings for those classes anymore. As such, your mapping file will stay empty, as shown:
<?xml version="1.0"?> <!DOCTYPE mapping PUBLIC "-//EXOLAB/Castor Mapping DTD Version 1.0//EN" "http://castor.org/mapping.dtd"> <mapping> <!-- no mappings required --> </mapping>
| Note |
|---|---|
Please note that you can of course supply mappings for those classes that stand outside of the generation process from your XML schemas. It is possible, too, to match both modes. In other words, a domain class mapped manually will be able to refer to a domain class as generated. |
In order for Castor to be able to access the generated (JDO) class
descriptors and to load those classes from the file system,
you will have to configure an instance of
JDOClassDescriptorResolver and pass it to your
JDOManager instance when loading the JDO
configuration.
The following example shows how to configure Castor JDO so that the classes generated from the sample XML schema above can be used with CASTOR JDO seamlessly.
JDOClassDescriptorResolver resolver = new JDOClassDescriptorResolverImpl(); resolver.addClass(org.castor.jdo.extension.sample.BookType.class); resolver.addClass(org.castor.jdo.extension.sample.LectorType.class); resolver.addClass(org.castor.jdo.extension.sample.AuthorType.class); InputSource jdoConfiguration = ....; JDOManager.loadConfiguration(jdoConfiguration, null, null, resolver); JDOManager jdoManager = JDOManager.createInstance("jdo-extensions"); ...
Alternatively, if the classes generated from the sample
XML schema shown above reside in the same package, you can
configure the JDOClassDescriptorResolver
as follows:
JDOClassDescriptorResolver resolver = new JDOClassDescriptorResolverImpl();
resolver.addPackage("org.castor.jdo.extension.sample");
...
| Tip |
|---|---|
For the latter approach to work, you will have to make sure that the
|
With Castor 1.2 and previous releases it was already possible to generate Java classes from an XML schema and use these classes for XML data binding without having to write a mapping file.
This is possible because the Castor XML code generator generated - in addition to the domain classes - a set of XML descriptor classes as well, with one descriptor class generated per generated domain class. It's this XML descriptor class that holds all the information required to map Java classes and/or field members to XML artifacts, as set out in the original XML schema definitions. This includes ....
artefact names
XML namespace URIs
XML namespace prefix
validation code
The SOLRJ extensions for the Castor XML code generator
extend the code generator in such a way that the set of domain classes is
augmented with SOLRJ-specific @Field annotations.
The following sections introduce the general principles, define the XML schema artifacts available to annotate an existing XML schema and highlight the usage of these artifacts by providing examples.
To facilitate the detailed explanations in the following sections, we now define a few <complexType> definitions that we want to be able to store in a SOLR index in addition to vanilla XML data binding funtionality.
This section enlists the XML artifacts available to annotate an existing XML schema
with SOLRJ extension-specific information. These constructs are defined themselves
in an XML schema solrj-extensions.xsd that has a target
namespace of http://www.castor.org/binding/solrj.
To enable proper validation of your XML schemas when editing SOLRJ
annotations, and to enable XML completion in your preferred XML
editor, please add schemaLocation information to
your XML schema definition as follows:
<xs:schema xmlns:xs="http://www.w3.org/2001/XMLSchema" targetNamespace="http://your/target/namespace" xmlns:solr="http://www.castor.org/binding/solrj" xmlns="http://your/target/namespace" xsi:schemaLocation="http://www.castor.org/binding/solrj http://www.castor.org/solrj-extens
where ...
|
The values supplied in the |
The <field> element allows you to map a member of the content model
of a <complexType> definition to SOLRJ field.
<complexType name="bookType"> <sequence> <element name="isbn" type="xs:string"> <xs:annotation> <xs:appinfo> <solrj:field name="id" />
where ....
|
Defines that the element definition |
|
Defines that the element definition |
Above example maps the element isbn to
the SOLR index field id, and the element
name to the identically-named SOLR index
field. Please note that a SOLR index field name does not have
to be specified if the field name and the Java property name
are identical.
Above complex type definition will be transformed to the corresponding Java property definitions (within a class):
public class BookType {
@Field("id")
private String isbn;
@Field
private long pages;
}
The XML schema definition for <field> is
defined as follows:
<xs:element name="field"> <xs:annotation> <xs:documentation> Element 'field' is used to specify the use of the SOLRJ @Field annotation. </xs:documentation> </xs:annotation> <xs:complexType> <xs:attribute name="name" type="xs:string" use="optional"> <xs:annotation> <xs:documentation> Attribute 'name' is used to specify the name of the index field to be mapped against; if not used, the name of the Java property will be used as filed name. </xs:documentation> </xs:annotation> </xs:attribute> </xs:complexType> </xs:element>
where the content is described as follows: